Tuesday 31 March 2015

Planet Painting

Himself has sent me a snap to show progress with painting our new Conway Castle.


It's a very complicated tri-tone livery and its still at an intermediate stage so please don't be alarmed by the somewhat untidy appearance.

When it's finished the colours will be separated by very fine straw coloured lining which will make it look much tidier.

The trickiest bit is getting the 'whiskers' at each end nice and even and it looks to me like Himself has made a good fist of it so far.


Sunday 29 March 2015

Vegetation

I've written before about how we planned to build up the scenery in layers and these latest pictures show how Himself has been adding foliage on top of the basic long grass layer.


It also features our latest Garratt 138 showing off its new Narrow Planet number plates and works plates which are newly fitted.

The small one on the front water tank is particularly pleasing.


As well as adding bushes and other vegetation Himself has been working away at fitting the remaining level crossings with their anti-sheep grids.


These are made up from sets of triangular sections which I cast in resin for him.

He has calculated that around 70 more are required to finish all the crossings which he would like to get done in time for the next exhibition in a couple of weeks time.

So if you'll excuse me I'll stop writing now and get casting.


Friday 27 March 2015

Scraping By

At last the new house looks like it's starting to get somewhere.


It only took a few minutes work with the prong to scribe the stone cladding onto the wall around the garage door and then I was able to fix the bits of the north wing of number 22 into a box shape.


I've also taken the chance to fit a couple of internal spacers to make sure the walls don't get squeezed in the middle.

I also need to cut, and scribe the front wall of the garage. That is a very crucial part because it is the bit that connects this house to number 23 so it has to be made very accurately and the height of the buildings will have to line up exactly.


Wednesday 25 March 2015

Slow Progress

I know it doesn't look like I've done very much on the latest house since the last post about it but appearances can be deceptive.


Number 22 is a devilishly complicated design so there's been at lot to do to get all the pieces for the 'north wing' into a state where they're ready to be glued into a box.

Chief among the complications is the stone cladding around the garage door which has to be scraped onto the styrene - this is obviously much easier to do on a flat, single piece of styrene rather than when it's part of a bigger house shape.

As that part is one of the key components of the structure, however, I can't start assembling any of them until it's ready to join the fray.

You may also notice that the other end piece has acquired a strange protrusion at one side.

This is a small bit of the garage which extends beyond the side of the rest of the house and butts onto number 23.

I have also shaped the bottom of this end piece to reflect the change in the ground level between the front and the back of the house.

It will have 'foundations' added behind and below later on so that the whole structure sits flat and at the correct height.

It's going to a be while until I get to that stage though.

Stone scraping next. Can't wait......

Monday 23 March 2015

Bogie Brainwave

I don't experience many moments of genius but I did the other day.

It came when a set of redesigned etches for the modern FR bogie arrived from Narrow Planet.

The first stage of completing these is to make a master for a resin cast of the running gear and suspension.

I'd already gone through this process with the first test piece, and although it only took me a single evening to make the pieces out of styrene and fix them into place on one of the brass bogie sides I was not overly enthusiastic about the prospect of having to repeat it.

And that's when I had my brilliant idea.

The styrene bits are were superglued onto the brass, but because of the properties of the bond between those materials it is often possible to slice them apart leaving them relatively unscathed.

I wondered whether it would be possible to get the axle box and suspension bits off the original master so I could simply glue them back in position on the new etch.

And it worked!


So now I have a new master to make a revised mould from.

The difference with this new etch is that everything above the axle boxes has been moved up by 1.5mm which will make it easier to use the bogies as a direct replacement for the old Parkside Dundas ones we currently use.

It also looks much more like the real thing, but since when has that been a major consideration?


Saturday 21 March 2015

Water Works

The time has come to fill the Afon Cwm Cloch.


This is one of the major scenic features on Bron Hebog.

It runs the full depth of the layout with the railway crossing over it three times as it winds its way up / down the long S bend.


Himself has decided to use some gloop called Realistic Water and I'm given to understand it's been a venture into the unknown with a lot of trial and error involved.

Firstly it would appear the river bed is porous in places because some of the stuff is leaking out before it sets - destination unknown!

Then the actual cure time as been causing much consternation.

If it is poured to a depth of 1/8 of an inch it stubbornly refuses to set, so little and often appears to be the key.

Of course it's possible that the ambient temperature at this time of the year in the UK is a factor but having not used the stuff before it's hard to tell.


Hopefully it will all be dry / set for the next exhibition appearance in a few weeks time!

Thursday 19 March 2015

Angle Of Attack

As we progress down the cul de sac the houses of Oberon Wood get ever more complicated. and the next one I'm tackling, number 22, is the worst yet from a modeller's point of view.


Even with the benefit of the Artistic Director's patiently drawn plans it has caused me to indulge in an extensive session of head-scratching.

It took me the whole of one evening this week to cut out the first of the blank end pieces.


The difficulty I had was in transposing the measurements from the design to the styrene sheet.

Somehow the angles didn't turn out right when I drew them onto the plastic. The pitch of the roof was not equal and the step in the lower of the two pieces shown here wasn't right either.

I double checked - it all matched up on the plan, - so why couldn't I copy it correctly?

In the end I resorted to tracing over the drawing and cutting out a paper template to use on the styrene, because I don't want to destroy the drawings.

This time I got the result I wanted, but I fear its only the start of my struggle with this building.

Tuesday 17 March 2015

Test Run Through The Forest

Our newest carriage 2046 was officially signed off as finished at the weekend and Himself sent me a couple of pictures of it posed in our forest scene at the back of the layout.


He also tells me that he's being doing a spot of tree surgery to remove some of the lower branches so that more of the trunks are visible.


Having stood and watched the real trains at this crossing I have to say I'm really pleased with how convincingly 'forresty' it looks.


Sunday 15 March 2015

Laying The Foundations

Model houses, like the real ones, should extend below the surface of the ground around them and I've been adding this foundation to my model of number 23 Oberon Wood which is nearing completion.


This foundation helps to ensure the house sits more securely in the scenery (as opposed to on top of it) and means there will be no obvious gaps around the bottom.

Because these houses are finished with a thick layer of render I've found it most effective to add and extra layer behind and below the main walls which is why I've left it towards the end of the build.


I've also added the ridge tiles now and all that remains is the gutters and downpipes, but I shall need to order in more supplies of the right size and shape of styrene for that.

Friday 13 March 2015

Door To Door

While I'm not a rivet counter or a fetishist for extreme detailing I do sometimes take a certain satisfaction in knowing that I've got things on the model even when very few people are going to notice them.

The doors on our latest house are a case in point.

The front door is tucked away in a gully between the two wings of the building and hidden beneath a solid porch.


Its only really visible when you view it straight on like this, but that's only possible on the workbench.

Once it's in place on the layout people will be viewing it from a much higher angle.

Even so, I'm glad I made the effort to represent the style of door properly.

In the same way I've gone to the trouble of making a proper version of the slatted door which hides the bid cupboard outside the house.


The next step, I think, will be to add the foundations.

Yes, it is all a bit back-to-front.....

Wednesday 11 March 2015

Slating

I found some time at the weekend to cut out and fit the slate roof sections for the new house.

For this we use the Ratio slate sheets which I reckon are as good as you can get without doing the job yourself with strips or individually cut slates.

Ratio product has the advantage that the slates overlap properly, but on the other hand the sheets are rather thick and can be a little tricky to work with, especially when you are working on challenging buildings like the ones in Oberon Wood.


Now that the roof sheets are on you get a much clearer impression of the complex shape of the building.

There is still a section missing at the front of a building - a small bin store which is tucked away beneath the overhang - but I'll be leaving that for now because the wall (with dry stone cladding) is shared with the garage of the neighbouring house.


At the back I still have to add a dormer window in the roof on the right hand side as well as the chimney.

This was the trickiest section of slate roof to cut.  It was made in one piece and it was any taller I wouldn't have been able to make it out of a single sheet of the Ratio slates.

Monday 9 March 2015

Spring Has Sprung

Until now you could be forgiven for thinking Bron Hebog looked not so much like a layout set in the heart of Snowdonia but a representation of a narrow gauge railway in the Shetland Islands, a place famous for an absence of trees.

Not for long, however!

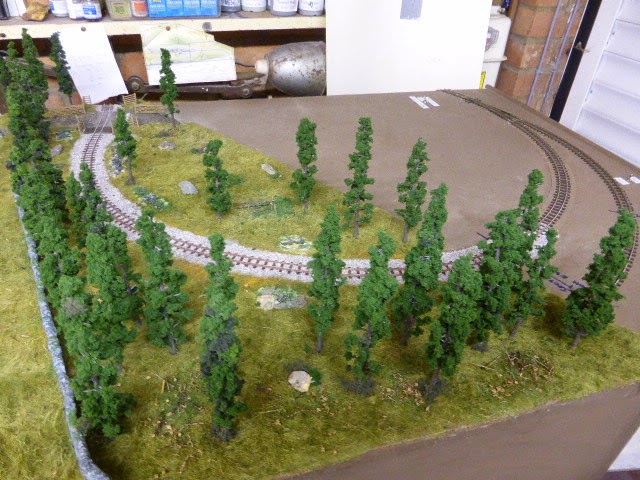
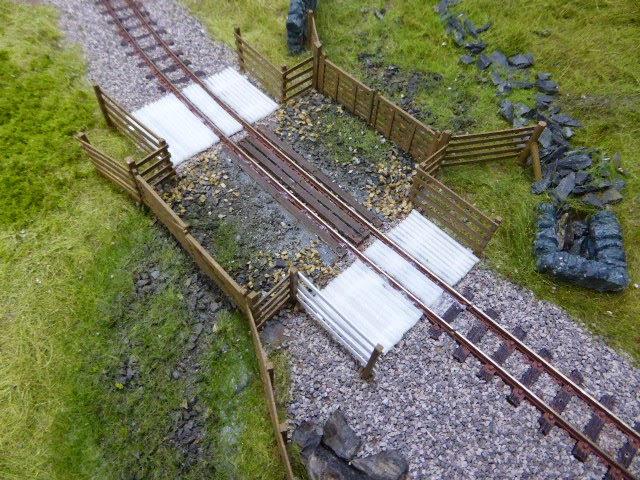
Himself reports he has spent a day making and planting trees around the Bron Hebog crossing area.


He doesn't particularly like making trees, in fact it ranks alongside fabricating and fitting carriage handrails as one of his least favourite tasks.

He complains that he has tried various ways of making trees but has never been entirely happy with the results.

The line at the back of the layout, where it disappears into the upper fiddle yard runs into the start of the Beddgelert Forest, mostly comprised at this point of conifer trees.

In Himself's opinion a lot of the commercial conifer trees 'look like miniature bog brushes' so he's turned to Woodland Scenics tree kits which we exploited on Dduallt a quarter of a century ago and which he reckons they still look good.


These are not actual conifer tree kits, of course, but he argues that as they're at the back of the layout no one's going to notice the difference from 15ft away.


I'm inclined to agree with him.

I think it's the overall effect of the edge of a forest that we're aiming to achieve and what's most important is that the trees are planted in a realistic pattern.

What do you think?


Saturday 7 March 2015

Grand Designs

You may be familiar with the TV programme which follows people building weird and wacky houses and it occurred to me that this project on number 23 Oberon Wood has some similarities.


It isn't just the unconventional design of these properties but more that a recurring narrative theme of the programme is the conflict between what the architect has dreamt up and the struggle of the people on the ground trying to bring it to three dimensional reality.

In my case I came across a discrepancy between the Artistic Director's plans the research photographs we have of the house.

My concern was with the southern half of the building - the bit with the overhang at the front - and the height of the roof.

The photographs showed a very considerable step between the different roof sections on the building but the plans not so much.

Closer examination showed the plans had the eaves of the overhanging section positioned lower down than the opposite side of the building with the dormer window - whereas the in the photos they appeared to be more on the same level.


Reluctant as I am to doubt the Artistic Director, who spent many hours researching the buildings and scaling them down, I decided to take an executive decision to alter the design to make it look more like the photograph.

I've written before that I have never been what's known as a rivet counter. My modelling credo is that if it looks right it is right.

So now all the walls of the house are complete and I'll move onto fitting the roof sections and making the dormer windows next.

The shot from above shows just how complicated the shape of these buildings is.

Thursday 5 March 2015

Crossings Continued

Himself has declared that he is bored of painting rolling stock having turned out at least 2 locomotives and more carriages than I can keep count of so far this winter, and has turned his attention back to the layout and continued with fitting the sheep grids on the level crossings.

These, you may recall, are made up using some triangular sections which I cast in resin because we were unable to source any styrene strip of the correct profile.

The picture above is where he has added to new bits to the right hand (Rhyd Ddu) end of Cemetery Crossing and below is the first of the occupation crossings on the curve leading out of the station.

Himself has calculated how many of these triangular strips will be required to complete all 6 level crossings on Bron Hebog.

Each crossing requires 46 strips - 23 on each side.

He tells me he's going to need another 161, and with each casting including four strips I'm going to have to make another 41 of them!

Tuesday 3 March 2015

Number 23

As always I am obeying Himself's orders and have started work immediately on the first of the six new houses for the Oberon Wood scene which the Artistic Director has drawn out.


These properties are anything but simple and the previous four have caused me a fair degree of consternation and I have no reason to believe that this one will be any different.

Like all the others so far number 23 is formed of two sections with split levels and various slopes and insets.

What you can see above is the parts for the 'north wing', the rear of which is one of the most straight forward aspects of the building represented by the piece in the top left with the patio door.

Again I am cutting these pieces from 60 thou sheet and the window detail is glued on behind using strip.

I should have some more to show you later this week.

Sunday 1 March 2015

Ready To Spray

I've been sent some pictures of carriage 2046 for final approval before it receives a coat of varnish.


Looks pretty good to me. Another neat and careful job by Himself.

These pictures really show off the WHR crests we had produced for us by Precision Decals, they certainly finish off the models beautifully.


2046 will be running in the carriage sets when we take the layout out next month to the Crawley show (which is in Fareham, actually).

All the details are on the exhibition page so come along and see us!

Oh, and Happy St David's Day to our Welsh readers too.

Dydd Gŵyl Dewi Sant hapus