Showing posts with label 125. Show all posts

Tuesday, 26 December 2017

Review Of The Year - Part 2

April

At the start of the year Himself had begun painting our Britomart, a few months later it was finally lined out and had its name and works plates fitted.

The finished effect was terrific!


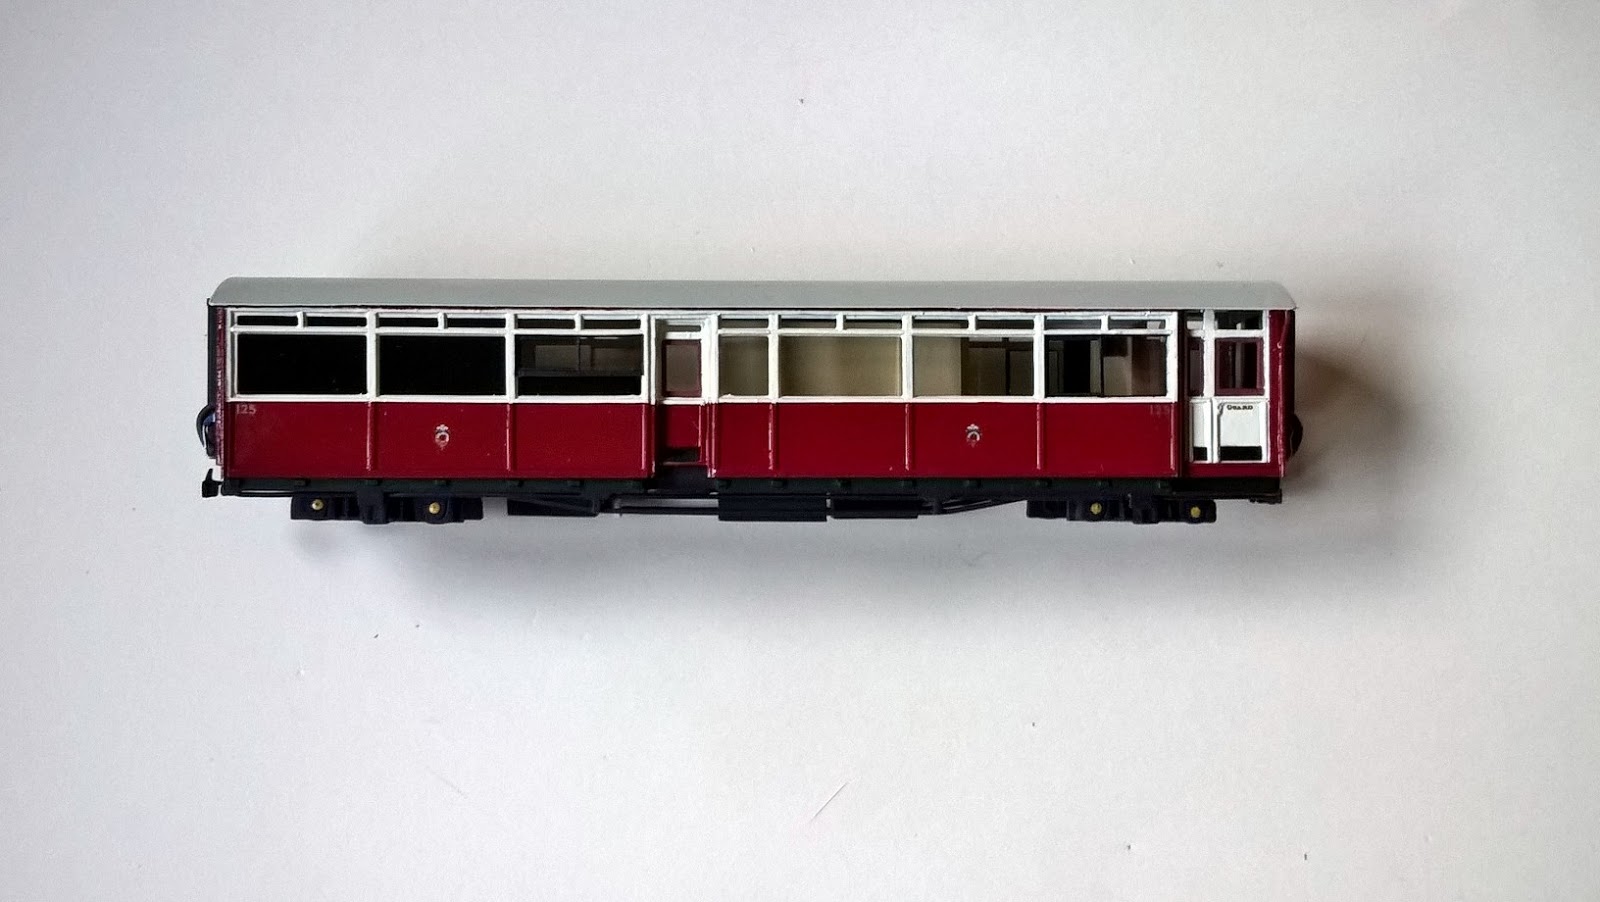
He was also making the finishing touches to another model which featured in our January review, the service car 125, which had received a coat of varnish and was ready to join the fleet.


I had made rapid progress with the latest house for the estate scene which was looking pretty much finished.


Or so I thought.....

May

Yes, I spoke too soon.

I had to pull it to bits in places because I'd come across an aerial picture of the estate which showed me aspects of this house which I had never noticed before, including an entire extension on the back.


Fortunately with styrene it's easy enough to splice in new bits.

Yet another long-term project came to fruition this month when our model of observation car 150 had its (very complex) lining finished and the glazing added.

It was so impressive I had to take some portrait shots on Bron Hebog.


June

Our attention in the early months of the summer was all about the estate scene.

The house which you saw me building earlier in the review was ready to be tried out in place on Bron Hebog.


Around the same time I was already well on the way to filling the gap site at the top of the picture with one of the more interesting houses on the development - which is saying something given the unconventional shape of many of them.


We'll begin looking at the second half of the year next time.

Friday, 22 December 2017

Review Of The Year - Part 1

Let's face it, there's not a lot of modelling gets done in the run up to Christmas, so I've got into the habit on the blog of taking stock of what we have achieved over the course of a year.

Quite often I end up surprising myself with how much has been done, because progress on a model can be such a haphazard affair that you sometimes don't realise how many things you have been working on over the period.

January

At the start of the year Himself was putting the finishing touches to our scratch built model of the new FR service car 125.


A few miles down the coast I was starting work on one of the more obvious missing pieces on Bron Hebog - the ruined barn which sits in the middle of the S bend.


And after many years sitting in primer Himself got around to painting the exquisite model of Britomart which was built up from a Brian Madge Quarry Hunslet kit  (which are sadly filed under H for Hen's Teeth currently, more's the pity.)


February

There were other locomotive loose ends which Himself set about tidying up earlier this year, including the long-standing issue we had with the wheels on our Welsh Pony.

This model was built - with extreme difficulty! - from another now unavailable kit  (do you spot a trend here?) and the problem was that one of the wheels on it was slightly less than round.

Our little pony ran with a nasty limp.

Fortunately, one of my contacts who knows the manufacturer was able to obtain a replacement set of wheels, for which we are most grateful.

Himself pulled the chassis part and replaced them, with the result that it now runs much more satisfactorily as you can see below.


Which is more than can be said about the real Welsh Pony! (Patience is a virtue...)

As milder weather arrived he ventured into the garage and began scenic work on the layout again, making a start on the scale miles of post and wire fencing alongside the line.


I was very taken with an overhead shot he took of the farmyard area, which I think showed off the subtlety of the scenic work he's been doing.


March

While that was going on Himself had been painting the old barn which was ready to be tried out in position on the layout, and looked very effective.


We'd also taken a radical step into a new technology: 3D printing.


For his birthday I bought him a copy of the Robex design for the unique Quarry Hunslet Lilla which I had been admiring for some time after seeing pictures of models which other people had made.

Until now all our locomotives have had brass or white metal bodies.

Himself found that bits fell off this one from virtually the first time he held it, which didn't do much to endear him to the medium.

On my workbench I had begun another stretch of house building with the intention of finally finishing the Oberon Woods estate scene.


To be continued after Christmas.

Thursday, 18 May 2017

In Service

The poor weather so far this week has had at least one compensation - it's forced Himself to retreat from the garden into the safety of his modelling den,

He's been getting on with finishing a few off jobs including final assembly of the service car 125 after it was varnished many moons ago.


Wednesday, 12 April 2017

Service Car Sprayed

Our latest carriage, the service car 125, is just about finished.


It's been given a coat of matt varnish with the aid of an airbrush and there are just a few details to finish off before it's ready to join the rest of the Superbarn fleet.

The footsteps at the doorways need to have their yellow safety line added along the front edge and there are also those pesky handrails to fix in place either side of the passenger entrances.


After that it will just be a case of slipping the glazing pieces into place.

There is previous post about these describing how we painted the back of the clear styrene to create the effect of the blanked out panels in the kitchen area and, of course, the toilet.

Of course what the service car really needs is its running mate 150, but I won't show you a close up of that until it's completely finished.


Saturday, 8 April 2017

Soft As Satin

Himself has been saying for months that he would wait until the weather turned warmer to catch up on his backlog of painted models which require a final coat of satin varnish.

Now the clocks have gone forward he's decided it's time.


The models you can see here - split into their constituent parts - are the new Britomart, the service car 125 and the observation car 150.

The latter is an interesting case.

I have restrained myself from posting any pictures of it while it was being lined out because I intended to do a big reveal when it was finally finished.

That was around Christmas time, though, and my resolve appears to have weakened.

The one thing preventing us from considering it properly finished is that Himself needs to think of a way too represent the curtains in the window of the rear saloon.

All suggestions appreciated, I'm sure.

Monday, 30 January 2017

Nearly Ready For Service

Himself has finished painting 125, the new FR Service Car, and all that remains is to give it a coat of varnish.


He did spot something I'd missed when I built it - the kick plates on the bottom of the doors.

Rather than attempting to paint them in situ he was quite canny and cut the pieces out of thin styrene and painted them black before gluing them into position.


The carriage looks very smart - and shiny - just now. I'm very happy with how it's turned out.

It may well be the case that' he'll wait until there are a few more models ready to varnish before firing up in the air brush, however.

Monday, 16 January 2017

First Coat

The wild weather of late has kept Himself out of the garage which means he's made a fair amount of progress on painting the new Service Car 125.


The body has had a first coat of red and cream.

He also tells me that getting the black paint on the louvres of the generation compartment doors (and nowhere else) was a bit of a pain.

The interior is done and he's done a terrific job bringing alive the details on the bulkhead in the guard's area.


I hope we'll still be able to see it when it has the body on top again.

Sunday, 8 January 2017

Blackout

The new service car is going straight into the paintshop over at Himself's place.

Before it gets a coat of primer, though, he had to cut, fit and paint the glazing.

Paint?

Yes, paint.

In what, I suppose, was an attempt not to make the new carriage not stand out too much in a rake of standard saloons they fitted windows even in places where they are completely obscured by the internal fittings.

In previous carriages there were solid panels in these spots but on 125 there is blacked out glass instead.


Our solution has been to carefully mask off the areas on the pieces of perspex and apply black paint to the innner surface.

And a metalic grey in the case of the toilet compartment.


I think the effect is going to be very realistic when the body shell is painted.


Wednesday, 4 January 2017

Service Car Roof

Himself found the time for a litle light modelling in the run up to Hogmanay and cut, shaped and fitted the brass roof to the service car 125.


We use this solution on on the superbarns - rather than our usual method of styrene secured to a flat, false ceiling - because of the the inboard doorways at each end of the carriage.


Although the (slightly) larger WHR saloons also have inset doorways they have a flat section above them rather than the curved profile and the toplight above of the FR superbarns.

Friday, 23 December 2016

Boxing Day Comes Early

A rare midweek day off meant I had a view hours to try and finish off some of the remaining
jobs on 125, the biggest of which was adding all the ancillaries beneath the carriage.


The way we build our carriages, with all the interior detail fixed onto a removable chassis, it sometimes seems like this is the major part of the model and the bodyshell just an extra we slip on top.

While not attempting to go down the super-detailed route I felt I simply had to try to represent the kitchen taps.


Just when I thought I had done all my bits and was ready to take it over to Himself to fit the brass roof and fettle the bogies I remembered the inevitable thing I've forgotten - the electrical connections at each end.

Oh well, it'll just have to wait until after Christmas now.

Tuesday, 13 December 2016

Meals On Wheels

The bits I needed for the bogies for 125 arrived in the post and half an hour with a soldering iron, a set of broaches and some superglue later the new Service Car is on wheels.


The bogies and the door unit will almost certainly require some adaptation in order to get around the curves on Dduallt - or at least at the 'bottom end' where there is the cut in on the frame.


It may be a while before this can be done because the layout has been taken down while Himself works on the fences on Bron Hebog.

At least now, though, I can fit the truss rods and all the gubbins beneath the carriage and be sure they don't hang down too low.

Saturday, 10 December 2016

That Sinking Feeling

I've continued fitting out the 'kitchen' of 125.


Along the 'top' of the 'engine side' there is a continuous row of units and appliances with a worktop above which includes a pair of sinks which I have duly sunk.

I do intend to fit something that represent the taps which can just be seen peeking above the window ledge, but I'll leave that little detail until towards the end of the build.

Friday, 9 December 2016

Shut Up

No, not you. I'm referring to the high security storage in the buffet area of Service Car 125.

The bit I've been working on is the full height shelves on the clock side at the Blaenau end of the carriage.

These can be covered up with roller shutters so I've decided to take the easy way out and model them in the closed position using pieces of clapboard styrene sheet.


The work tops in this carriage are worthy of note because they come up to the level of the horizontal bar about a quarter of the way up the window.

This is going to be interesting challenge because we need to paint the back of the glazing so from the outside it looks like it has a film on the glass but in the inside it needs to look like a wood panel.

We're going to have to give that one some thought....

Wednesday, 7 December 2016

Fitting Out

I was intending to continue working on the under frame of 125 next - those tricky truss rods.

(Well, they're tricky for me anyway, because I've never been that good where bending brass is concerned.)

To do that I really need to have it sitting on bogies, but I don't have any of those yet because I am waiting on fresh supplies of bearings and wheels to arrive.

So instead I've started on the interior.


The biggest feature, and the most obvious thing to start with, is the big central compartment which contains the generator and the toilet.

As they're both obscured from view behind the louvred doors and an opaque window, I shall not bother to add the internal division.

I have never been one of those modellers who bothers with details that no one will ever see.

That doesn't make me a bad person, does it?

Saturday, 3 December 2016

The Pips

I did warn you not to expect rapid progress on 125.

For various reasons it's been one of those weeks where I didn't get a lot done at the modelling desk.

What I did manage was to fix on the pips on the under frame of the carriage,


These are a very distinctive feature on the Superbarns.

In fact they're not pips but, I believe, brackets which support the wood-framed body shell.

For our purposes, however, they can be represented with small pieces of thin styrene strips.

The challenge is to get them all in a straight line and on the same level.  Placed too high they will affect the height that the body shell sits on its chassis, too low and there's an obvious gap to be seen,

They also have a habit of falling off randomly during handling and painting

Tuesday, 29 November 2016

Back To The Floor

After taking the best part of a fortnight to cast another batch of wagon kits to resupply our friends at Narrow Planet I've been able to resume work on 125.

Unfortunately, for the purposes of this blog, what I've been doing is not visually spectacular.


Firstly, I have drilled the holes for the bogie locating bolts.

This doesn't sound like the pinnacle of railway modelling achievement, I appreciate, but you must see this in the context of the humiliating experience of discovering that on my last carriage (Observation car 150) I managed to drill them off-centre to the extent that it fouled the walls of the cutting under the bridge on Dduallt.

So this time I did this routine task very carefully indeed!

I have also added on the skirt which represents the very prominent frame that the Superbarns are built on.

This one is more complex than the others because it includes the cut in on the clock side for the staff  access doorway and an alternation on the engine side to allow for the doors on the generator compartment.

This is the most boring bit of carriage building - it will get more interesting, I promise.

Thursday, 17 November 2016

Properly Parallel?

It was the moment of truth for carriage 125 the other day.

Having completed the ends with my best guesstimate of their respective widths there was no reason to delay gluing it together and see whether I ended up with parallel carriage body or not.


I'm relieved to say it looks like I have, and I'm rather pleased with how it's come together.

The cast resin vestibule end fixed on without difficulty to the styrene body sides.


More importantly I think, at this stage, it's definitely got the look of the prototype, wouldn't you agree?

Sunday, 13 November 2016

Split Ends

The carriage ends are normally quite simple but 125 requires a bit more brainpower because they are not identical.

The trickiest aspect is accounting for the difference in their width.


The problem is that one end of the carriage has the vestibule doors inset as on a regular Superbarn saloon while the other is at the full width of the body.

I've had to make some calculations (and cross my fingers) to hopefully ensure that when it is all joined together the two body sides will be running parallel and it's not narrower at one end than the other.

At the point where my brain started to hurt I decided to stop theorising and just cut some styrene and see what happens....


Monday, 7 November 2016

Middle Door

So, I plucked up the courage to slice the other side of 125 almost in two, except for a sliver of a cantrail along the top.

I won't pretend it went like clockwork.

As soon as I had removed the section of lower bodyside I decided that the gap didn't look quite big enough and I set about relocating the window pillar on the right, which was not as simple as it sounds because by this point it already had all the beading in place.

That had to be carefully peeled off before chopping out the pillar and moving it a mm or so along the way.

Satisfied, at last, with the positioning I built up a section behind and formed a doorway.

Here's how the finished side looks from the front.


And from the back you can see how far into the carriage body this doorway is set.


I shall turn my attention to the ends next, which are not identical.

For the Caernarfon end I can use a set of standard double door superbarn castings but the other, which is a regular, full-width affair, will be scratch built in styrene.

Tuesday, 1 November 2016

Hole In The Middle

After a break of a few weeks I've picked up where I left off on the service car 125.

The first task was to add the top layer of beading.


This, the engine side, still has a gaping hole in the middle where the generator doors go.

My strategy for this was to make a separate unit to glue into place.

The first step was to create the door frames on a thin piece of styrene.


The louvre doors have been a compromise on all the service car models, both the FR and FR types. What I've ended up using to represent them is clapboard styrene.

Small sections were cut to size and placed inside the door frames.


And then the whole piece was fixed in place, completing the carriage side.


The opposite side, the clock side, also has a challenge right in the middle.

Instead of a hole to fill in I have to cut out a section of the lower body panel to create the recessed doorway.

Get it wrong and I may have to re-do the whole side. No pressure then...