Showing posts with label 2047. Show all posts

Friday, 17 January 2020

Carriage Cloning

While I continue plugging away with Gwyrfai my mind is turning to the other projects I could be taking on in 2020.

If I attempt to keep pace with Boston Lodge then I’ll need to knock out another WHR saloon.

The last one I made was 2047 and 2048 is already well under construction in Wales.


Unlike the Super Barns, for which I have resin casting moulds at the ready, I’m still making these from scratch in styrene.

The other major gap in our carriage roster is the replica of Ashbury tourist / bogie quarrymans carriage 22.

That’s an easy hit with a scratch aid kit from Worsley Works.

Plenty to be getting on with.

Thursday, 20 December 2018

Review Of The Year - Part 1

I've established a tradition on this blog in the last days of December of taking stock of everything that Himself and I have achieved over the year.

I usually find there are things that I've forgotten about, and I'm always surprised by how much we've got done.

So here's a look back at what we were up to in the first quarter of 2018.

January

Looking back now I see that there was a lot of carriage building going on at this time.

FR 'superbarn' 118, which I'd built up from resin castings, had been painted, assembled, had its transfers applied and, finally, varnished.


Himself was also starting work on a very long-term project indeed - the completion of a Worsley Works bowsider 19 which had been sitting in a drawer in its naked state for years.


I was also busy trying to keep up with the expanding WHR carriage fleet and had started work on saloon 2047 which was being scratch built in styrene - as opposed to the resin parts I use for the latest FR stock.


February

This was the big reveal of our finished Robex 3D printed Lilla.


I thought at the time - and still do - that it looks absolutely stunning!

We'd decided to finish it in its current, highly ornate, plum livery with oodles of gold leaf lining.

It was taking up all Himself's reserves of patience and concentration but it was already clear the results were going to be worth it.


He'd also restarted work to plug the last remining scenic gap on the layout, landscaping around the last two houses I'd built.


March

There was yet more carriage work going on with me kit-bashing a Dundas 'Bro Madog' carriage to make it look like it's current condition on the WHHR.

As to why I was doing it, that was about to be revealed...


I'd also been putting together the castings for the second of the latest FR observation carrs 152 ready for Himself to add a brass roof and the window pillars at the front.


The reason I was making a WHHR carriage became clear when I handed over Himself's birthday present - a Robex print for the Bagnall Gelert.


I had confidence that he'd make a fine job of the body, after what he'd done with Lilla

The challenge for him was going to be doing the outside frame adaptation on a Fleischman chassis to go under it.

I had a feeling he wasn't going to thank me for that...


Wednesday, 21 February 2018

Mr Fixit

Himself is cracking on with WHR saloon 2047 after I delivered it to him last week.

Already it's been primed and he's begun applying the top coat to the interior and the outside of the body.


Much to my embarrassment he discovered (another) error which I had made.

Somehow I had managed to fit the electrical connections on the wrong side on each end of the carriage - goodness only knows how I managed to do that because I was using 2046 as a guide alongside be.

I'm beginning to believe that this carriage is cursed!

He also did some delicate soldering to firm up the brass brake rigging underneath which had been secured (or indeed, unsecured) with superglue.

Despite the litany of errors during construction on my part I'm sure he'll turn out a carriage which looks as good as all the other ones.


Thursday, 15 February 2018

Off My Hands

I've done as much as I can on 2047 and handed it over to Himself to finish off.


That innocent phrase - finish off - involves a lot more than you might first imagine.

There's the handrails which go either side of the entrance doors to be soldered together from brass wire, which probably Himself's least favourite job.

The bogies will need couplings fitted, which may well involve grafting on an extension to the shaft.

There is the glazing to cut and fit and the roof to glue into position.

Then, and only then, will he be able to begin to think about priming and painting it by hand.

It will be finished off with transfers, a coat of varnish and the interior populated with a few people.

(Only a few, mind. Have you see how pricey they are!)

So as you can see, it's a real team effort.

Saturday, 10 February 2018

Tables And Chairs

To borrow a phrase from Britney: Oops, I did it again!

There's been another blunder, this time with the interior.

(This carriage seems fated.)

The re-cast table and seat units went in easily enough in one evening session, and I sat back to admire my handiwork.


It was only a couple of days later when I was looking at it again, and comparing it to 2046 that I realised something was wrong - the single and double seats were on the opposite sides of the carriage.

Which one of them had I got wrong?

I delved back through by research pictures and confirmed that, yes, both carriages confirm to the normal FR / WHR standard of having the double seats on the clock (inland) side.

I had made a very simple error when gluing them into place.

I was so concerned with ensuring that the seat backs lined up perfectly with the window pillars that I failed to notice I had it the wrong way round.

Fortunately, because they are resin and fixed in with superglue it's quite easy to snap them off without damaging them, and I can confirm that they've been replaced in their proper positions this time.

I really to need to start paying attention, though.


Thursday, 8 February 2018

The Bits Beneath

So I've been getting on with the chassis of 2047 - and also getting it wrong (again)!

The original WHR saloons built by Winsons were very modest and keep all their gubbins covered up behind large panels which ran almost all the way along the underneath between the two bogies.

Quite literally a case of 'nothing to see here!.

Since then progressive designs of the carriages have opened everything up and all the brake gear and other stuff is on show, which is bad news for the modeller when the carriages sit so high on their bogies and there's so much daylight underneath them.


So what you can see here are representations of the vacuum cylinder and the reservoir along with the boxed areas which contain, among other things the fuel tank for the heater and the batteries for the electrics.

I had still to add the brake gear fashioned out of brass when I took this picture.

I have also since discovered that I've once again made the mistake of using 2046 as a guide and making a wild assumption about them being identical.

In fact it turns out that the longer of the two panels, nearest the camera, is cut back on 2047 allowing sight of the brake gear from both sides.

This is easily corrected at this stage, but it's annoying all the same.

Sunday, 4 February 2018

Skin A Car

At long last Saturday night was modelling night.

With the two ladies in my life away for the weekend, and the youngest sound asleep, I had a couple of hours undisturbed to make some serious progress on 2047.

The first job was to finish putting in the remaining ribs and fixing the roof skin in position.


Fortunately the WHR saloon design has always had a flat area immediately above the inset entrance doors which means I can employ my usual styrene skin technique, rather than being forced to use a brass one (which shows the curve beneath) as we do on the FR Superbarns.

I also got a lot of work done on the underframe, but I'll show you that in the next post.


Wednesday, 31 January 2018

Big Rib

Once again I find myself lamenting that I've not spent as much time as I would have liked to at the work bench in the last week or so, but there has still been a little bit of progression on the 2047 project


I've cut and fit the laminated false ceiling which along with the chassis will help to keep the sides of the carriage straight, and in particular the delicate top rail along the top of the windows.

One piece of it rests on top while there is a slightly smaller piece beneath which sits in between the sides and stops them bowing inwards.

Along the top is the first of the longitudinal ribs which will help support the stressed styrene skin which I will fix in place over the top - these are to stop it bowing like a banana in the middle.

There will be another two lower ones glued on either side before the roof skin goes on.

Tuesday, 23 January 2018

The Body Shell

It's time for the most exciting bit of a carriage build - gluing all the parts together to make a body shell.

The first task is to fix the sub-assemblies for the doors in place on each end of the main side pieces.

In the shot below you can see all the parts laid out.


And a few minutes later here they are joined together.


One of the things about gluing styrene pieces together with solvent is that they can twist and warp if you give them the opportunity so once the body parts are put together I am always anxious to make the floor piece to sit inside and stop any ideas it has about bending inwards like two back-to-back bananas.


The next job will be to drill the holes for the bogie pivot bolts and begin to think about making a roof.

Sunday, 21 January 2018

Back To Work

I have managed to shake off the modelling malaise and found an hour or so to work on putting the beading onto the ends for 2047.


The truth is it wasn't so much a lack of motivation but a case of lots of other things to do which had kept me away from the workbench.

There's not much more to do on these now.

The corridor connections have already been made so it'll be very easy to glue them on.

When that's done in I won't be far away from being able to glue the 8 bits together to make up a body shell.

Friday, 19 January 2018

Pay Attention!

I'm kicking myself for falling for the oldest one in the book.

There I was merrily making bits for 2047, using our model of 2046 as a guide, without stopping to check that they are completely identical.

Talk about a beginner's error!

The difference I discovered was at the top of the doors.

Every other WHR up to and including 2046 had a solid panel, with beading, above the window.


What I hadn't clocked was that on 2047 this has been changed to a small glazed panel, the same as the FR Super Barn design.


Fortunately I noticed this while I was still working on detailing the sub-assemblies, so it was reasonable straightforward to chop the panels out and add in a bar at the top of each of the windows.


If hadn't noticed until I had glued the bits of the body shell together, or even worse finished the whole carriage, I would have been fuming.

Oh well, we live and learn, Or not, as the case may be....


Wednesday, 17 January 2018

Detailing Doors

It's taken me long than I would have liked to get back into a modelling routine in 2018 and very little has been done at my end of the operation in the last couple of weeks.

I did receive my new stocks of styrene strip, however, and I have made a start on detailing the end door assemblies for the WHR saloon 2047.


At the moment they're about 75% finished.

I still have to add the droplights in the windows and there is the kick boards to be put beneath as well as the footsteps.

This is just one end of the carriage, there is another pair of single doors which I haven't started on yet and the ends as well.

So there's quite a lot to be done.

I have the materials now, I just need the time and the motivation.

Thursday, 11 January 2018

Odd Jobs

I've hit a wall with the body of my new WHR carriage because I've run out of the right size of styrene strip for adding the beading detail.

My back-up plan of raiding Himself's stocks failed because he hasn't got any either!

So while I wait for fresh supplies to arrive I've had to think about what other jobs I could be getting on with to progress the model which is increasingly being built in reverse order.

The seats and tables have already been cast - that was the first thing I did - so instead I've soldered up a pair of bogies and glued on the castings with the axle boxes and suspension details.


For these latest WHR saloons I've made a new mould to represent the roller bearings and improved suspension which have been retro-fitted onto the former SAR wagon bogies at Boston Lodge.

For the fold-up brass part I can use the same etch which goes into my wagon kits.

I've also taken the opportunity to get my least favourite bit of a carriage build out of the way and fabricated and shaped the corridor connections which are very fiddly to do.


The new packets of strip should be hear soon and then I can begin detailing the door and end pieces which I made last week.

Sunday, 7 January 2018

A Start On The Doors

I got around to doing some actual modelling at last.

The next task on the WHR saloon 2047 is to make the base layer of the doors and the ends.


Like the FR Superbarns - sorry, Super Saloons - these carriages have the doors at either end inset so I build them as separate units to be glued onto the end of the central section of the body.

The WHR carriages are much wider, because of the more generous loading gauge, and they are also easier to make because they do not have the windows above the doors which extend upwards into the roof which make the FR carriages that much harder to model.

I've also made the first stage of the ends which are noticeably deeper and are tricky to fabricate with that curved top piece and the challenge of making sure you have positioned it perfectly centrally so you have the same overhang on either side.


I won't be able to start on the next layer, however, until I've got my hands on more of the right size of thin strips.

I could order some online or I could just raid Himself's stockpile.

Decisions, decisions....

Saturday, 30 December 2017

Review Of The Year - Part 4

For the last post of 2017 I'll bring our modelling review of the year up to date.
October

Himself was steadily getting on with the top coats on the Superbarn 118 between other jobs.


He had many tasks on the go including fixing the last two bungalows in place and beginning the task of landscaping around them.


It was such a relief to have finally got all the houses built - a project which had taken many years to bring to fruition.

We also got round to purchasing a chassis to put our 3D printed Lilla body on.

At this stage it still needed some material cleared away from beneath the saddle tank which explains why it is sitting at a very racy angle.


November

There was still the need to paint the bungalows before they could be fixed in place on the layout.

The last of them was the most challenging of the lot because one wall has stone cladding which was very well represented by Himself.


The only shame was that this effect is mostly hidden from the viewing public at exhibitions because this is the side which faces the operators.

There was more work on Lilla.

The Minitrains chassis was improved with some new slidebars from RT Models and Himself also carefully filed down the fly cranks to remove the very large balance weights.


While he was doing all that I was busy earning a little money fulfilling a promise to build some of my resin SAR wagon kits for a customer.


December

As we moved into the final month of the year Himself set to with the task of painting Lilla which we're going to finish in its Penrhyn Quarry Railway lined black livery.


Currently he is engaged in the very careful and patient task of lining it out.


The project on my workbench at the moment is to bring our WHR carriage fleet up to date with the latest of the saloons 2047 which I am building from scratch in styrene.


So all that remains is for us to wish you all the best for 2018 and thank you for visiting the blog or keeping up with what we're up to by following us on Facebook or Twitter,

We'll be taking both Bron Hebog and Dduallt out on the rode during the year ahead and we look forward to seeing you there - full details are on the Exhibition Diary page.


Sunday, 17 December 2017

Panel Show

I was left alone for an entire weekend (albeit in some charge of the youngest in the family) so I had an evening to fill.

Sometimes when you are faced with an open goal it's hard to decide what to do and I was torn between starting work on the doors and the ends of the WHR saloon or adding the panellling to the sides.


In the end that was what I decided  to do.

It was a close run thing, though, because I only had just enough of the finest size of strip.

It's too close to the festive season to order more online so I might have to raid Himself's stocks again.

Sunday, 10 December 2017

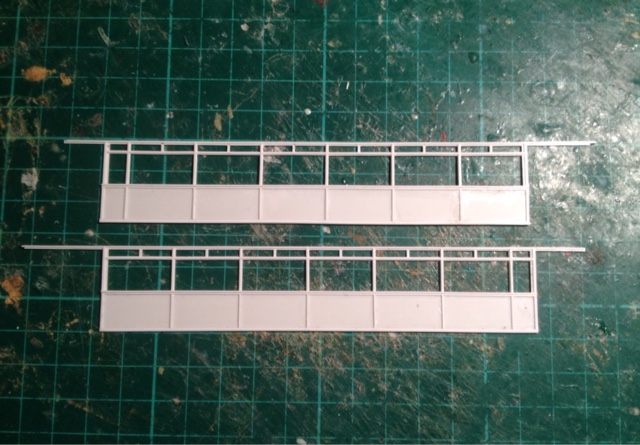
First Two Sides

I can't remember the last time I had a midweek day off to myself, but my employer insists on a use-it-or-lose-it policy on annual leave so who am I to argue if I've got a few days to use up before the end of the year?

A whole day to yourself - or at least the bit in the middle when the kids are at school - is the ideal time to tackle a job like making the first layer of a carriage side out of styrene because it's not the sort of task you can stop half way through.


It took me longer than I would have liked to make the first side because I reckon it's at least a year and a half since I last did this, when I was making the masters for the observation car 150.

The second one was a lot easier once I'd rediscovered the knack and probably took less than an hour.

In case you're wondering why the cant rail is extended at each side, or where the doors are, it is because the larger WHR carriage design has entrance vestibules which are inset much more so than on the FR's superbarns and they will be made up as separate parts to be joined to it further on down the line.

The next stage is to add the second layer of beading detail, but for the moment they are being stored nice and flat in traditional photo album until I have a few hours free again.

Wednesday, 6 December 2017

In Reverse Order

The first bit of work on our next WHR carriage - the latest 3rd class saloon 2047 - are the parts which I would usually leave until towards the end of the build.

I've cast the seat and table units for the interior using a mould I developed for the previous carriage, 2046, which is something I hit upon when I was making a job lot of FR Superbarns.


The reason I've begun with the inside rather than the body sides is that I was waiting for Himself to bring over the model of 2046 so that I could remind myself how I built these WHR carriages.

All that needs to happen with these castings is for the table tops to be glued onto the uprights and then they'll be put to one side until I've got the body shell ready to receive them.

You can also see at the top of the image that I've also cast the detailing covers for the bogies.

These slip over a pair of the SAR diamond frame bogie etches I use in my wagon kits but these castings are adapted to represent the extra suspension and the roller bearings which are now standard on the WHR carriage fleet.

I can't make the bogies up just yet because I'm waiting on a new delivery of bearing cups and wheels.

Thursday, 30 November 2017

Drawing A Blank

I posted a couple of days ago about how I was going off to search through my file of drawings to look for something to use to make a model of 2047.

I didn't find anything.

All of which left me scratching my head and wondering how on earth it was I managed to make the previous one, 2046?

This was the first WHR saloon with the big windows and the sliding toplights.

Then, from the very depths of my mind I remembered that perhaps I never did have a drawing?

I vaguely recall that I'd approached my usual inside source to enquire about a plan, but they replied that they hadn't got round to drawing it yet!

(There is indeed nowhere quite like Boston Lodge.)

I also remembered that my man in the know told me that the new design was a very simple adaptation from the original and that the window pillars were in the same position as on the previous carriages - all I needed to do was take out the ones which were left over.

Thinking about it now I think that I may simply have used one of the original drawings when I made the last model, but this time it seemed like a good idea to create a proper one.


What would we do without good old Microsoft Paint, eh?

Sunday, 26 November 2017

Same Again, Please

I have to confess that I haven't started work on 2047 yet, so you'll have to make do with a picture of what it's hopefully going to look something like.


This is 2046 posed at the very back of the layout where the line plunges into Beddgelert Forest.

These WHR saloons have always been scratch built out of styrene, rather than cast in resin, mainly because their construction has been rather sporadic and I've never been sure that it's worth the time and expense of making a master and moulds.

I also am going to have to dig back through my file of drawings to find the one I used to make the last one, otherwise it will be a literal case of back to the drawing board!