Showing posts with label Ballast Wagons. Show all posts

Tuesday, 10 November 2020

He Chutes

The last few days of modelling have been filled with more steady casting as I work to restock Narrow Planet with the full range of SAR wagon kits.

After a batch of DZs I've moved on to the most complex of my kits, the NG-Y ballast wagon.

The trickiest part to cast are the pieces which make up the ballast chutes at the bottom of the wagon.

Unusually this time I've been able to make a full batch without any mis-castings.

I must be getting the knack of this resin casting lark.

Sunday, 30 December 2018

Review Of The Year - Part 4

October

So to the final post of the year.

Dduallt was making yet another comeback, appearing at our home club's exhibition over two days in Greenock, and there will be more outings in 2019.


Himself hadn't wasted any time in getting started on the first of the new Garratt kits, which we decided would be 143.

He was making very rapid progress on the power units - here's the front one.


We were also taking apart our eldest Backwoods Fairlie, Merddin Emrys, to try and get to the bottom of its very poor performance.


It turned out that what it needed was new brushes for its Mashima motor.

Fortunately these could be fitted by twisting the motor round in the mounting, because it's impossible to remove it without deconstructing a lot of the locomotive.

November

I was making more progress on superbarn 120 which was having its underframe detail added by this stage.


Himself was adding the valve gear to the first of the Garratt bogies, which was being test run.


I had taken on the job of making up some wagon kits as repeat business for a customer.


December

Progress on 143 had got the point where both power units had their vale gear fitted and much of the detail was in place on the boiler unit as well.

As I write it has yet to be joined together or pick-ups fitted, so there's be no test running so far.


The ballast wagons and B wagons were completed and delivered to the customer ready in time for Christmas, even though there was no deadline on the contract.


Thanks to you for reading the blog in 2018 and all our best wishes for 2019.

Sunday, 16 December 2018

Ready For Christmas

With just the small matter of the bogie frames to clean up and fit it didn't take long to finish off the wagons I've been making for a client.


Time now to package them up and despatch them by reindeer and sleigh in time for Christmas.


Friday, 14 December 2018

Customer Service

The old adage goes that the customer is always right, even when they're wrong.

When I'm building models to order I always do my best to try to meet my clients requirements, even when it sometimes makes things a little more awkward.

Take the case of the couplings on the latest batch of wagons which are just about finished.

The customer has standardised on couplings designed by PECO for their ready to run range of rolling stock..

Standardising in this way makes things much easier  - but fixing plastic parts to brass? Not so much...


The etched bogie frames I use on my kits work best with the brass Greenwich couplings, which can be soldered direct onto the tongue which extends out from the middle.  Or failing that the Bemo ones with a long shaft which gives you plenty of surface area to glue them on.

These PECO couplings are designed to slot into NEM pockets, and have almost no shaft on them.

They're also made from the kind of plastic which doesn't work with Superglue.

So the solution I've had to adopt is, firstly, to solder on a brass extension piece onto the bogie, and then use epoxy resin to attach the coupling, which is less than ideal because it takes an age even for the rapid stuff to set hard.

It's done, however, so now all I have to do is fix on the resin detail parts on the side of the bogies (it seemed sensible to wait until I'd finished the soldering work) and then spray them.


Monday, 10 December 2018

One Good Turn

I took the wagons over to Himself's place to take advantage of one of his nifty bits of kit - a spray booth turntable.


My presence was required anyway to shin up a latter to attach his Christmas lights to the guttering so it seemed a fair exchange.

It turned out it wasn't just the turntable I needed to borrow.

While enthusiastically agitating the new can of primer I'd bought just a couple of days before it slipped out of my hand and fell on the floor, breaking the aerosol spray head.

Whoops!

Fortunately Himself had half a can of his own left over on the shelf so I was able to make use of that.

Next I shall turn my attention to the bogies and the couplings.

Saturday, 8 December 2018

Ready For Red Oxide

The wagon bodies I've been building for a customer are at the stage where they're ready to be given a coat of red oxide colour.


The thing I've found best for this is the spray cans of primer you'll find in your local car parts store, although it does chip easily so a further coat of varnish can be a good idea.

One of the final pieces of construction work on the ballast wagons was assembling the shafts with the cogs which operate the doors to release the stones onto the side of the track.

I've always been rather pleased with these.


It's the kind of tricky detail that might otherwise be missed off a kit but thanks to the very skillful design team at Narrow Planet I was able to get some tiny little cogs and brackets etched onto a fret.

They need to be threaded onto a length of brass wire, secured in the right spots to line up with the ends of the doors and then the whole thing is just glued into place.

And as I get more adventurous with the iron I have begun to solder these in position rather than gluing them onto the wire, which I'm quite chuffed with, too.

Sunday, 2 December 2018

Wheels Of Fortune

One of the features I love best about the South African wagon kits I make are the bits I had no part in making - other than asking a much cleverer person to do it for me.

They are the distinctive wheels for the handbrakes and the ballast door mechanism on the B wagon and the NG-Y.


They were designed for me by Narrow Planet and come on a small fret along with the bogie frames, the brake gear and the cogs which go along the side of the ballast wagon.

It's a very neat piece of work and they set the kits of beautifully, especially when they're picked out in yellow when they're painted.

I always feel that they're starting to look the part when I get round to fitting them.

Saturday, 24 November 2018

Kit Building

Occasionally I get asked if, as well as manufacturing resin wagon kits, I could supply them as ready-to-run models, which I don't mind doing - for a price, of course..


So that's what I've been up to this past week while Himself has been plugging away on the new Garratt build.

This time the client is looking for a pair each of my B and NG-Y ballast wagons.

I cast the parts last weekend, cleaned off the flash and now I'm in the process of gluing them together before adding the brass detailing parts which come with the kits.

If you fancy having a go at building one yourself for your fleet may I point you in the direction of the Narrow Planet shop who keep my range of kits in stock.

Sunday, 15 July 2018

Crisp Apple Strudels

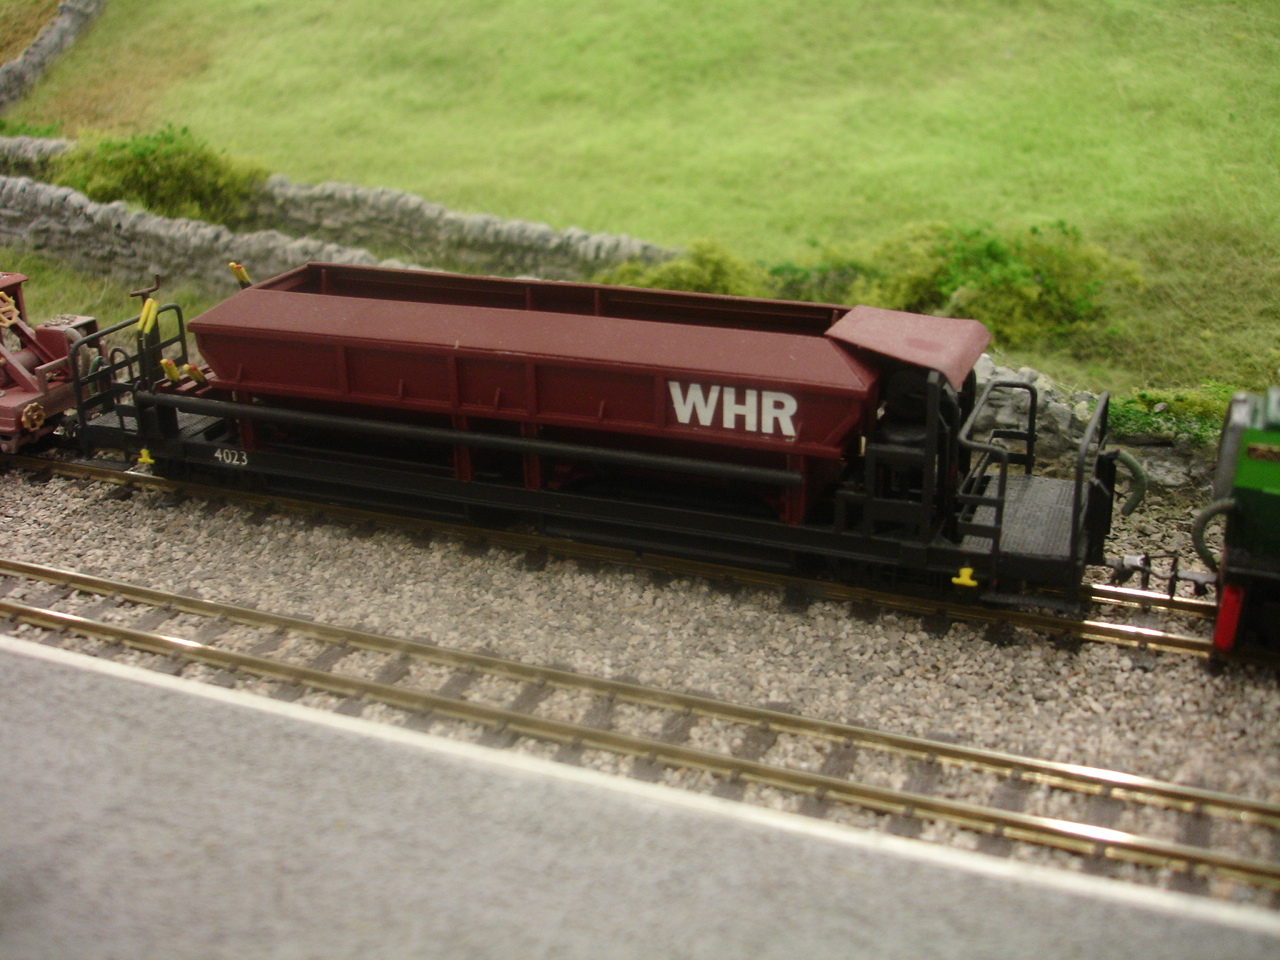
Or perhaps gooey goulash, in this case, because this wagon has Romanian roots.


It was built for the WHR push to Porthmadog to supplement the SAR ballast wagons, and it's party piece is to spread the stones in all sorts of directions rather than just to the side of the track.


It was a hideously complicated shape to make out of styrene and I'm really chuffed with it, including all the brass bits I shaped and soldered for it.


There's no way I could have taken it on without a very kind insider taking pity on me and giving me a copy of the plans and lots of photos of it under construction.

Thursday, 14 January 2016

A Hard Life

The 'scrapped' wagons are ready to be sent off of their new owner.


They obviously look far too clean and well presented right now but I'm sure he'll have fun weathering and further distressing them.


Saturday, 26 September 2015

A Little Bit Of Lyd

It's been a quiet week on the modelling front - other than wall to wall resin casting.

(Around a third of the wagon kits for the FR shop have now been cast, you'll be pleased to know, so there is hope that I may soon be able to return to more interesting topics on the blog)

In the meantime I hope I can amuse you with a short piece of video I filmed on the layout at Super Power a fortnight ago.

Wednesday, 31 December 2014

Review of 2014: Part 2

July

The second half of the year began with Himself starting work on the very final scenic board of the layout which leads into the fiddle yard at the southern (Aberglaslyn) end of the layout.


In a matter of a few days it had progressed from bare Mod Roc to the top coat of plaster and walls and grass being added.


While that was going on I was working on a 5th SAR / WHR wagon kit, this time for the V-16 brake van.

This shot shows one of the masters for the sides made out of styrene with the waterslide rivet transfers being added.


August

Although we had now built all the scenic boards which make up the complete layout the fiddle yards at the back were still outstanding.
With just a few weeks to go until the exhibition in Woking Himself got down to work designing and constructing them.


He was also starting to add some of the finer details on the other parts of the layout like these complex gates around one of the farm crossings.

They were all made up from styrene strips.


I was also making up more of my resin wagon kits for clients who wanted them ready to run.

This is a pair of NGY ballast wagons.


September

For the first time in a while I was able to start work on a model for the layout, having spent a number of months fulfilling an agreement with a client for a rake of wagon kits.

The subject was the WHR's latest carriage produced at Boston Lodge, 2046.

Here are the major component parts fabricated from styrene before it was assembled into a body shell.


On the layout, Himself had painted the two new houses I made earlier in the year and fixed them in position in the estate scene just south of the station.

As you can see there are many more houses still til be designed and made...


And so finally, towards the end of the month, the big reveal!

Bron Hebog made its debut as a complete (but not finished!) layout at the exhibtion in Woking.


Take a look back through the blog to find more pictures from that weekend.
 
October

I didn't get to join the team at the exhibition and would have to wait until Hull in November for my first glimpse of the completed layout.
By this time I'd more or less finished my model of 2046.


My next project was something which had been on the To Do list for many years - the Match Wagon which carries the tools for the KMX Tamper.

The basis for the model was a OO9 Society kit for ex RNAD wagons which had a new superstructure built out of styrene on top of the chassis from the kit.

It took it with me on a visit home to set the height of the coupling against those on the Tamper.


I also carried with me a 2nd model of the KMX which I'd been slowly building over the last couple for years for a client who was involved in re-engineering the machine for the WHR.

I couldn't resit the chance to photograph the two of them together.


November

The main focus on the layout was completing some of the finer scenic details such as the livestock grids which protect the many level crossings around the layout.
Unable to find some styrene sections of the right profile for the job I ended up casting many dozens of lengths of section out of resin.

This is just one half of one crossing - there are many more to go...


By this time I had also completed and painted the Tamper match wagon


And so to the exhibition in Hull...


Once again there are lots more pictures elsewhere on the blog if you want to go looking for them.

December

So in the last few weeks of the year I've been working on another carriage, this time the brand new updated design of Super Barn 119 which has recently entered service on the FR.
The word is there will be more of these emerging from the carriage works at Boston Lodge very soon so I've taken the precaution of making masters and casting this one in resin in the expectation it will be easier to make subsequent ones.

If the FR alters the design in the meantime there will be trouble!


The shape and arrangement of the windows are the major change from the original 3 Super Barns so I was able to use my castings for the seats and tables from the earlier carriages with no problems.


And currently Himself has started work on the backlog of incomplete carriages which has built up over the last couple of years while he's been concentrating on locomotives and the layout.


So there are the highlights of our modelling during 2014. Many thanks for visiting the blog and taking a look at what we're up to, we hope you'll stick with us and maybe come along and see us out on the road in 2015.

Happy New Year.

Friday, 12 October 2012

Protot-Y-pe

The mould for the NG-Y ballast wagon sides has been tried out for the first time and I'm more than satisfied with the result.

Here's how it looks fresh out of the mould..


All that excess resin you can see is the very thin film - and it is no more than a film - which is formed when the clear sheet (covered in sellotape, for non-stickness) is placed onto the back of the open mould and squelches out in all directions.

A few minutes careful work with the scalpel leaves you with this....


Now I have proved the master - and the mould - is satisfactory I can get on with making masters for the hopper ends, the frame and the trademark Z struts on these NG-Y ballast wagons.

Sunday, 30 September 2012

Let's Get Ready To Rubber

I'm just about ready to make the first mould for the ballast wagon kit.

Here you see the wagon side in its moulding box about to be covered in silicone rubber.


This isn't the same side I showed you the other day. I decided to make a second one because I wasn't completely happy with the angle on the ends of the hopper.

You can see it's got some additional details on now such as the two gearboxes which are part of the mechanism for opening the doors on the chutes, the triangular brackets at the very ends and on the left one of the supports for the two brake cylinders which sit diagonally opposite each at the ends of the NG-Y's.

If the mould turns out OK and I get some satisfactory casts from it then I shall move onto making masters for the hopper ends and the main frame of the wagon.


Monday, 24 September 2012

Ballast Wagon Kit

So I've started work on my second resin kit project.

The follow up to the DZ wagons is going to be the NG Y ballast wagons, of which there are two on the WHR.

I've begun by tackling the master for the main side section of the kit. Here is progress after a couple of hours at the workbench.


Designing a kit, especially one that you intend to produce in an open-backed mould is a very interesting challenge.

It's quite a different approach to scratch building and you might say more akin to reverse engineering.

You have to be able to imagine the complete model and break it down into the least number of constituent parts.

So whereas when I scratchbuilt these wagons for Bron Hebog I began by making up the hopper and the frame separately before joining them together and adding the second level of details like the U channel straps, the sensible way to tackle making a casting master is to make up the largest flat piece you can.

In this case it means attaching the side of the hopper to the frame at the outset and adding on all the surface details an an early stage.

I will post further updates as the work progresses.

Tuesday, 7 August 2012

MOTW - NG-Y Ballast Wagon

A treat for South African NG fans this week, our featured model is one of our pair of the WHR's ex-SAR ballast wagons.


In my opinion these wagons are a 'must have' for any model of the modern WHR because they were so essential to the effort to rebuild the line from Caernarfon to Porthmadog.

Ours are scratch built from styrene and it took a while to get around to making them because I didn't have access to any drawings for the NG Y design. In the end I took a tape measure to one of them myself along with a copious amount of pictures taken from every angle.

A big help in getting them to look right is the availability of U section styrene produced in a wide range of sizes by Evergreen which was used for the straps along the side of the hoppers, the Z struts at each end and the inner parts of the main frames.

Another important finishing touch is the distinctive wheels used for the hand brakes and the controls for the ballast chutes which I had custom etched.

Himself made use of his airbrush for the weathering effects to make them look suitably used.

We've perhaps overdone it a little with the load - some viewers at exhibitions have commented that they would be over the weight limit - but I have to say I have seen pictures of them looking pretty full when in use on construction trains.

I've also scratch built a handful of these wagons for other modellers in both 4mm and 7mm scale. With the development of the resin DZ's progressing well I would be interested in assessing whether there would be any demand for me working on a kit for these NG Y monsters. If you would be, please do let me know.

Thursday, 12 July 2012

MOTW - Romanian Ballast Wagon

This is another of my most favourite scratch built models.


This wagon was built new for the WHR in Romania in 2006 and was apparently based on a four-wheeled standard gauge design for Austrian Federal Railways.

Whereas the ex-SAR wagons are very simple designs - just a big hopper with sloping ends - this Eastern European monster has one of the most complicated bodyshells I've ever attempted.

And even once you've got all the angles on the hooper (which is divided into two) sorted out you then have the challenge of replicating all the control rods and leves and the ballast chutes beneath the frame.

Unlike the SAR wagons this one discharges ballast along the centre line of the track as well as at the sides.

I was also very pleased with the way the various handrails, which I had to fabricate from brass myself, turned out.

This wagon is so complex that I doubt I would ever have attempted it were it not for a very kind contact on the WHR (who was very proud of their new toy) offering me a large scale General Arrangement drawing which, along with the photographs he supplied of the wagon, was invaluable during the build.