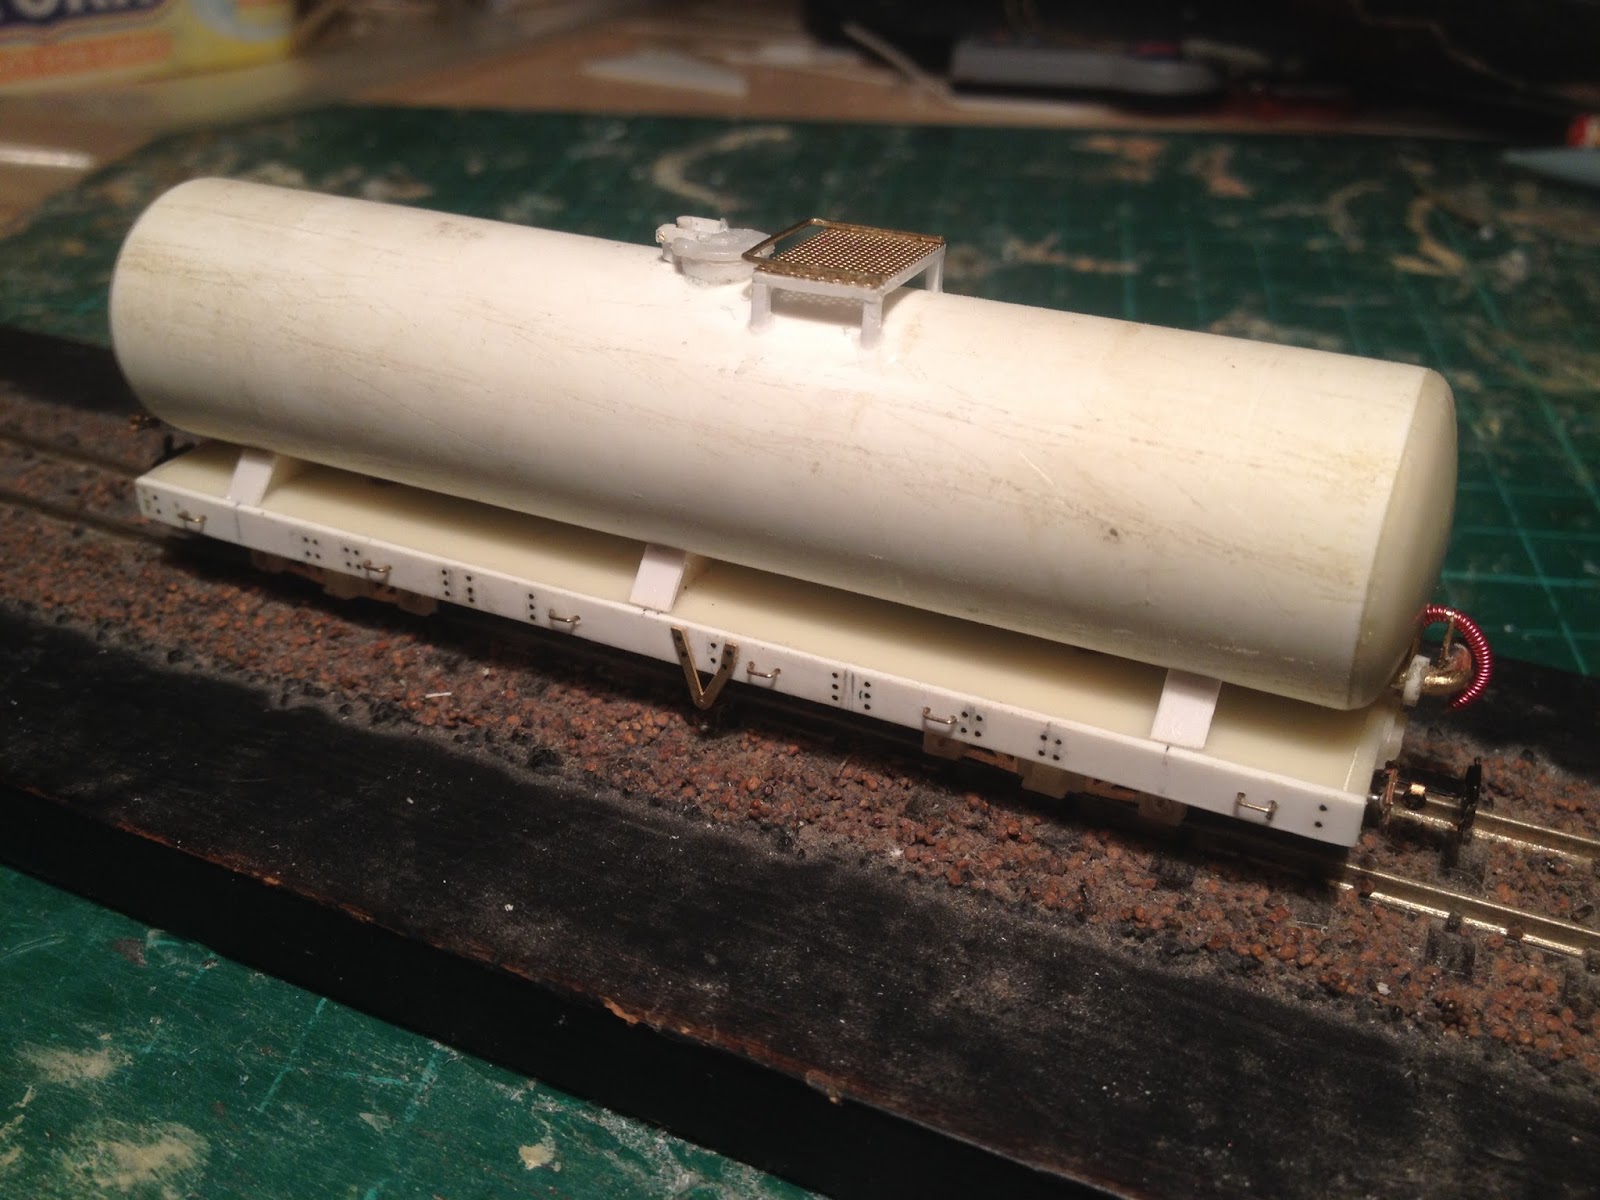
A very important part of the fleet in the weather we've been having so far this summer is the water tank wagon.
In South Africa vehicles like these were towed behind the Garratts to extend their operating range, in Wales its role is as a strategic, mobile store of fire-fighting water in case of a lineside conflagration on one of the more remote sections of the WHR.
I puzzled for a while about how to build the tank before I discovered the diameter was pretty much a match for plastic pipe I could by at the local DIY store, and for the domed ends I adapted parts from that old faithful, the Airfix / Dapol four-wheel oil tank wagon kit.
The whole thing was mounted on one of my resin cast DZ wagon chassis.
On special occasions the wagon does get a run and performs another useful purpose as a barrier wagon between double headed NGG16s to prevent any strain on the heritage bridges on the WHR.
Showing posts with label Water Tank. Show all posts
Saturday, 21 July 2018
Thursday, 31 December 2015
ROTY - Part 3
And so to the final part of our review of the year.
The three days we spent in the Goods Shed at Dinas exhibiting Bron Hebog and Dduallt side by side were the highlight of the year for Himself and I.
It was a major effort to have both the layouts there and we couldn't have done it without the support of a great team of helpers, so thank you once again to Graham, Max, Huw and Chris.
We also gave a debut at Dinas to the water tank wagon which has now been lettered and varnished by Himself.
After the upheaval of the exhibition and the effort to complete models to use on the layout I spent the early weeks of October catching up on a backlog of orders for my South African wagon kits which I cast in resin.
I also found the time to put the finishing touches to the farmhouse which had been shown incomplete on the layout at Dinas.
11 months after I'd begun work on them Himself finished painting carriages 11 and 12.
We had a little disagreement about the colour he chose for the droplights.
I won in the end and they've since been repainted in a shade that is more to my liking.
He spent a number of weeks convalescing from an 'intermediate overhaul' but once he was able to get back into the workshop he painted a couple of Barns which had been waiting in the queue for the paint shop for about 5 years!
In recent weeks I've been working through the backlog of buildings which the Artistic Director drew up plans for earlier this year.
One of them, which only took a couple of days to knock up, was this small outhouse which sits next to the farm house.

We rounded off the year with another of the projects which was begun at the turn of the year.
Himself had done a rough paint job on Conway Castle ahead of the appearance at Dinas but it still requires lining out.
His first attempt involved some home-painted and home-cut waterslide transfers to match the two-tone green colours with commercial yellow lines on top.
We weren't entirely happy with them and he's going to try again with some even thinner ones.
That's just one of the projects lined up for the year ahead.
All that remains is for us to wish you a Happy New Year and thank you for coming here to read the blog in 2016 and look forward to welcoming you in 2017.
September
The three days we spent in the Goods Shed at Dinas exhibiting Bron Hebog and Dduallt side by side were the highlight of the year for Himself and I.
It was a major effort to have both the layouts there and we couldn't have done it without the support of a great team of helpers, so thank you once again to Graham, Max, Huw and Chris.
We also gave a debut at Dinas to the water tank wagon which has now been lettered and varnished by Himself.
October
After the upheaval of the exhibition and the effort to complete models to use on the layout I spent the early weeks of October catching up on a backlog of orders for my South African wagon kits which I cast in resin.
I also found the time to put the finishing touches to the farmhouse which had been shown incomplete on the layout at Dinas.
November
11 months after I'd begun work on them Himself finished painting carriages 11 and 12.
We had a little disagreement about the colour he chose for the droplights.
I won in the end and they've since been repainted in a shade that is more to my liking.
He spent a number of weeks convalescing from an 'intermediate overhaul' but once he was able to get back into the workshop he painted a couple of Barns which had been waiting in the queue for the paint shop for about 5 years!
December
In recent weeks I've been working through the backlog of buildings which the Artistic Director drew up plans for earlier this year.
One of them, which only took a couple of days to knock up, was this small outhouse which sits next to the farm house.

We rounded off the year with another of the projects which was begun at the turn of the year.
Himself had done a rough paint job on Conway Castle ahead of the appearance at Dinas but it still requires lining out.
His first attempt involved some home-painted and home-cut waterslide transfers to match the two-tone green colours with commercial yellow lines on top.
We weren't entirely happy with them and he's going to try again with some even thinner ones.
That's just one of the projects lined up for the year ahead.
All that remains is for us to wish you a Happy New Year and thank you for coming here to read the blog in 2016 and look forward to welcoming you in 2017.
Tuesday, 29 December 2015
ROTY - Part 2
Welcome to the second instalment in our review of the modelling year
Himself began a new project this month.
For a long time I'd been intending to replace our models of the original FR bogie carriages 15 and 16 which I scratch built in styrene over 20 years ago and which were finished in late 1980's liveries and so really not suitable for running on Bron Hebog.
If these lovely Worsley Works etches had been available back in the 1990's then there is no way I would ever have attempted to scratch build such an intricate, panelled carriage myself!
This is number 16 which will be finished in the 1920's Colonel Stephens green livery.
Himself was also working on redesigning the fiddle yards on the layout with overlapping upper and lower yards to allow us to run full-length WHR trains.
I'd been working away on that row of houses for a few months and at last we had a row of three almost ready for painting.
I find I can get a little bored when working on one project solidly like this, so I decided to put the house building on hold once the 3rd one was complete and resumed work on the Garraway Set which had been on ice since the start of the year.
11 was assembled and a roof fitted before I began work on the interior.
It's becoming a familiar theme, but once again I gave myself a kick up the backside and resolved that the time had come to begin building a model that I'd been planning in my head for ages.
And so in the space of a few weeks I produced this model of the WHR water tank wagon which was built up on a DZ wagon chassis.
The tank, if you were wondering, was made with a length of 22mm plastic plumbing pipe.
The Artistic Director had one of his periodic bursts of activity and produced a mock-up of the Cwm Cloch farm house before finalising the design for me to build.
Here it is placed on the layout to check for fit and scaling.
Redesigning the fiddle yards was turning into quite a marathon project.
Himself spent making weeks wiring up these control panels at either end.
At the other end of the country I started work on building the farm house with the intention that even if it would not be finished we would at least have something presentable to place in the space for the big event of the year which was coming in September - taking both layouts to show at the WHR Great and Small event at Dinas.
And that's where we'll pick up for the final instalment of our review of the year.
May
Himself began a new project this month.
For a long time I'd been intending to replace our models of the original FR bogie carriages 15 and 16 which I scratch built in styrene over 20 years ago and which were finished in late 1980's liveries and so really not suitable for running on Bron Hebog.
If these lovely Worsley Works etches had been available back in the 1990's then there is no way I would ever have attempted to scratch build such an intricate, panelled carriage myself!
This is number 16 which will be finished in the 1920's Colonel Stephens green livery.
Himself was also working on redesigning the fiddle yards on the layout with overlapping upper and lower yards to allow us to run full-length WHR trains.
June
I'd been working away on that row of houses for a few months and at last we had a row of three almost ready for painting.
I find I can get a little bored when working on one project solidly like this, so I decided to put the house building on hold once the 3rd one was complete and resumed work on the Garraway Set which had been on ice since the start of the year.
11 was assembled and a roof fitted before I began work on the interior.
July
It's becoming a familiar theme, but once again I gave myself a kick up the backside and resolved that the time had come to begin building a model that I'd been planning in my head for ages.
And so in the space of a few weeks I produced this model of the WHR water tank wagon which was built up on a DZ wagon chassis.
The tank, if you were wondering, was made with a length of 22mm plastic plumbing pipe.
The Artistic Director had one of his periodic bursts of activity and produced a mock-up of the Cwm Cloch farm house before finalising the design for me to build.
Here it is placed on the layout to check for fit and scaling.
August
Redesigning the fiddle yards was turning into quite a marathon project.
Himself spent making weeks wiring up these control panels at either end.
At the other end of the country I started work on building the farm house with the intention that even if it would not be finished we would at least have something presentable to place in the space for the big event of the year which was coming in September - taking both layouts to show at the WHR Great and Small event at Dinas.
And that's where we'll pick up for the final instalment of our review of the year.
Labels:
11 12,
16,
Buildings,
Carriages,
Cwm Cloch Farm,
Farmhouse,
Fiddle Yard,
Oberon Wood,
Water Tank,
Worsley Works
Sunday, 6 September 2015
Finishing Touches On The Tanker
A couple of weeks ago I handed over my new WHR water tank wagon for Himself to have a tinker with.
He's stuck on the transfers.
There's lots of other tiny wee technical blurb on the real one but quite frankly life's too short!
I also left it for him to make and attach the footstep which you can see at the right hand end of the frame.
These are hangers-on (excuse the pun) from the chassis' days as a DZ wagon but strangely it only still has one at one end.
He'll give it a protective spray of varnish before it join the fleet for the show at Dinas next weekend.
There may be some squabbling about what we do with it.
His idea is that we'll leave it parked in the siding at Beddgelert where the real one spends a lot of its time as an mobile emergency source of water in the event of a major lineside fire.
I , on the other hand, would prefer to see it hung behind one of the NGG16's at the head of a full rake of SAR freight stock.
I wonder who will get their way?
He's stuck on the transfers.
There's lots of other tiny wee technical blurb on the real one but quite frankly life's too short!
I also left it for him to make and attach the footstep which you can see at the right hand end of the frame.
These are hangers-on (excuse the pun) from the chassis' days as a DZ wagon but strangely it only still has one at one end.
He'll give it a protective spray of varnish before it join the fleet for the show at Dinas next weekend.
There may be some squabbling about what we do with it.
His idea is that we'll leave it parked in the siding at Beddgelert where the real one spends a lot of its time as an mobile emergency source of water in the event of a major lineside fire.
I , on the other hand, would prefer to see it hung behind one of the NGG16's at the head of a full rake of SAR freight stock.
I wonder who will get their way?
Wednesday, 12 August 2015
Water Tanker Finished
Well almost. It's as near as damn it completed.
It still needs to get a spray varnish and some transfer lettering as the finishing touches, plus a couple of footsteps to be attached to the frame at the ends.
Here you can compare how my version compares to the real thing photographed at Beddgelert last week.
Its one of those models which has spent a long time on my to do list and I'm so looking forward to see it running on Bron Hebog next month.
It still needs to get a spray varnish and some transfer lettering as the finishing touches, plus a couple of footsteps to be attached to the frame at the ends.
Here you can compare how my version compares to the real thing photographed at Beddgelert last week.
Its one of those models which has spent a long time on my to do list and I'm so looking forward to see it running on Bron Hebog next month.
Saturday, 8 August 2015
Access Ladders
I reckon on any model there are always some details that you can get away without fitting but also some that are absolutely essential if you're going to capture the feel of the real thing, and on the WHR water tank wagon I reckon that feature is the ladders.
I'd given these a bit of thought all through the build process.
I looked at seeing whether I had anything in stock which would do the job.
I had a spare section of Plastruct ladder but it was way too thick, with too many rungs and not quite wide enough.
Even so I experimented with filing it down and chopping out every other rung to see if I could get away with it but in the end I decided it was too much of a compromise.
Similarly for a while I toyed with the idea of using the plastic ladders which come with the standard gauge Dapol oil tanker kit - which I'd robbed to make the masters for the ends and the tank filler on top - but it was a similar scenario.
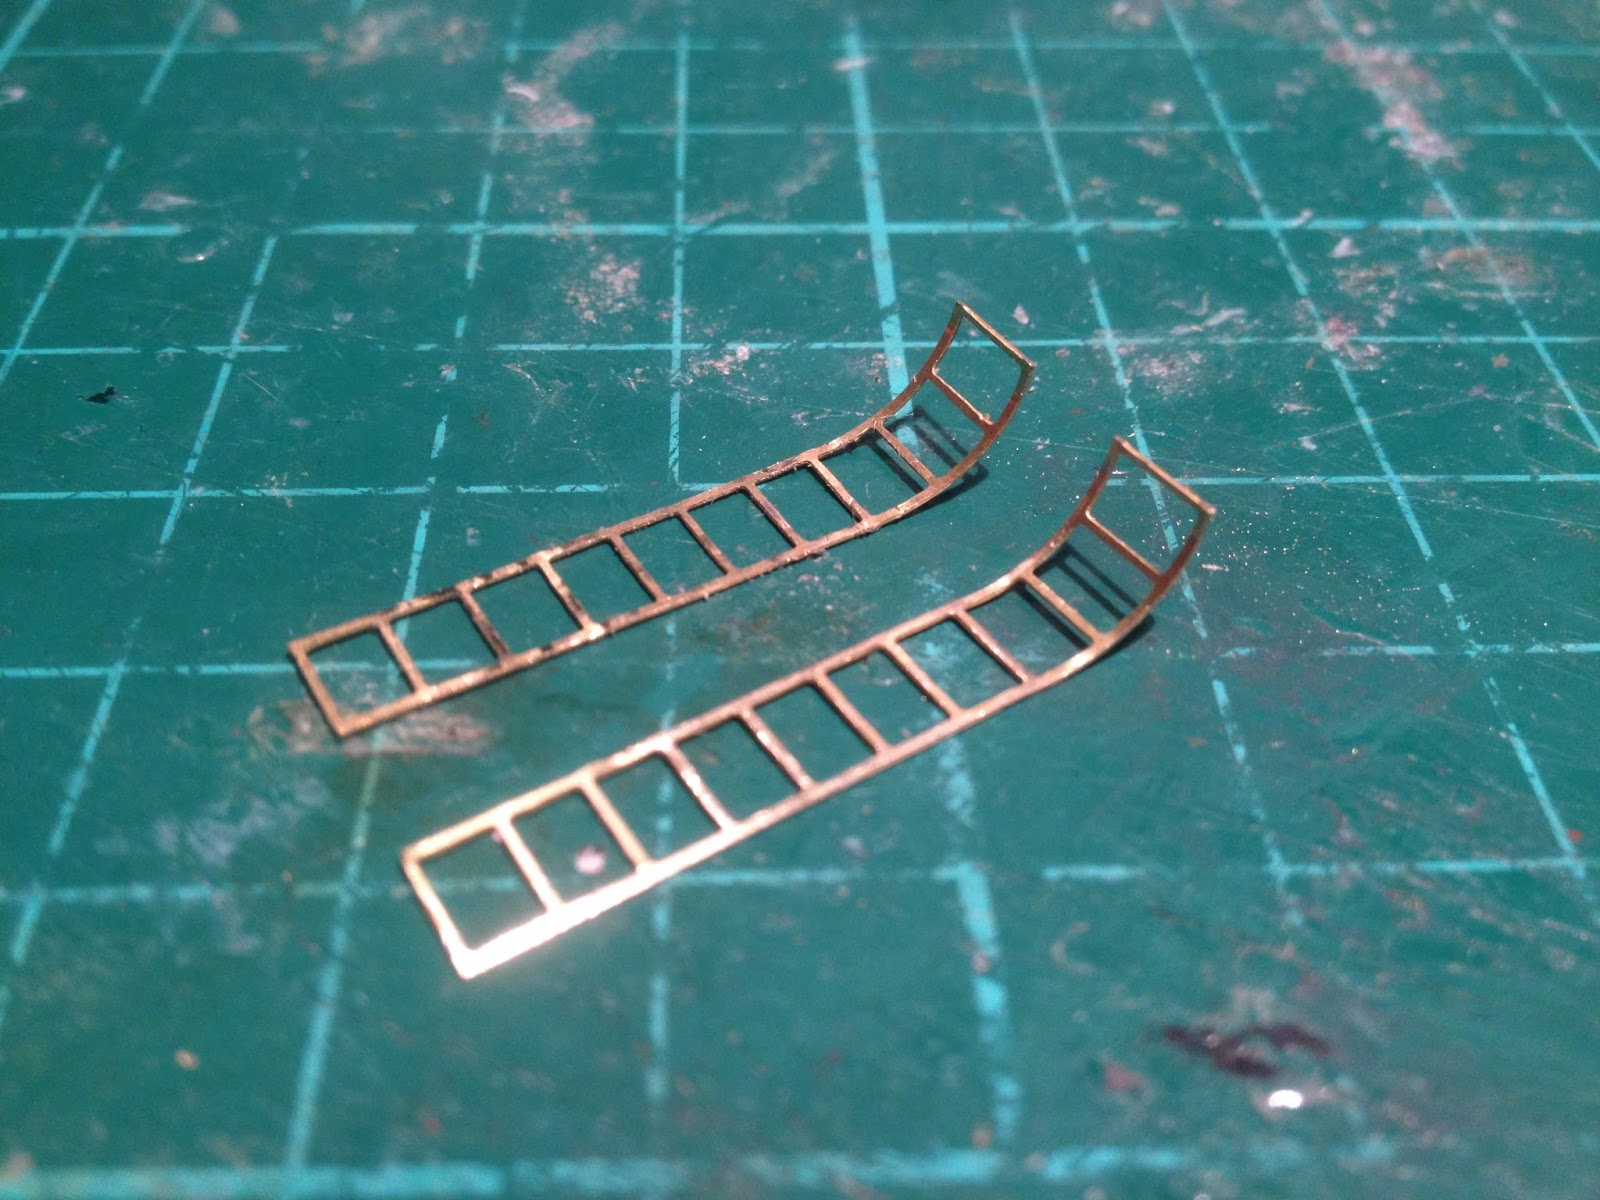
So in the end I pushed the boat out - really quite far out in fact - and ordered a fret of Scalelink etched brass ladders.
I think they're pretty much bang-on for width and not too far off the correct rung spacing either but, jeezo, it's pricey for two measly bits of ladder!
With them cut to length and bent at the top they were given a coat of red oxide primer.
My youngest's Play-Doh came in rather handy for holding them in place while I sprayed!
So here they are ready to be fitted, but I shall tease you for another couple of days before showing you the finished wagon...
I'd given these a bit of thought all through the build process.
I looked at seeing whether I had anything in stock which would do the job.
I had a spare section of Plastruct ladder but it was way too thick, with too many rungs and not quite wide enough.
Even so I experimented with filing it down and chopping out every other rung to see if I could get away with it but in the end I decided it was too much of a compromise.
Similarly for a while I toyed with the idea of using the plastic ladders which come with the standard gauge Dapol oil tanker kit - which I'd robbed to make the masters for the ends and the tank filler on top - but it was a similar scenario.
So in the end I pushed the boat out - really quite far out in fact - and ordered a fret of Scalelink etched brass ladders.
I think they're pretty much bang-on for width and not too far off the correct rung spacing either but, jeezo, it's pricey for two measly bits of ladder!
With them cut to length and bent at the top they were given a coat of red oxide primer.
My youngest's Play-Doh came in rather handy for holding them in place while I sprayed!
So here they are ready to be fitted, but I shall tease you for another couple of days before showing you the finished wagon...
Thursday, 6 August 2015
Tanked Up
The moment has come to fix the tank permanently on the wagon now most of the painting is complete.
Until now the pictures I've posted have only had the tank resting on its supports and I knew I was only going to get one chance to get it right - if the filler and platform a the the top ended up slightly tipped to one side or the other it would be indescribably irritating.
To give myself the maximum amount of fiddling time I used epoxy resin and squinted and stared at it from all angles.
I'm as certain as I can be that it's straight.
I'm quite pleased with how it's turned out, I think it's certainly got the look of the real wagon.
Perhaps the ends aren't quite as bulbous as on the full sized one but I don't think it notices too much.
The real test will be to see it attached behind one of the NGG16's with a train of SAR wagons hung on the back on the layout in a few weeks time.
There is still one major job to do, however, bend, paint and fit the ladders.
Until now the pictures I've posted have only had the tank resting on its supports and I knew I was only going to get one chance to get it right - if the filler and platform a the the top ended up slightly tipped to one side or the other it would be indescribably irritating.
To give myself the maximum amount of fiddling time I used epoxy resin and squinted and stared at it from all angles.
I'm as certain as I can be that it's straight.
I'm quite pleased with how it's turned out, I think it's certainly got the look of the real wagon.
Perhaps the ends aren't quite as bulbous as on the full sized one but I don't think it notices too much.
The real test will be to see it attached behind one of the NGG16's with a train of SAR wagons hung on the back on the layout in a few weeks time.
There is still one major job to do, however, bend, paint and fit the ladders.
Sunday, 2 August 2015
Black Magic
it quite often feels as if painting a model takes longer than building it!
It took me most of a week to get this far with the water tank wagon.
The one picture does not do justice to the number of processes which have to be gone through.
First the sections were sprayed with a primer. In this case it was red oxide because I didn't have any grey or white to hand.
This was fine for the tank body which received its all-over black from an aerosol can, but the grey on the frame, which was hand painted, required two coats.
Then the saddles had to be picked out in black, as well as underneath the frame.
Then the grey had to be touched up where there were any stray bits of black, then the black re-touched......and so it goes on until you're satisfied it's as neat as it's ever going to be.
The finish line is in sight, however, and I can say with confidence that it will be appearing at Dinas next month.
It took me most of a week to get this far with the water tank wagon.
The one picture does not do justice to the number of processes which have to be gone through.
First the sections were sprayed with a primer. In this case it was red oxide because I didn't have any grey or white to hand.
This was fine for the tank body which received its all-over black from an aerosol can, but the grey on the frame, which was hand painted, required two coats.
Then the saddles had to be picked out in black, as well as underneath the frame.
Then the grey had to be touched up where there were any stray bits of black, then the black re-touched......and so it goes on until you're satisfied it's as neat as it's ever going to be.
The finish line is in sight, however, and I can say with confidence that it will be appearing at Dinas next month.
Friday, 31 July 2015
Just Ladders Left
I'm about ready to begin painting the water tank wagon.
Since the last update I've added a few more of the final details including the vacuum pipes and, in a very fiddly operation, soldered on some tiny lengths of brass wire to represent the levers on the valves on either end of the tank outlets.
The pipes were not straightforward either because on one end the outlet pipe passes behind the hose and I had to do it in such a way that the tank can still be taken off for painting - it won't be fixed down until the very last moment when I will also add the ladders.
Since the last update I've added a few more of the final details including the vacuum pipes and, in a very fiddly operation, soldered on some tiny lengths of brass wire to represent the levers on the valves on either end of the tank outlets.
The pipes were not straightforward either because on one end the outlet pipe passes behind the hose and I had to do it in such a way that the tank can still be taken off for painting - it won't be fixed down until the very last moment when I will also add the ladders.
Monday, 27 July 2015
Inlets & Outlets
I've spent the last few details beginning to add the essential details to the water tank wagon, such as the filler and the platform on the top and the two outlets on either end where Fireman Sam connects his hoses should it ever be required at a lineside incident.
The platform is a tricky little piece fabricated from styrene strip with etched brass mesh on top.
It was very flimsy and delicate while it was being made and didn't stand up to handling well, but now it's glued in place on the top with the mesh attached it is seems to be more solid. Lets hope it stands up to the rigours of service at model railway exhibitions.
I have also dug out my trusty resin rivet transfer sheets to add the detailing along the frame.
There are also half a dozen grab handrails to be fitted along the frame before the chassis and tank are painted - still as separate units.
Only when they are painted and finally glued together will I be adding the ladders on either side.
The platform is a tricky little piece fabricated from styrene strip with etched brass mesh on top.
It was very flimsy and delicate while it was being made and didn't stand up to handling well, but now it's glued in place on the top with the mesh attached it is seems to be more solid. Lets hope it stands up to the rigours of service at model railway exhibitions.
I have also dug out my trusty resin rivet transfer sheets to add the detailing along the frame.
There are also half a dozen grab handrails to be fitted along the frame before the chassis and tank are painted - still as separate units.
Only when they are painted and finally glued together will I be adding the ladders on either side.
Tuesday, 21 July 2015
Tank Trial
So, here we go. The tank is resting on its supports and the wagon is on its wheels.
What do you reckon?
I think it's got potential.
Looking side-on at it it doesn't half look long!
As I don't have any of the finished stock for the layout here I've been holding up some scrap B wagon sides next to it and comparing it with photos I can find online to try and get some reassurance that it's roughly the right size.
The tank matches with the measurements I was given, and the DZ chassis is a known known, but you always have that doubt in your mind.
What do you reckon?
I think it's got potential.
Looking side-on at it it doesn't half look long!
As I don't have any of the finished stock for the layout here I've been holding up some scrap B wagon sides next to it and comparing it with photos I can find online to try and get some reassurance that it's roughly the right size.
The tank matches with the measurements I was given, and the DZ chassis is a known known, but you always have that doubt in your mind.
Sunday, 19 July 2015
Saddle Up
While the tank is the big ticket item on the water tanker project there are quite a few smaller bits to make before I can think about fitting it into place.
Prime among these are the 3 cradles which it rests on atop the flat DZ wagon chassis.
As these need to be identical to each other the easiest thing to do is make one master and cast the three I need for the wagon.
I'm making this wagon without ever having seen it with my own eyes.
I do have the benefit of some research pictures taken for me by a friend, and another who ran a tape measure over it, but I've made an assumption here that the supports are in the form of a saddle rather thatn separate ones on each side - it's very dark under there and impossible to tell from the pictures I have.
If I've got it wrong I'm sure someone reading this will be quick to correct me.....
I have also been carrying out the alterations to the DZ wagon chassis.
It's not really possible to use the side castings from my flat wagon kit because they include the remains of the stanchions and door stops which have been stripped off the frame used for the water tank wagon.
So instead I have fitted plain lengths of styrene which I will decorate in due course with transfer rivets.
There was a similar issue with the ends so for this I have adapted a couple of castings from the ballast wagon kit which are uncluttered.
I've also put together a pair of diamond frame bogies for it run on.
Once the saddle parts have been cast I'll be able to see what it looks like with the tank on top!
Prime among these are the 3 cradles which it rests on atop the flat DZ wagon chassis.
As these need to be identical to each other the easiest thing to do is make one master and cast the three I need for the wagon.
I'm making this wagon without ever having seen it with my own eyes.
I do have the benefit of some research pictures taken for me by a friend, and another who ran a tape measure over it, but I've made an assumption here that the supports are in the form of a saddle rather thatn separate ones on each side - it's very dark under there and impossible to tell from the pictures I have.
If I've got it wrong I'm sure someone reading this will be quick to correct me.....
I have also been carrying out the alterations to the DZ wagon chassis.
It's not really possible to use the side castings from my flat wagon kit because they include the remains of the stanchions and door stops which have been stripped off the frame used for the water tank wagon.
So instead I have fitted plain lengths of styrene which I will decorate in due course with transfer rivets.
There was a similar issue with the ends so for this I have adapted a couple of castings from the ballast wagon kit which are uncluttered.
I've also put together a pair of diamond frame bogies for it run on.
Once the saddle parts have been cast I'll be able to see what it looks like with the tank on top!
Friday, 17 July 2015
Chocolate Buttons
I've cast the ends for the water tanker and at first glance they do look like something you'd find in the confectionery aisle.
Much trickier than casting this pair was to ensure the ends of the plastic tube they were to be glued onto was flat and square.
I spent best part of a day filing, sanding and then squinting at them from all angles before deciding it was probably as good as it was ever going to be and sticking the caps on.
It doesn't look quite like a railway tanker yet because it still needs to be dressed with a filler, ladders and outlet pipes at each end but I feel the project has taken a big step forward.
Much trickier than casting this pair was to ensure the ends of the plastic tube they were to be glued onto was flat and square.
I spent best part of a day filing, sanding and then squinting at them from all angles before deciding it was probably as good as it was ever going to be and sticking the caps on.
It doesn't look quite like a railway tanker yet because it still needs to be dressed with a filler, ladders and outlet pipes at each end but I feel the project has taken a big step forward.
Monday, 13 July 2015
Working On The Water Tank Wagon
The time has come to make a determined effort to finish the water tank wagon.
I cast the DZ chassis a while back and many months ago I got my hands on a length of 22mm plastic tube for the main body of the tank.
What's been holding the project back - aside from all the other things I've been building - is the lack of something to use for the ends of the tank.
My idea all along has been to borrow from this legendary plastic kit.
You may recognise it as the Kitmaster / Airfix / Dapol oil tank wagon which has been around since the year dot.
We had a fleet of them when we used to model OO standard gauge.
The advantage is that the tank ends are separate parts which are ideal to be re-sized for the smaller diameter of the new WHR water tank.
The first step is to employ my trusty circle cutter.
As you can see from this pic of a trial run I've cut it a smidgeon on the large side so the edges can be filed down further to give it a nicely rounded profile where they join onto the tube.
My plan is to cut one disc and use it as a master to cast copies.
There's not a lot more I can do until the mould is ready.
I cast the DZ chassis a while back and many months ago I got my hands on a length of 22mm plastic tube for the main body of the tank.
What's been holding the project back - aside from all the other things I've been building - is the lack of something to use for the ends of the tank.
My idea all along has been to borrow from this legendary plastic kit.
You may recognise it as the Kitmaster / Airfix / Dapol oil tank wagon which has been around since the year dot.
We had a fleet of them when we used to model OO standard gauge.
The advantage is that the tank ends are separate parts which are ideal to be re-sized for the smaller diameter of the new WHR water tank.
The first step is to employ my trusty circle cutter.
As you can see from this pic of a trial run I've cut it a smidgeon on the large side so the edges can be filed down further to give it a nicely rounded profile where they join onto the tube.
My plan is to cut one disc and use it as a master to cast copies.
There's not a lot more I can do until the mould is ready.
Friday, 3 July 2015
Future Plans
So what's next on the agenda?
Well, I've still got plenty of projects that I want to get completed in time for our appearance at WHR Great & Small II in September.
First priority is to build the interior for my model of carriage 12 (our 3rd incarnation of it) which is supposed to look something like this.
It's relatively straightforward so I'd like to think there's not much more than a week's work in that.
There are a few other foutery details to finish off on both of those carriages, like the vacuum pipes and the electrical connections, and then I shall send them off to Himself to fettle and paint.
I am also determined to get my WHR water tank wagon finished in time for the show at Dinas.
So far I have acquired the tube for the tank - for free! - and cast the main chassis block in resin.
What I need to do now is get hold of a Dapol oil tank wagon kit to rob it of the end sections and summon up the motivation to get on with it.
I also have designs for another two of the Oberon Wood houses ready and waiting.
The next ones on the list are those nearest the entrance to Goat Tunnel which begin a row heading down towards the front edge of the layout.
And when they're done, looming on the horizon like a recurring nightmare is new observation carriage 150.
I feel a headache coming on.....
Well, I've still got plenty of projects that I want to get completed in time for our appearance at WHR Great & Small II in September.
First priority is to build the interior for my model of carriage 12 (our 3rd incarnation of it) which is supposed to look something like this.
It's relatively straightforward so I'd like to think there's not much more than a week's work in that.
There are a few other foutery details to finish off on both of those carriages, like the vacuum pipes and the electrical connections, and then I shall send them off to Himself to fettle and paint.
I am also determined to get my WHR water tank wagon finished in time for the show at Dinas.
So far I have acquired the tube for the tank - for free! - and cast the main chassis block in resin.
What I need to do now is get hold of a Dapol oil tank wagon kit to rob it of the end sections and summon up the motivation to get on with it.
I also have designs for another two of the Oberon Wood houses ready and waiting.
The next ones on the list are those nearest the entrance to Goat Tunnel which begin a row heading down towards the front edge of the layout.
And when they're done, looming on the horizon like a recurring nightmare is new observation carriage 150.
I feel a headache coming on.....
Labels:
11 12,
150,
Carriage Interiors,
Oberon Wood,
Water Tank
Saturday, 24 January 2015
Freebies!
I haven't got very far with my project to model the new WHR water tank wagon but I have obtained the single largest component part, and on the most favourable terms too!
The diameter of the tank scales down at 22mm which, rather fortuitously, is a common size of plastic household plumbing pipe.
I'm only going to need around 10cm worth of it, however, so those of you who share my tightfisted tendencies will readily understand why I was reluctant to go out and invest in a metre length of pipe (or more) when I only required a fraction of it.
This is where the benefit of living in a relatively isolated small town played into my hands.
We are fortunate to still have an independent DIY shop and I figured there was a chance I could talk the proprietor into selling me a six inch length of pipe.
In fact, such is his acute appreciation of customer service and the value of repeat business, not only did he cut me a small length he told me I could have it for free.
So I am more than happy to use the pages of this blog to say that if you ever find yourself in Largs and are in need of any miscellaneous hardware do not hesitate to call on Peter Valerio and his staff in their little Aladdin's Cave in Stanlane Place.
The diameter of the tank scales down at 22mm which, rather fortuitously, is a common size of plastic household plumbing pipe.
I'm only going to need around 10cm worth of it, however, so those of you who share my tightfisted tendencies will readily understand why I was reluctant to go out and invest in a metre length of pipe (or more) when I only required a fraction of it.
This is where the benefit of living in a relatively isolated small town played into my hands.
We are fortunate to still have an independent DIY shop and I figured there was a chance I could talk the proprietor into selling me a six inch length of pipe.
In fact, such is his acute appreciation of customer service and the value of repeat business, not only did he cut me a small length he told me I could have it for free.
So I am more than happy to use the pages of this blog to say that if you ever find yourself in Largs and are in need of any miscellaneous hardware do not hesitate to call on Peter Valerio and his staff in their little Aladdin's Cave in Stanlane Place.
Tuesday, 25 November 2014
Double Eau Nine Wagon
I've always been guilty of daydreaming about the next project when I'm only half way through my current one.
So it is I am already musing about how I'm going to go about making my next wagon, the WHR's new water tanker.
The justification for its construction is to carry thousands of gallons of water which could be hauled directly to the site of a large lineside far in a remote location.
Visitors to the railway this autumn, however, could be fooled into thinking its primary purpose is to create more authentic looking South African freight formations for photo charters!
It is no coincidence that it is a dead ringer for the wagons the Garratts used to drag around for additional water capacity.
Making a model should be relatively straight forward.
The frame is a flat DZ wagon so there's no problem knocking one of those out in resin.
I have had my spies measure the dimensions of the tank which scaled down work out at roughly 21mm diameter and plastic pipe of that size is available off the rack at most local DIY centres.
Which leaves me wondering about how best to do the ends.
At the moment my thoughts are turning to borrowing the bits from the venerable Dapol (ex-Airfix) 00 oil tank wagon kit.
Without one to hand I can't be sure how it compares for diameter but I'm guessing it's a little bit bigger but they could be reduced a little and would still have the right sort of fat look that I need.
Once I've got carriage 119 out of the way I shall investigate further.
So it is I am already musing about how I'm going to go about making my next wagon, the WHR's new water tanker.
The justification for its construction is to carry thousands of gallons of water which could be hauled directly to the site of a large lineside far in a remote location.
Visitors to the railway this autumn, however, could be fooled into thinking its primary purpose is to create more authentic looking South African freight formations for photo charters!
It is no coincidence that it is a dead ringer for the wagons the Garratts used to drag around for additional water capacity.
Making a model should be relatively straight forward.
The frame is a flat DZ wagon so there's no problem knocking one of those out in resin.
I have had my spies measure the dimensions of the tank which scaled down work out at roughly 21mm diameter and plastic pipe of that size is available off the rack at most local DIY centres.
Which leaves me wondering about how best to do the ends.
At the moment my thoughts are turning to borrowing the bits from the venerable Dapol (ex-Airfix) 00 oil tank wagon kit.
Without one to hand I can't be sure how it compares for diameter but I'm guessing it's a little bit bigger but they could be reduced a little and would still have the right sort of fat look that I need.
Once I've got carriage 119 out of the way I shall investigate further.
Subscribe to:
Posts (Atom)