Tuesday 31 December 2013

Bron Hebog Review Of The Year Part 2

July

The second half of our review of the year finds us in high summer with Himself continuing to make progress with the Mercian Models Welsh Pony kit.


The shortcomings of its origins as a 7mm kit scaled down to 4mm were becoming all-too-obvious with a rather complicated sequence of construction as can be seen above.

Having built the first two houses for the Oberon Wood estate on the layout I was called upon to build a scaled-down version of the double garage I built from a guesstimated design a number of years back which was now very obviously too big when sat beside its new neighbours.


August

We were in print again in the summer when Model Rail magazine brought out this special glossy edition featuring some of the best layouts to have appeared in the magazine including Bron Hebog's sister layout Dduallt.


Himself had also been busy painting the WHR tool van which I had scratch built. It needed more weathering but was beginning to look the part.


September

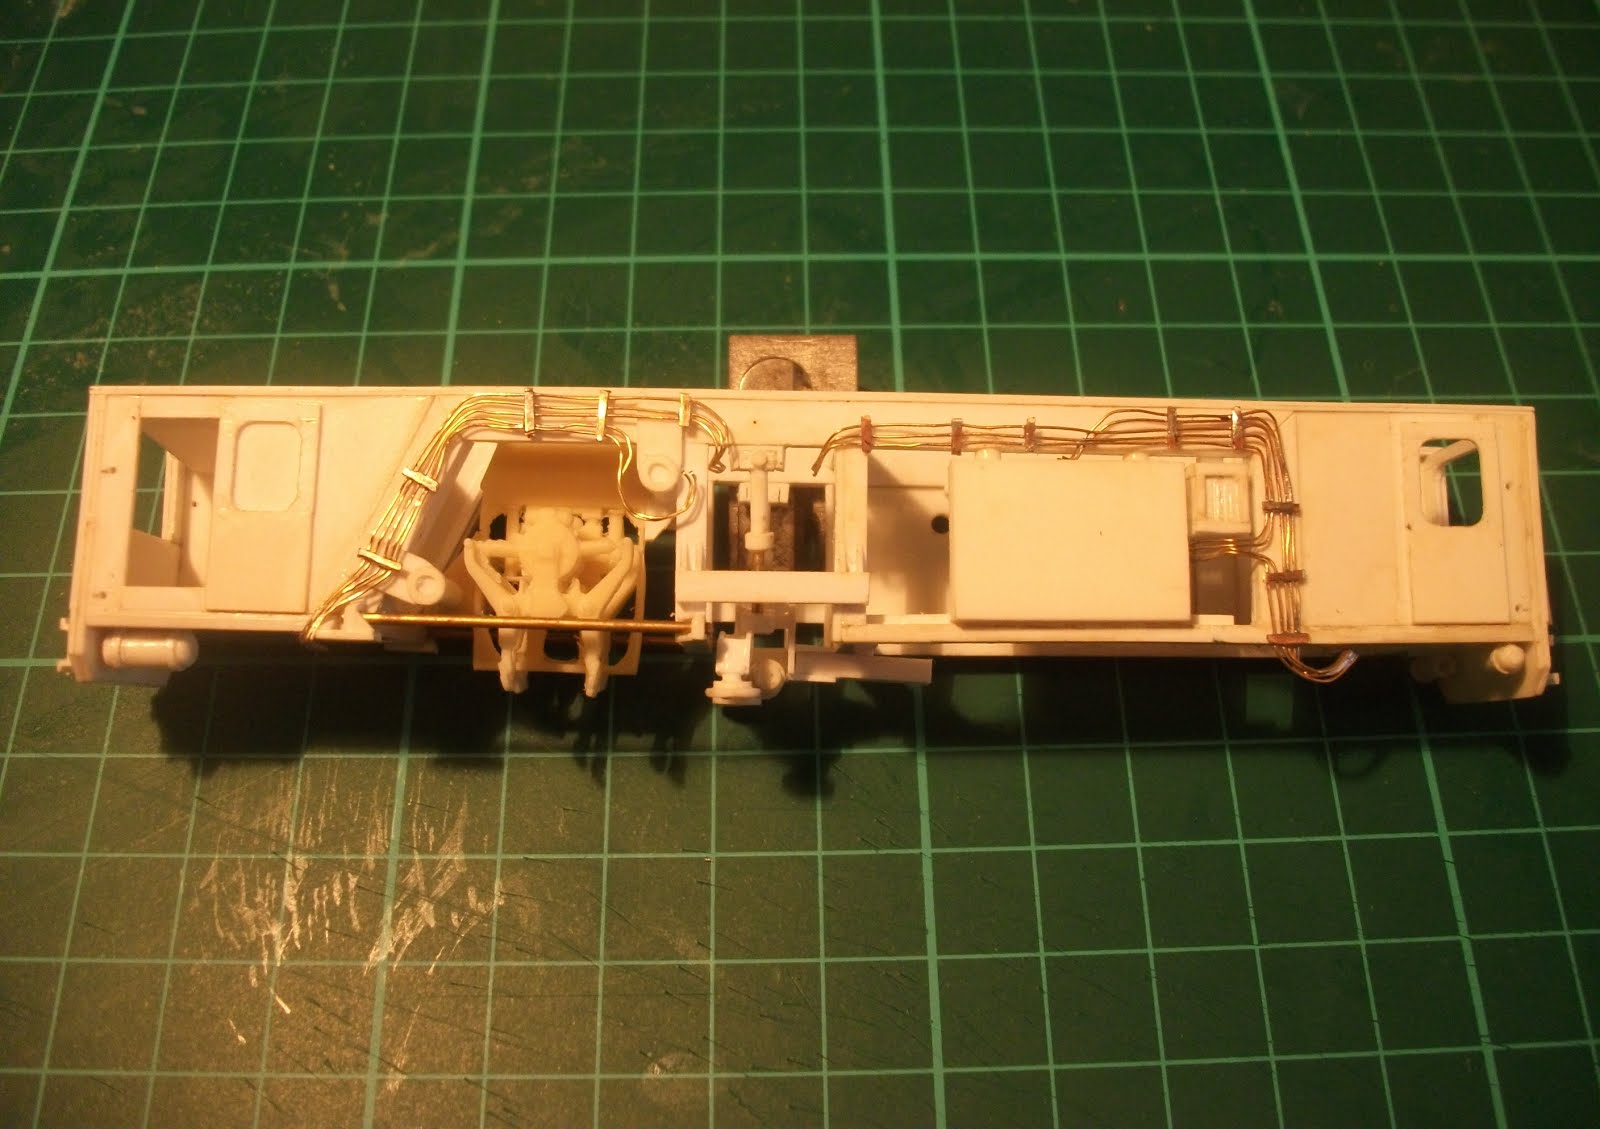
Himself now turned his attention onto the chassis for Welsh Pony, and this was when the problems really began!


It transpired that the motor and gearbox - which the kit instructions say should be fitted in a transverse arrangement - is impossible to fit.  Not only does it not fit within the confines of the saddle tank but the gears foul the motor casing and will not mesh.

We sought advice from the manufacturer who put us in touch with a modeller who had devised an alternative gearbox arrangement (seen above).

September was a big month for us because we got to take the layout out on the road for the first time in 18 months to the WHR's Superpower weekend where it was displayed as part of a model railway exhibition in the goods shed at Dinas.


During the weekend the FR's John Wooden shot this lovely video footage of the layout which included a sequence filmed by placing a miniature camera onto a flat wagon and towing it around the layout.


October

Whilst at Superpower Himself decided to splash out on an RT Models kit for the Harrogate Peckett which was making a guest appearance at the gala.

It didn't take him very look to put it together, and very purposeful it looks too..


He also began work with another push to complete the layout laying the trackbed on the middle section of the big Cwm Cloch S bend.


November

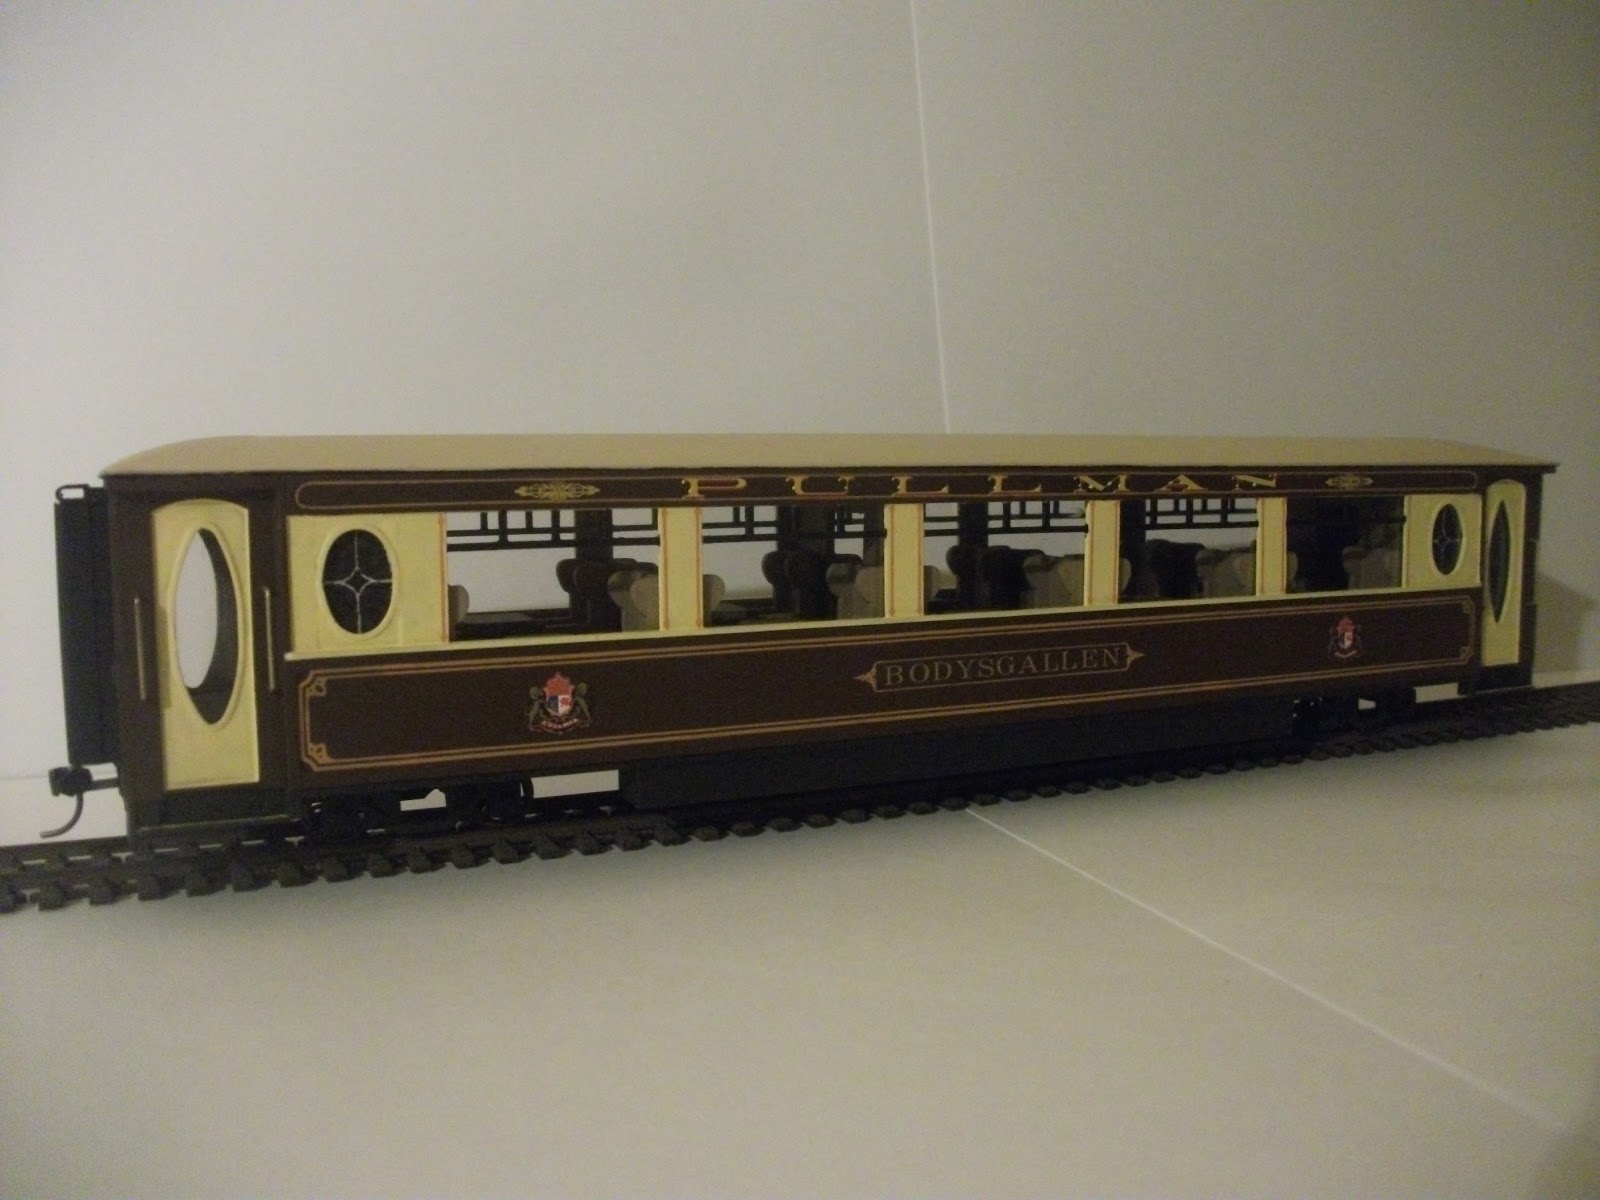
Having had reasonable success with my wagon kits I took my resin casting experiment to the next level with a project to produce a batch of FR Super Barn carriages for a client.

I scratch built the main sections in styrene in my usual fashion and used them as the masters to create mould sand cast a run of  resin copies.

Here you can see the first of the carriages in the early stages of being glued together. So far so good....


At the other end of the country Himself was making rapid progress with landscaping the new section of the layout, seen here with Mod Roc spread over chicken wire in a most traditional fashion...


December

We ended the year with Himself completing an improvised gearbox for Welsh Pony.  


The Large Englands may only have had an extra 6 inch wheelbase compared to the original batch but it looks very obviously longer in this side-on snap.

My efforts to cast a run of Super Barn carriages had got so far as having three body shells completed by the turn of the year.


Thanks for all your visits to the blog during 2013 and even more so if you left a comment or interacted with us on our Twitter or Facebook feeds.

We look forward to sharing our modelling efforts with you in 2014.


Sunday 29 December 2013

Bron Hebog Review Of The Year Part 1

There were no complaints about our following the media fashion at this time of the year for a look back over the preceding twelve months so I shall repeat the exercise with a look back at the Bron Hebog modelling year.
January

I began with a burst of activity on a long term project to make a 2nd model of the WHR KMX tamper for a client - one of the designers of the conversion of the real machine in fact - and gave my finger tips some heat treatment soldering up these hydraulic looms from offcuts of brass and untwisted picture hanging wire.


This project has taken so long that when the model was commissioned the client was living in Australia but has since moved back to Yorkshire. Oops!

In January I also completed the first of my B wagon kits - in this snap you can see one completed as a WHR bike carrying wagon posed next to an example of the 2nd generation DZ wagon rivet details added to the master.


We also made some progress on our model of Super Barn 121 with Himself getting round to putting a brass roof on it.


February

The early months of the year saw us finally delivering on another long term outside contract - a pair of 7mm scale WHR Pullmans which I scratchbuilt in styrene and Himself painted and lined out with Fox's transfers.


They are a stunning pair of carriages, even if I do say so myself, and it was hard to let them go.


March

I caught up with another of my 7mm carriages at the Model Rail Scotland on the layout Rhyd which was on show at the SECC.   It is a model of the original FR Barn Observation Carr 100.


I also began work on the first of the models of the houses in the modern estate which is a feature at the south end of Beddgelert station, working on designs drawn up by the Artistic Director.


April

Having spent many months casting kits to sell and making carriages for clients I had to submit to the urge to make something for myself and started work on a model of the WHR tool van.

The real van was built up on the chassis from a DZ wagon and I used one of the chassis castings from my DZ kits as the base for the model, scratch building the van body from styrene.


I also paid a visit south to Bron Hebog HQ to observe progress on the layout and took this snap of our set of DZ wagons - all of them slightly different - which Himself had painted and lettered.


May

I was making steady progress on the build of the first two houses.  

By May this one was almost complete with the roof in place and just awaiting some finishing touches such as the guttering and the ridge tiles.


Having got accustomed to the nature of the complicated design of the buildings the second house came together quite rapidly.  Here they are posed together.


June

I was thrilled in June when the news I'd waited a lifetime for was confirmed - a decision to go ahead with the restoration to steam of FR Large England Welsh Pony.

I have very fond memories of playing on the engine as a child in its days perched on a plinth outside Harbour Station dreaming that one day I would see it steam again.


I immediately announced a pledge that a proportion of turnover of sales from my WHR wagon kits would be donated to the appeal fund.  The total donated is into three figures already.

Inspired by the restoration announcement Himself recommenced work on our model of Welsh Pony which he is building from a rather flawed Mercian Models kit. It has been rather a saga as regular readers of the blog will know...


I was also able to finally sign off on the NGY ballast wagon kit with the arrival of the test etches for the brass parts of the kit and it was able to go into production.


Friday 27 December 2013

Another Garratt - But What Colour??

Santa was very good to Himself this year and he found what he really, really wanted lying under the tree.

It wasn't a Furby or an iPad, or whatever this year's must-have present is, but another Backwoods Miniatures NGG16 kit.


An unlike so many toys which are tossed aside out of boredom, or broken, on Boxing Day you can be sure that this one will be played with for many weeks to come - because that's how long it takes to put them together.

Of course, given his long record of building beautifully smooth running Backwoods kits I have no doubt at all that he will make a first class job of this third one, but the big question is what to make it as?

Those who are familiar with Bron Hebog will know that we have one Garratt that depicts number 87 in the temporary grey livery in which it first worked on the WHR.


And a second (which was the first he built) which doesn't actually represent any of the 3 NGG16's in Wales as it was made up in South African condition.


Being black it does look a little quite like 143 used to do. But, of course, 143 was an oil burner at that time and this one has a bunker full of coal.

On the other hand it does have the big headlamps which are now fitted to 138, which also burns coal but is currently painted red.

To complicate matters further 143 is now a coal burner but is painted green but still has the small SAR spotlights.

So answering the question about which loco we build this new kit into also determines which one our existing black Garratt should be rebuilt into.

It is a bit of a knotty one.

Tuesday 24 December 2013

Merry Christmas!


All of us on the Bron Hebog team would like to pass on our hope that everyone who reads the blog has a very contented Christmas and that Santa will fill your stocking with all the modelling items on your list.

Himself is certainly hoping for something special, I'll let you know whether or not his wish comes true......

Oh, and thanks to Roger for lending us the seasonal photograph, we do hope you like it.

Sunday 22 December 2013

Welsh Pony Comes Together

Having got the chassis working Himself has begun adding the finishing touches to our Mercian Welsh Pony kit.

He began by adding some of the detail in the cab including the bits and pieces on the firebox.

It was at this point that it suddenly dawned on him that he'd put the cab on back to front.

(Some bad words were muttered...)

With that fixed he continued on by making up the hand brake - which was apparently rather fiddly - and soldered it in place on the back of the cab and added the spectacle rims.

It was during the process of soldering the cab in place that he broke the regular off and managed to melt the white metal safety valve casting.

(More naughty muttering....)

As you can see from the picture below he managed to bodge up some replacements out of some brass bits he had hanging around.


So here's what it looks like from the side.


Obviously it's missing a couple of rather important bits - like the chimney and those iconic Festiniog sandpots - but we've got a real idea now of how impressive the finished Welsh Pony is going to look.

Friday 20 December 2013

Mission Accomplished!

I try not to write too many self-indulgent, self-congratulatory posts - which is a trap I fear it would be easy to fall into as a blogger - but I'll make an exception today because I have achieved one of the targets I set myself for the year.

And I should be thanking you all, too, because the ambition was to achieve 200,000 pageviews, which as you can see from the counter in the menu section on the right hand side of the page has been surpassed.

I know that a basic count of page views is a very imprecise way of measuring the impact a website is having but even so its quite satisfying to see.

The counter has become a little meaningless at times over the past few months as various spam bots and web crawlers have locked onto the site leading to rather improbable spikes in traffic every time something new is posted, but even allowing for those I think I can be reasonably confident the number of genuine views has passed 200k.

So many thanks to you, wherever you are the in the world and whatever your interest in the FR & WHR or narrow gauge modelling for stopping by and reading the blog.

Writing this does take up time that otherwise might be spent modelling so it's good to know that it is being read and I hope to have lots more to tell you about in 2014.

Onwards to half a million!

Wednesday 18 December 2013

Saddle Sore

There's been more improvisation as our Welsh Pony canters towards completion.

First on the snagging list was to find a way of attaching the saddle tank to the main frame of the locomotive which has been achieved with the aid of a couple of brackets made out of brass as you can see in the picture below.


Also the locomotive will require pick ups if it is to be self-propelled, of course, and these will be attached to a piece of copper clad strip which is itself secured by those same screws that hold the saddle tank in place.


Clever, eh?

The only question remaining unanswered is whether the fake brake shoes will become entangled with the pick ups when they are fitted.

Himself does like to keep us in suspense...

Monday 16 December 2013

Seating Plan

I've been turning my attention to the interior for the Super Barn models.

It's something I've been turning over in my mind for quite a while.

With at least four carriages to make I wanted to find a way to cast them, if possible, to cut down on the time and effort involved - because I know from experience that making dozens of seats from scratch can be rather a bore.

Another consideration, though, was that I had to find a way to cast them using an open back mould without making them too boxy like interiors from a '60's Triang MkI, and I didn't want to make them as one single casting because at around 10cm long it would also take a lot of rubber to make a mould.

So this is the solution I've settled on.


The bottom of the seats units have had to be made boxy so they can be cast - a bit like the very first Barns in fact - and the table support is designed in such a way that the next seat unit can be placed up against it and should be in the correct position.

You can also see I've made masters of the table tops with a slit underneath which hopefully should slot in place on top of the table supports when they're cast.


Saturday 14 December 2013

Boxes & Brake Bits

There's been more progress on the underframe for the Super Barns,

They are relatively simple affairs - once you've gone through the trauma of bending the truss rods - with two basic boxes to be formed out of styrene for the batteries and the fuel tank for the diesel carriage heating as well as something to represent the pivoting crank below an imaginary brake cylinder.

(I've always worked on the basis there's no point adding detail that no one can see)


The underframe for the carriage that will be 103 has been completed but I have run out of 0.7mm wire so I've only been able to do one side of the second and the third remains untouched.


However, I have made up the boxes and brake gear for all three and kept them to one side so I'll be able to complete the other chassis as soon as I get more wire in.

Thursday 12 December 2013

Angle Tangle

I've started working on one of the underframes of the resin Super Barns - 103 to be precise.

The first job is to get the truss rods in place which are formed from styrene strip for the four posts and a couple of lengths of 0.7mm brass wire.


I've always found making these to be a process of trial and error.

Mostly error.

I've tried drawing out a template on a piece of paper as a guide to getting the bend points and the angles correct, or just offering the wire up against an existing model, as I did in this case.

Whichever method I choose, however, it always takes a long time, twisting the wire this way and that. The angle's always too steep, and then too shallow, then too steep again.

Eventually I end up with somethng that I can live with and drilling a couple of holes in the floor and super glue it into place.

I've written before here that I have a bit of a mental block about bending brass and this is yet another example of it.

Tuesday 10 December 2013

More Of The Same

 So that's all three Super Barns now up to the same stage.


The most recent modelling sessions have seen 103 - nearest the camera - gain its roof rib and corridor connections.

What's been very interesting in this process of making these resin carriages is that even though the sides are cast, and theoretically identical, it is still very much a case of scratch building rather than kit building.

For example, each of the three chassis / floor units - which have to be a close fit inside the carriage body - are all slightly different and will only fit inside their own carriage. They are not interchangable.

Some of that, I suspect, will be down to very small differences in the thickness of the castings or perhaps variations in the positioning of the parts as they were glued together.

Or perhaps it's just a manifestation of how all my models are just bodges to a greater or lesser extent...

Anyway, time to press on.

Having discovered a forgotten about length of 0.7mm brass wire I think I will attempt to make some truss rods next.

That'll be fun. Not! Bending brass always drives me round the bend...


Sunday 8 December 2013

Pony Is Hot To Trot

After many weeks working on the extension to the layout it seems that Himself is definitely in a 'loco phase' because he's making very rapid progress with the chassis for Welsh Pony.

After sorting the motor and gearbox he's already moved onto fitting the motion.

The first task was getting the wheels and the connecting rods on and apparently that went well and it seems to move very smoothly.


Of course, as we have discovered before, this Mercian Models kit has a habit of biting you in the bum.

The latest set back was when Himself fished about in the box looking for the crossheads.

Apparently what he was expecting was some kind of white metal casting. What he discovered was some etches to be assembled in a sandwich fashion to make a crosshead.

Did you notice I wrote Crosshead, there? The singular and not the plural.

That's right! There are only enough parts supplied to make up one.

Terrific!

Fortunately Himself is tremendously resourceful in these situations and managed to take some scrap pieces of brass and make up a pair using the etches from the kit for the front bits and the homemade pieces for the rear which were very carefully soldered together.


Here they are in position on the cylinder / slidebar assembly.


He tells me they had to be made very slim because, as you can see, there is literally a fag paper clearance between the crossheads and the front crankpins.


And so here we have the chassis with all the motion on.


Looks great, doesn't it? Can't wait to see it with the body on and even more so moving!

Friday 6 December 2013

I Couldn't Resist

I've ended up putting together the third set of Super Barn castings for the model of 103 for a client, so I seem to be committed to building a batch of 3 rather than 2 2's.


It's gone together as smoothly as the others, although I had a moment of brain fade when it became apparent I had forgotten to mark and drill the holes in the floor for the bogie pivot bolts. Whoops!

Fortunately the chassis isn't too far advanced so I was still able to measure and mark the position easily and hold it firmly enough in my hand to drill through a couple of mm of styrene without dislodging any details.

So the plan is to add the bits to bring it up to the same point as the other two, which means a rib along the top of the roof, some little bracket bits along the false framework and some corridor connections, and then I'll make some more progress on the first pair.

I have to choose between finishing off the underframes, doing something about the roof skins or making some masters for interior seats and tables which I would be able to make casts of.

Wednesday 4 December 2013

Welsh Pony Chassis Breakthrough?

Himself has had some titanic battles with kits over the years.

Some have had him turning the air blue, others driving him to the point of hurling recalcitrant mechanisms across the workshop.

But the Mercian Models England kit must rank as the most difficult yet on account of the sheer unbuildability of the chassis.

As previous discussed on this blog the motor and the gearbox will not fit together as designed - the laws of physics will not allow it - and so he has had to resort of creating his own solution to get our Welsh Pony on the move.

After two days hard slog he has bodged up a gearbox and a longitudinal motor mount (as opposed to the damned silly transverse arrangement in the kit) and installed it in the frame.


He reports that he had to cut a bit out from the inside of the frames and so will now have to find an alternative way of attaching the chassis to the footplate at the front as he had cut some bits out at the front trying to fit gearbox in the original position.


As you can see from this video below  the motor is running in the frames.

Until we get the other axle in place and the motion fitted up we won't know for sure how good the gearing is and whether our pony will go at a canter or a gallop!


Monday 2 December 2013

Little Tweaks

So, I haven't decided yet whether I'm going to press ahead with making more Super Barns or finishing the ones I have part built, but in a few minutes I had free a couple of nights ago I decided to make the modifications needed to the end pieces to make a model of 103.


As you can see from the picture above the windows at either side of the corridor connection are not so tall as on the later carriages - 121 & 108.

Fortunately it proved simple enough to add in a couple of pieces of styrene and slice off the small sections of beading detail at the top of the original window and replace them with pieces of thin strip.

I have also had to hack away some of the double door castings.

On 103 they never bothered to fit a wood-framed droplight in the narrow door so they had to be carefully cut away.