Friday, 30 September 2016

Interior Done

It's all come together in a rush.

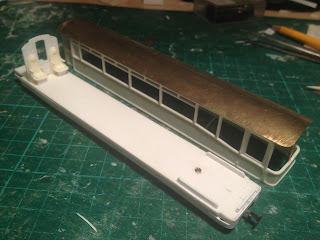
In a couple of sessions work I've got all the seats and tables in position.


In fact the most awkward bit was completing the cupboards in the vestibule.

Once again I was very pleased with the performance of the 60 second Loctite glue which gave me enough time to adjust the pieces into the right spot but not so long that they would move before they were properly set.

Himself found the same when using it to assemble the latest B wagon.


The major outstanding items now are the tanks and various brake bits hanging underneath and the bad pipes.

I know that Himself simply can't wait to paint it and tackle all that ornate lining....

Wednesday, 28 September 2016

Seats In

I've been rather putting off fixing the interior into place in carriage 150.

Quite why I was being hesitant I don't really know, it was just one of those things I felt uneasy about.

I decided the other day, however, that I couldn't put it off any longer so I have made a start with the vestibule at the corridor end of the carriage.


It is unusual because the interior partition has a curved profile at the top to match the underside of the roof - normally they are flat because of the false ceiling we fit.

I've also taken it to extremes and included the step up in the middle.


So the first two saloon seats are fixed in position helping to keep it nice and vertical.

There's a long way to go yet, though.


Monday, 26 September 2016

Brass Bits On The B

The latest B wagon is ready to be sprayed in its red oxide colour scheme.


There are lots of bits that Himself has added in in to bring the basic resin kit alive.

The most obvious is the step which hangs down from the right hand side of the frame and the piece of brass in the centre which is there to stop the door damaging the brake hanger when it is dropped down I suppose.

As usual he's also added the vacuum brake hoses and the pipe work which wraps itself around the reservoir and seems to be a feature of the alterations made to this particular wagon at some point in its life.

Because the paint job on these wagons is ludicrously simple I don't suppose it will be long before it's ready to join the fleet.


Saturday, 24 September 2016

Fencing Repairs

One of the many little jobs on Himself's 'To Do' list is to fix some of the small instances of damage to the layouts during their cross-border migration and the time in storage last winter.

A corner which suffered was the fencing around Bron Hebog level crossing which is being replaced.


He makes up the fences using styrene strip sections of various sizes - the main horizontal bars are 20 x 60 thou for example.

These days the safety regulations demand that a veritable maze of fences are erected around a level crossing - and there are no shortage of them on the big S bend out of Beddgelert - and so we find ourselves getting through a lot of styrene.

And with the stuff retailing at nearly a 40p per foot these days the price is probably to scale too!

Thursday, 22 September 2016

More B's

There are usually part-built and untouched kits lying around in a drawer in a modeller's home and Himself is no different.

A couple of years ago I cast him a job lot of B wagon kits and there are still some he hasn't got around to making up.

So he's decided to get on with one of those to kick-start the autumn modelling season.


This one, he tells me,  is number 1125, and I am not in a position to argue.

My encyclopedic knowledge extends only to carriages, not the finer details of wagons.

To me they're all sort of reddish-brown utility vehicles and I've never studied them enough to tell one from the other.

Himself has paid a little more attention, however, and I believe he has altered the position of the vacuum reservoir on this one and I can see the the handrail at the top right is the opposite way round to normal.

I can only assume this is correct for this wagon, and I know there are some of you reading the blog who'll be happy to correct me should I be proven wrong.

Tuesday, 20 September 2016

Wiggle Room

No it's not a radical new design of carriage - although it's an interesting idea - it is in fact the chassis of our latest Superbarn 117 on test.


The purpose of the test run is because we've discovered that these carriages, fitted with my own design of proper-sized FR bogies, do not have sufficient swing to traverse the tightest curves on Dduallt.

Previously, when we have run superbarns on the layout, they have all been fitted with Parkside Dundas Vale of Rheidol bogies dressed up to look (not a lot) like FR carriage bogies.

Although the new FR bogies were fitted to carriage 119 it had only run on Bron Hebog, where the geometry of the curves is more generous.

The root of the problem is the way the frames are inset below the doors at either end - a consequence of the designer attempting to squeeze the absolute maximum amount of carriage into a loading gauge designed for horses and slate waggons!

Himself has been hacking away at the underneath of the chassis to give the bogies a little more wiggle room.

He sent me this picture, but now I think about it I realise that he didn't actually say whether or not it was a success....

Sunday, 18 September 2016

Fully Furnished

After two weeks making masters, moulds and then castings I've finally assembled all the seats and tables to make up the interior of new Observation Car 150.


I'm pleased with the way the tables have come out which is going to be a lot more elegant than the previous way of doing it with a big supporting pillar in the centre.

Before I can fit in the carriage I'll have to make up the rear bulkhead and the shaped screens which divide the observation saloon from the armchair section behind.

And to do that I'll need to very carefully remove Himself's curved glazing without scratching it. Eek.

Friday, 16 September 2016

Creaming It

A pleasant moment last weekend in Wales was seeing confirmation of another aspect of our models which we have, somewhat accidentally, got right.

Over time the ivory colour on our carriages darkens to a distinctly creamly complexion.

Looking over at one of the sets of WHR carriage stabled at Harbour station we noticed something similar happens to the real ones.


I would assume the carriage in the middle of the picture has passed through the paint shop more recently that those on either side of it which will account for its much lighter shade.

(So I hope no insider comes on here and shatters my illusions by informing me that they've changed the paint.)

Wednesday, 14 September 2016

Table For Two

Such is my dedication to accuracy that I drove more than 350 miles at the weekend to the 'top left hand corner' to confirm some details about the interior of 150.


Don't feel too sorry for me, though, because some of this 'research' was conducted while quizzing (they may say interrorgating!) the carriage builders over a pint or two in the pub.

My main query was about how many tables are in the observation section of 150.

(It was a good job I checked too, because my initial information was wrong!)

With that all confirmed I've been able to have a go at making a master for the main saloon tables.

I'm doing these a little differently and will attempt to cast them in one piece.

The usual superbarn tables I make have a vertical pillar to support the table top along its centre.

For 150, though, I thought I would try to be a little more prototypical.

Although the real ones are fixed to the side of the carriage - not self-supporting like mine - at least there will not be a bloody great pillar to see.


In fact, this is how the smaller free standing tables in the front saloon are made, although I can't promise mine will be as fancy.


There are only two of these - which is part of what I needed to check - but the question is whether I cast them or just make both from scratch?

Monday, 12 September 2016

Best Seats In The House

Half a dozen lucky passengers get to sit in comfort at the business end of 150.


I've made these like I did the armchairs in the main saloon as a mix of castings and bits of styrene glued on to complete them.

The main 'bucket' section of the seat is one casting and the other is the square base and four legs.

The base has proved to be a very awkward piece to cast reliably. It is the devil's own job to make sure that there are no air bubbles trapped in the legs which are just short sections of 1mm square strip.

Even the smallest bubble fatally weakens them and on half of the seats I've had to graft on styrene replacements.

Anyway, that's good progress on the interior with all the seats made.

Now just the tables to go before I begin gluing these bits into position.


Saturday, 10 September 2016

Farm Painting Finalised

There has been a burst of autumnal activity from Himself which bodes well for the winter.

Among the projects he's been finishing off is painting the Cwm Cloch farmhouse.


He's applied some weathering to the south gable wall which looks very subtle.


The house was tarted up around the period we're modelling Bron Hebog so this explains why the render looks more like a royal palace than your average Gwynedd farm dwelling.

Thursday, 8 September 2016

Clearance Test - Failed!

This is a problem that I suspect only narrow gauge modellers encounter, when your new rolling stock doesn't fit your layout!


Having mounted 150 on its bogies I took it over to Himself's place to give it a wee test run on Dduallt.

We had an unwelcome surprise when we came to run it through Rhoslyn Cutting - it hits the bridge pillars on the engine side.


This caused some consternation, as you can imagine.

Closer examination, however, revealed there had been a fundamental (and rather foolish) error during the making of the chassis - the bogie pivots are off centre!


For this I must hold my hands up.

I have been sloppy and careless - and I've given Himself a damned good laugh into the bargain.

So the holes will have to be filled, re-drilled and the bolts re-inserted.

In future I shall remind myself to measure twice and drill once. Doh!

Tuesday, 6 September 2016

On Its Wheels

There's been a little bit of progress on 150 although it probably looks rather more significant that it is.


I've finished off the bogies by adding the bolster strip to bring them up to the correct height and added the Greenwich couplings.

This involves soldering them on which is always something of a hit or miss affair, and this time it was very much miss.

In fact what should have been a 5 minute job stretched to over an hour and involved some burned fingertips.

(There might also have been some bad language too were in not for the fact the children were within earshot.)

The difficulties were due to the unusually inward positioning of the front bogie which means the tongue on the bogie frame to which we can usually attach the shaft of the coupling was not long enough, so I had to try to solder on an extension.

I lost count of how many times I had to re-do it because the coupling and its enormously long shaft was not sitting straight, or the coupling head was too near or too far away from the end of the carriage, or the everything overheated and the previous joint fell apart as I was doing the next one.

I got there eventually, however, but it would not surprise me in the least if Himself takes one look at it and decides to do it again.

He'll do it better, of course.

Sunday, 4 September 2016

Sound Check

Himself has finished the painting, varnishing and final assembly of the model of Tin Car 121 in Disco Car mode.

Before handing it over to the customer he decided to take it for a test run around Dduallt.


It's been an interesting project modelling a carriage with virtually no interior detail.

I'm very pleased with the way it's turned out. I shall be sorry to see this one go.

Friday, 2 September 2016

Armchair Critic

So, the first few of the main saloon armchairs for 150 are cast and have had the extra details added in styrene

What do you think?


As you can see I've decided they do need some support at the front but I've drawn the line at adding individual legs - there's only so much detail you can see inside a 4mm scale carriage, especially one with curtains each side of the window pillars.

To give you some sense of the size of these seats here's a hackneyed shot posed next to a penny piece.


Now you're really not going to quibble over two wee bits of styrene on that, are you?