Showing posts with label Superbarns. Show all posts

Thursday, 13 January 2022

Bits Of Bob

One of the best things about resin casting is that once you've made the masters (and the moulds) it's delightfully quick to turn out most of the key parts you need to make up a carriage or wagon.

The body shell for 808 was poured and cured in the time it took for me to cook and serve up the kids tea a few evenings ago.

This is the point, however, where progress stalls to the speed of any other scratch build project.

The castings will need their windows cleared of flash and tidied up very neatly before I can think about gluing it together into a box, and then it will need a floor / chassis cut from thick styrene sheet to help keep it all together.

I shan't be rushing ahead too much on this project in case I come up against some detailed differences with the real carriage, with an update expected from the carriage works any day soon.

Friday, 7 January 2022

Bob's Your Next Project

Now the festivities are over it's time to start thinking about what will be the next project on the workbench.

Himself spent the days following New Year re-organising all our stockboxes, much like the way a music fan sorts out their album collection, with our various models sorted into a more coherent system - with a box for FR locos, vintage carriages, freight stock etc.

He also knocked up a new wooden case for the current FR corridor stock and left a space for the new superbarn 'Bob'  - 808 to give it it's proper name - which is under construction at Boston Lodge this winter.

Pic: Glenn Williams

As ever, getting ahead of the boys and girls in Glan y Mor is a dangerous game.

Even a 'standard' design like the superbarns can catch you out with differences between the carriages, particularly on the underframe and the small windows at the top.

From what I can see, however, it looks pretty safe to fetch out the resin and run off a set of castings for the body sides from my moulds, although I shall be paying careful attention to images which emerge over the coming weeks to check I'm not making a big mistake.

Thursday, 27 June 2019

Clearance Run

Himself tends to have a number of jobs on the go at once - or perhaps we should just call them 'concurrent projects'.

One of them is the Observation Car 152, which has recently had a pair of bogies made up for it and has been taken for a test run around Dduallt by Blanche, which has itself been undergoing a strip down and clean of its pick ups ahead of the show in Perth this weekend.


The wisdom of a test run at this stage may be recalled by long-time readers of this blog, who will know that I made a very elementary mistake building the chassis of 150 and managed to drill the holes for the bogies not precisely along the centre line of the carriage, meaning it walloped the side of the very tight Rhoslyn Cutting as it passed under the bridge.


Thankfully, I haven't repeated that mistake, and the sister carriage passes through very sweetly with an equal amount of daylight either side.

Himself is now gathering the mental energy to take on the task of making the curved glazing for the observation end...

Tuesday, 2 April 2019

Plugged In

So I *think* my bit of 152 is done now.

(There’s always that element of doubt.)

Last night I added the electric connection on the corridor end.


These are quite fiddly to put on, involving drilling down into a styrene rod and twisting fine brass wire, which is never my strong suit.

However I feel it’s one of those details which make all the difference, so it has to be done.

I shall now pass it over to Himself.

Saturday, 30 March 2019

Exhausting

With Himself taking a working break on the FR I’ve been holding the fort, which explains why there’s not a lot of progress.


What I have managed to accomplish, in a snatched half hour, is to add the exhaust pipe onto the diesel heater and the filler pipe for the fuel tank onto the underside of 152.


All I need to add now is the footsteps and the electric connection on the end and then I can pass it back to him on his return from the top left hand corner.

Monday, 18 March 2019

Getting A Handle On It

The latest superbarn saloon is inching closer to completion.


Himself has added the grab rails onto the ends of 120.

He hates these with a passion - and I don't blame him.

They're very fiddly to fabricate out of brass wir.

The carriage body has been given a coat of varnish so all that's needed now is to install the glazing, and the door handles, and it's ready to join the fleet.

Tuesday, 12 March 2019

Front Passenger Seats

Time for modelling has been limited this last week (I seem to be saying that rather too often!) but I managed to grab half hour to fix more of the interior of 152 into position.


The bit which takes the time is the upright screens which separate the observation section from the main saloon.

There is a concave corner where it joins the window pillar which I form by filing an indent into a piece of styrene, then I slice off the little right angle section and fix it onto the top corner of the screen.


This is why I like working with the material because you can graft on pieces like this so much easier than with metal - or at least, I can.

Now I just need to form the cupboard in the entrance vestibule at the back before turning it over and starting on the underside.

Thursday, 28 February 2019

Furniture Delivery

I was determined that this week was going to be more productive than the last and that some actual modelling would get done at my end of the operation.


An hour of free time the other night allowed me to begin sticking the seats in place for 152 on the chassis unit.

These have to be lined up precisely with the window pillars, which are only around 1.5mm wide, which is where the 60 second superglue I'm using really comes into its own for bonding resin to styrene.

There are a couple of bulkheads to shape and fit before I carry on with fixing down the seats and tables in the observation end.

As with all my carriages these are not just decorative but are placed strategically so they will hold the glazing snugly in place.

Wednesday, 20 February 2019

The Posh Seats

Now I've got 152 back from Himself it's time for me to fit the interior I made many months ago.


Fortunately, although there are some obvious changes to the exterior of the carriage compared to 150, the same seat design has been used so I was able to run off another batch of resin castings to the same design.

These then have fiddly details, like arm rests and legs, added in styrene.

The high back chairs are cast individually and then glued together to make pairs for the middle six units.

There are a couple of internal partitions to be added in styrene but it's mostly a case of just glueing everything into position.

The underframe will be more involved with the vacuum cylinders, which are unusually fixed at an angle, to be formed out of styrene and lots of very curly pipework to be represented in brass.

I may have to ask for the other one back to remind myself how I did it.

Saturday, 16 February 2019

Just Varnishing To Go

Himself has had another busy week.

As well as lining out 143 (more on that to come soon..) he's putting the finishing touches to superbarn 120 with the application of the crests and the word Third on the doors.


I never cease to be impressed with how good the crests produced by Precision Decals are.

All it needs to be finished is a coat of varnish, but that will have to wait until the weather warms up a bit because spray painting inside the main part of the house is frowned upon.


Sunday, 10 February 2019

Like Buses

Yet another carriage has appeared.

Himself has now fixed the roof and front pillars onto 152 and it’s been handed over to me for the interior.


All the seats are already cast but I shall finish the job on bowsider 17 first before I get onto this one.

I don’t think Himself will mind because i’m Sure he’s in no hurry to do the painting and lining on this one knowing how tricky 150 was.

Sunday, 27 January 2019

Ready To Paint

The last of the superbarns is ready to get a coat of primer.


This is our model of 120, made the same as the rest of the fleet from a resin cast body with a styrene chassis and a brass roof, plus various other details in wire such as the handrails (not fitted in this view) and the gutter downpipes.

When I say 'the last' what I mean is that we've finally caught up with the prodigious output from Boston Lodge and our FR carriage fleet will be up to date when we've got this out outshopped.


Wednesday, 23 January 2019

Brass Roofs

Himself is doing that thing he often does where he's progressing multiple projects at the same time.

As well as preparing 143 for painting and assembling the body of bowsider 20, he's also got around to cutting and bending the brass roofs for a couple of superbarns I built last year.


Nearest the camera is the latest observation car, 152, which is quite a complex job.

As well as making the sure the front edge of the roof followings the curvy profile of the carriage body he's also going to solder in the two window pillars made from brass, create a lip along the underside which will keep the top rail of the sides nice and straight and also add some depth to the underside to represent the ornate ceiling on these latest luxury carriages.

Phew!

The one behind is rather more straightforward.

It's 120, the latest of the second series of third class saloons.

Most of the other details have been completed on this carriage, such as the interior and under floor detail.

Once the roof is fixed in place he'll be adding the finishing touches like the vac pipes and the handrails either side of the entrance doors before moving on to paint it.

152 will be heading back in my direction for the fitting of its exceptionally posh interior, the parts of which are already cast in resin.


Sunday, 30 December 2018

Review Of The Year - Part 4

October

So to the final post of the year.

Dduallt was making yet another comeback, appearing at our home club's exhibition over two days in Greenock, and there will be more outings in 2019.


Himself hadn't wasted any time in getting started on the first of the new Garratt kits, which we decided would be 143.

He was making very rapid progress on the power units - here's the front one.


We were also taking apart our eldest Backwoods Fairlie, Merddin Emrys, to try and get to the bottom of its very poor performance.


It turned out that what it needed was new brushes for its Mashima motor.

Fortunately these could be fitted by twisting the motor round in the mounting, because it's impossible to remove it without deconstructing a lot of the locomotive.

November

I was making more progress on superbarn 120 which was having its underframe detail added by this stage.


Himself was adding the valve gear to the first of the Garratt bogies, which was being test run.


I had taken on the job of making up some wagon kits as repeat business for a customer.


December

Progress on 143 had got the point where both power units had their vale gear fitted and much of the detail was in place on the boiler unit as well.

As I write it has yet to be joined together or pick-ups fitted, so there's be no test running so far.


The ballast wagons and B wagons were completed and delivered to the customer ready in time for Christmas, even though there was no deadline on the contract.


Thanks to you for reading the blog in 2018 and all our best wishes for 2019.

Saturday, 22 December 2018

Review Of The Year - Part 2

April

By this point my Bro Madog kit-bash had got to the point where the body had been assembled and was ready to be primed.


The main change to the carriage was creating the toplight windows by cutting out solid plastic and inserting new pillars and a top rail.

I was pleased that you really couldn't see the join.

Himself was tackling the biggest outstanding scenery job which was lining the walls of Cutting Mawr.


Some of it was done with genuine pieces of Welsh rock, although most were copies I'd cast in resin.

He also set about fitting a basic backscene to hide the goings-on in the fiddle yards from view.


May

I had started work on a second WHHR vehicle for a new rake, and again it involved a kit bash.

The ex-VoR brake van has changed a lot from the version with matchboard sides which is made by Dundas.

What I decided on was using the chassis and the very bottom section of the body (showing the frames) and making the rest out of styrene.

It was coming along well.


Himself had done a quite remarkable job with the gold leaf lining on a second vintage carriage - this time number 15.


And I was busy starting work on yet along superbarn, this time casting the parts for what would become 120.


June

This was a very big month for us as we took Bron Hebog out on the road for the first time in a couple of years - and what a road trip it was, all the way to Norfolk for a one day show!


The Dad's Army section of the museum building is certainly up there as one of the more unusual venues we've exhibited at, but they looked after us very well indeed all weekend.

It'd got the WHHR brake van ready to the point where it had been painted in BR blue, just like the real one, to wind everyone up.


Unfortunately I had yet to get my hands on some of the famous double arrow transfers to complete the look.

We'd had a few issues with track alignments during the show. It was nothing major but it's still and irritation when you're exhibiting, so Himself decided to invest in some additional  measures after we'd returned home.


These precision engineering dowels don't come cheap, but hopefully it will be money well spent.

Thursday, 20 December 2018

Review Of The Year - Part 1

I've established a tradition on this blog in the last days of December of taking stock of everything that Himself and I have achieved over the year.

I usually find there are things that I've forgotten about, and I'm always surprised by how much we've got done.

So here's a look back at what we were up to in the first quarter of 2018.

January

Looking back now I see that there was a lot of carriage building going on at this time.

FR 'superbarn' 118, which I'd built up from resin castings, had been painted, assembled, had its transfers applied and, finally, varnished.


Himself was also starting work on a very long-term project indeed - the completion of a Worsley Works bowsider 19 which had been sitting in a drawer in its naked state for years.


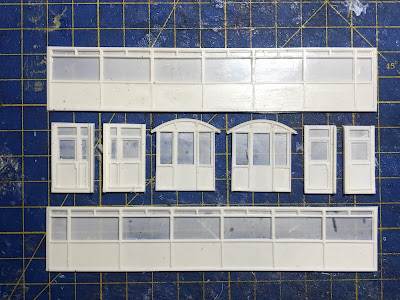
I was also busy trying to keep up with the expanding WHR carriage fleet and had started work on saloon 2047 which was being scratch built in styrene - as opposed to the resin parts I use for the latest FR stock.


February

This was the big reveal of our finished Robex 3D printed Lilla.


I thought at the time - and still do - that it looks absolutely stunning!

We'd decided to finish it in its current, highly ornate, plum livery with oodles of gold leaf lining.

It was taking up all Himself's reserves of patience and concentration but it was already clear the results were going to be worth it.


He'd also restarted work to plug the last remining scenic gap on the layout, landscaping around the last two houses I'd built.


March

There was yet more carriage work going on with me kit-bashing a Dundas 'Bro Madog' carriage to make it look like it's current condition on the WHHR.

As to why I was doing it, that was about to be revealed...


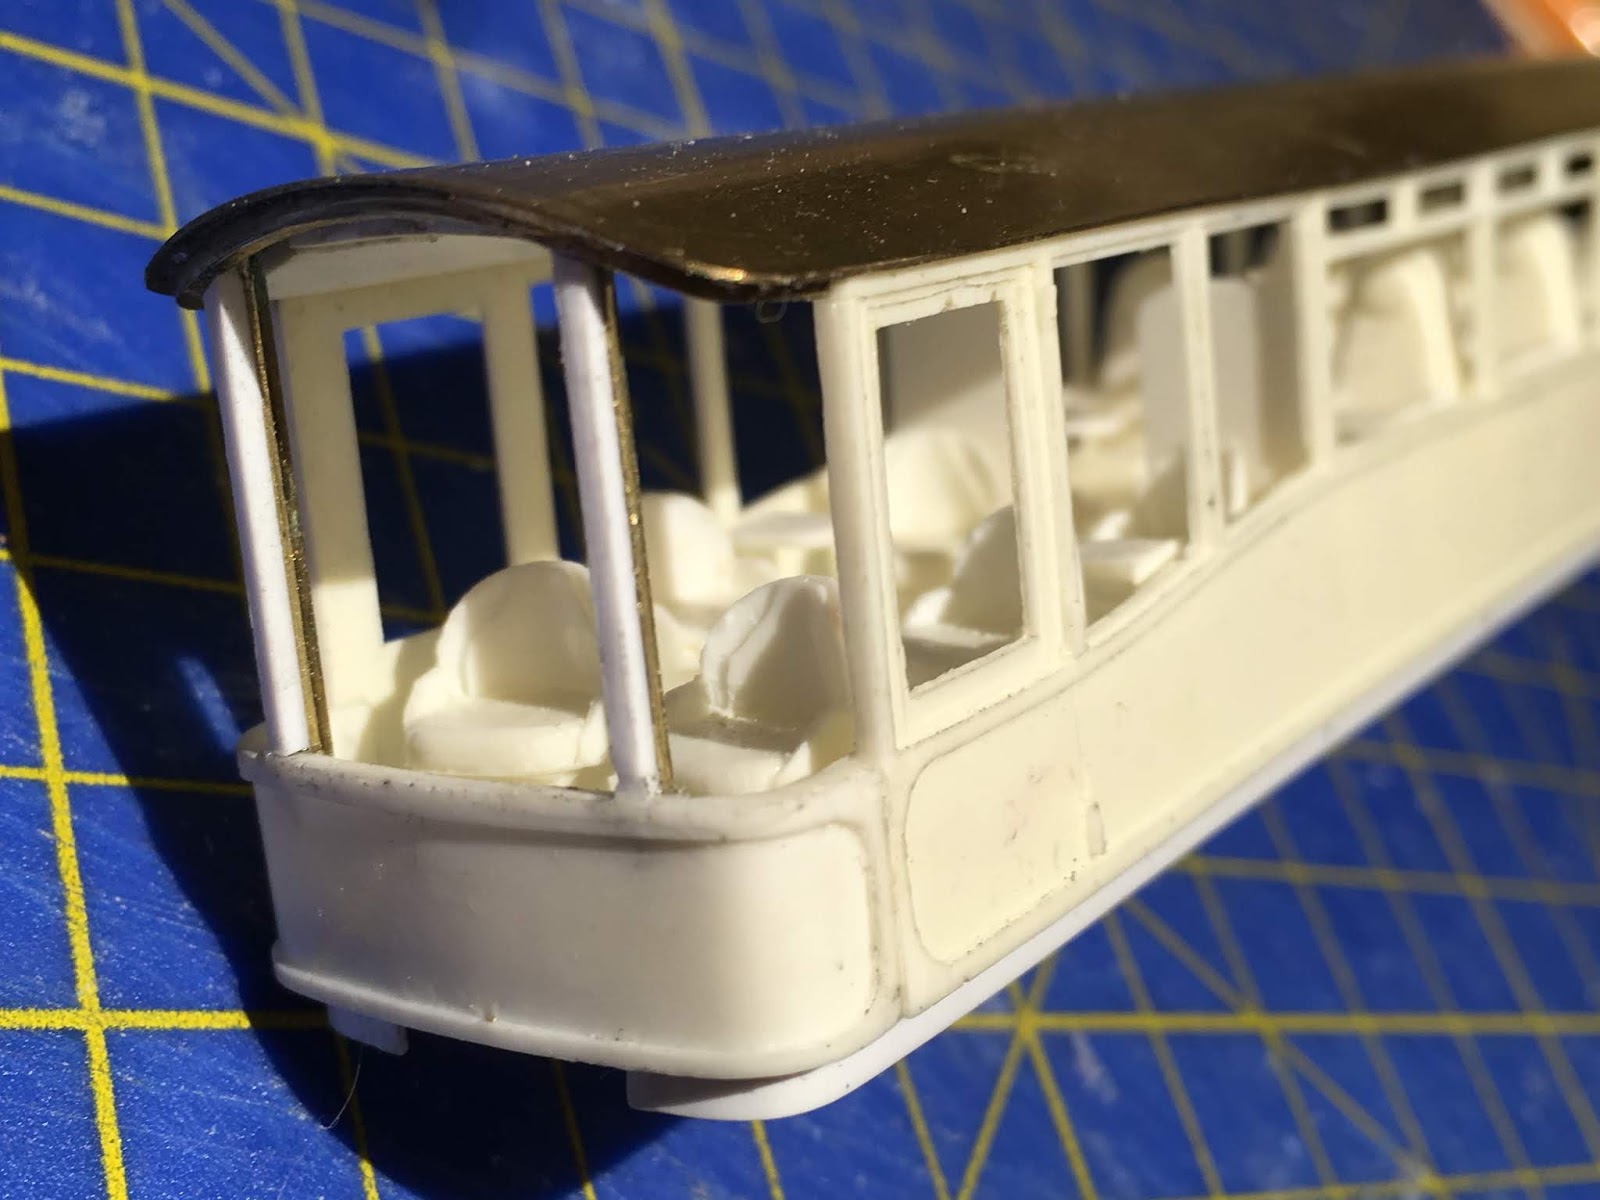
I'd also been putting together the castings for the second of the latest FR observation carrs 152 ready for Himself to add a brass roof and the window pillars at the front.


The reason I was making a WHHR carriage became clear when I handed over Himself's birthday present - a Robex print for the Bagnall Gelert.


I had confidence that he'd make a fine job of the body, after what he'd done with Lilla

The challenge for him was going to be doing the outside frame adaptation on a Fleischman chassis to go under it.

I had a feeling he wasn't going to thank me for that...


Wednesday, 14 November 2018

Fixtures And Fittings

It can be a bit of a bore casting lots of repeat parts like tables and chairs, but it doesn't half make it quicker when you come to fit them.


In the space of half an hour the latest superbarn, 120, had its full interior in place.

The only bits left to make are the tip up single seat at one end and the half glazed partitions at the vestibules.

Then I'll be handing it over to Himself where it will join the queue of carriages waiting for brass roofs.

Thursday, 8 November 2018

Filling In The Boxes

I've had another productive session on 120.


All the various bits which I include on the underframes of the superbarns have been added.

The big box on the right hand side is the diesel-fuel heater and the smaller box opposite it is the fuel tank.

Himself will add the vacuum brake pipe which runs all along the side of the underframe when I hand it over to him to fit the brass roof.

The next thing I'll be doing is turning it over and gluing in all the seat and table sets which I've already cast in resin.

Sunday, 4 November 2018

The Tricky Bit

I bit the bullet and got on with my least favourite part of a carriage build yesterday - adding the truss rods.


I've never been as comfortable working with brass as I am with styrene and having to bend angles doesn't help matters.

I find I have to mark the shape out on paper first as a template to measure it against, and even then it takes many attempts to get it right with the angle either too much or too little until eventually I get it right.

This time is was relatively painless and now I can get on with adding all the boxes and things which also hang underneath the carriage.

Friday, 2 November 2018

Skirting The Issue

Spending a hour at the workbench feels like a bit of an achievement after rather too long away.

I've fitted the skirt around the bottom of the chassis of 120.


Of course it's not really a skirt in real life, it's the big, solid underframe that the body sits on, but that's all part of the illusion of making a model.

This is a lot easier if you get exactly the right size of styrene strip to begin with, which is what I've done in this case.

On previous carriages in the series I've run out of this stuff and had to cut long pieces from a big sheet.

Not only do you have to ensure that they are completely straight and the same width all along, but I've also found that when you make the cut it leaves a slight angle on the edges so that when you glue it in place it sometimes develops a lean inwards or outwards.

Using the proper stuff generally avoids this issue and saves a lot of hassle, although with the price of a packet of strips now hitting £6 it's getting quite pricey.

I found a very old, empty packet at the bottom of my stash last night - probably dating back around 25 years - and it still had a price label on it showing less than £1.50.

A 300% percent increase!

I wonder how this compares to overall cost of living over that period?