Showing posts with label KMX Tamper. Show all posts

Sunday, 6 February 2022

Tamper Tinkering

Himself is getting very bored of wheel cleaning!

And the bad news is he's only halfway through scraping all the crud off the tyres of the carriage fleet ahead of Model Rail Scotland later this month.

It's worth doing, however, because there's no point cleaning the loco wheels and the track only to leave a fresh mucky trail on the rails with every train that passes.

Whilst testing the locomotives he noticed the KMX tamper wasn't picking up on the front axle of the trailing bogie.

This turned into one of those jobs that snowballed, when wires had to be soldered back into place - and were also pulled out of the connecting plugs - which was all necessary after cleaving the Kato shorty chassis in half to power this unusual contraption.

I've found that it's never performed as well as I might have hoped.

The gearing is so high that it is very flighty, and I've often wondered it it would benefit from having a resistor grafted on to calm it down a bit?

Contact with the rails isn't helped by one of the powered bogie axles being fitted with a traction tyre, which is quite unnecessary for something which is so light and doesn't have to haul anything.

The Parry People Mover is also very speedy, but is rather more reliable as it uses the four wheel tram chassis, but the lack of controllability of these Kato chassis does make me wonder how it is they became so popular for shoving under any number of 3D printed loco bodies?

The answer, I suppose, is simply because they're cheap.


Wednesday, 31 December 2014

Review of 2014: Part 2

July

The second half of the year began with Himself starting work on the very final scenic board of the layout which leads into the fiddle yard at the southern (Aberglaslyn) end of the layout.


In a matter of a few days it had progressed from bare Mod Roc to the top coat of plaster and walls and grass being added.


While that was going on I was working on a 5th SAR / WHR wagon kit, this time for the V-16 brake van.

This shot shows one of the masters for the sides made out of styrene with the waterslide rivet transfers being added.


August

Although we had now built all the scenic boards which make up the complete layout the fiddle yards at the back were still outstanding.
With just a few weeks to go until the exhibition in Woking Himself got down to work designing and constructing them.


He was also starting to add some of the finer details on the other parts of the layout like these complex gates around one of the farm crossings.

They were all made up from styrene strips.


I was also making up more of my resin wagon kits for clients who wanted them ready to run.

This is a pair of NGY ballast wagons.


September

For the first time in a while I was able to start work on a model for the layout, having spent a number of months fulfilling an agreement with a client for a rake of wagon kits.

The subject was the WHR's latest carriage produced at Boston Lodge, 2046.

Here are the major component parts fabricated from styrene before it was assembled into a body shell.


On the layout, Himself had painted the two new houses I made earlier in the year and fixed them in position in the estate scene just south of the station.

As you can see there are many more houses still til be designed and made...


And so finally, towards the end of the month, the big reveal!

Bron Hebog made its debut as a complete (but not finished!) layout at the exhibtion in Woking.


Take a look back through the blog to find more pictures from that weekend.
 
October

I didn't get to join the team at the exhibition and would have to wait until Hull in November for my first glimpse of the completed layout.
By this time I'd more or less finished my model of 2046.


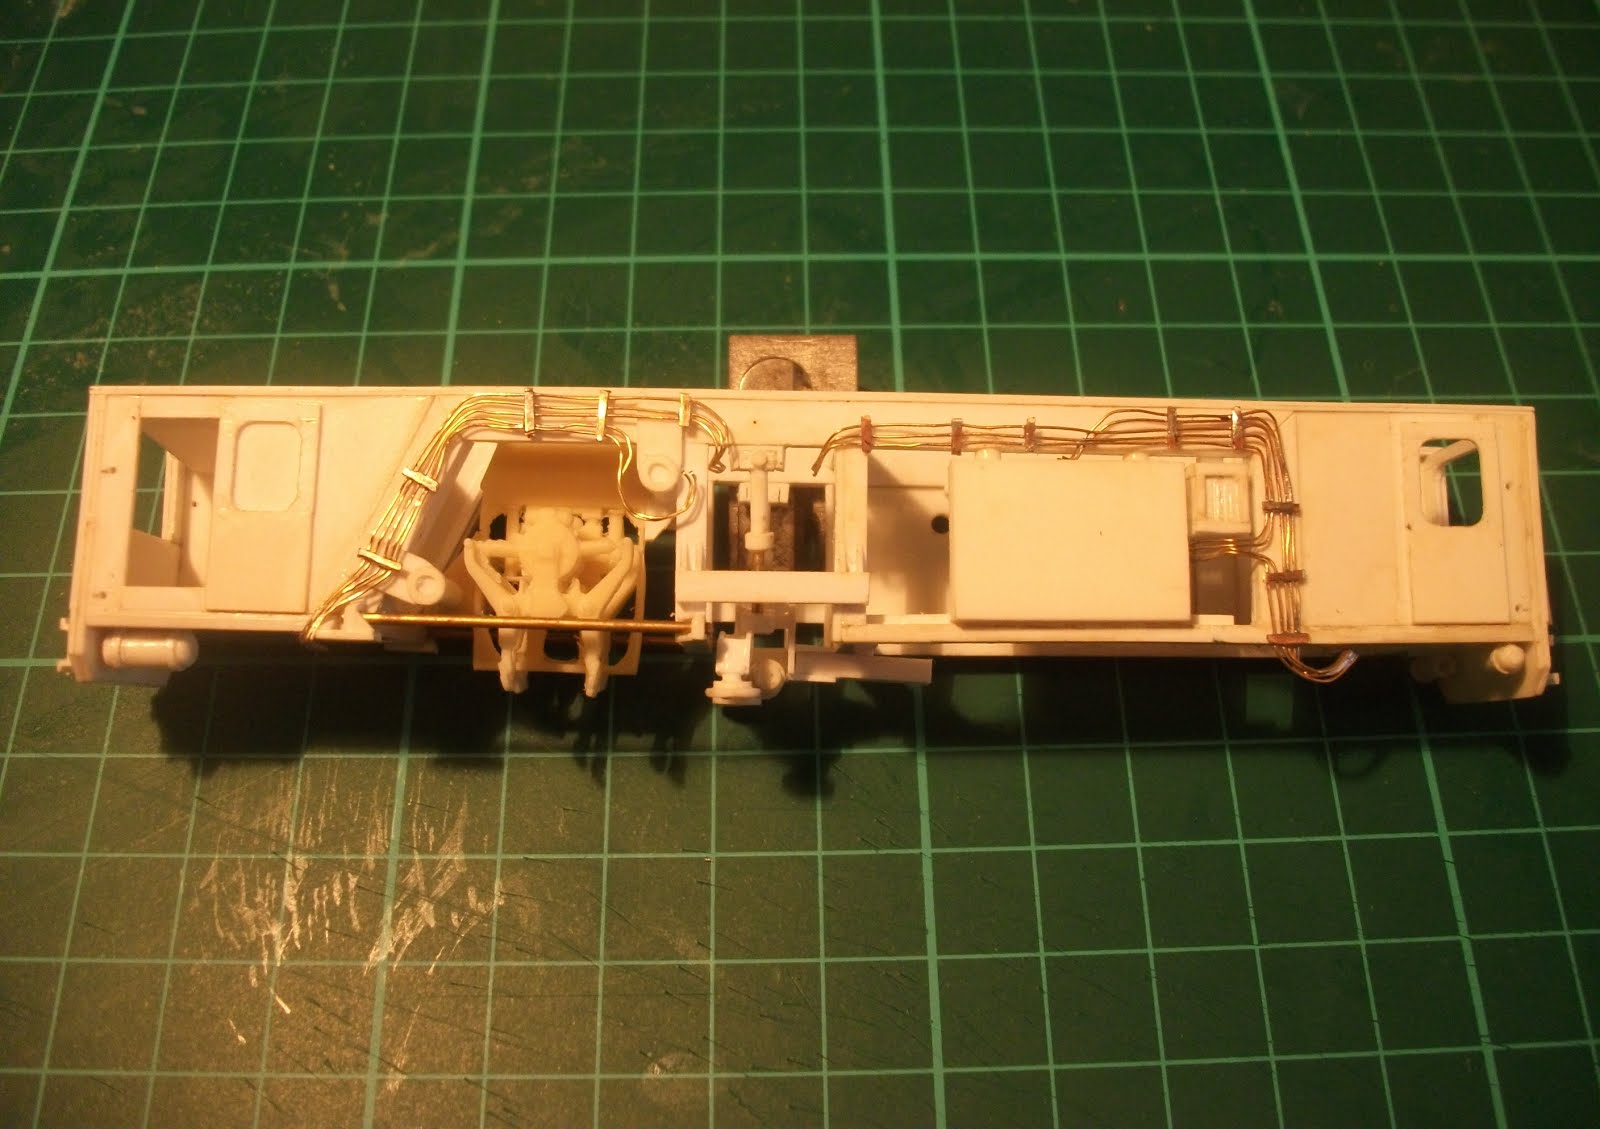
My next project was something which had been on the To Do list for many years - the Match Wagon which carries the tools for the KMX Tamper.

The basis for the model was a OO9 Society kit for ex RNAD wagons which had a new superstructure built out of styrene on top of the chassis from the kit.

It took it with me on a visit home to set the height of the coupling against those on the Tamper.


I also carried with me a 2nd model of the KMX which I'd been slowly building over the last couple for years for a client who was involved in re-engineering the machine for the WHR.

I couldn't resit the chance to photograph the two of them together.


November

The main focus on the layout was completing some of the finer scenic details such as the livestock grids which protect the many level crossings around the layout.
Unable to find some styrene sections of the right profile for the job I ended up casting many dozens of lengths of section out of resin.

This is just one half of one crossing - there are many more to go...


By this time I had also completed and painted the Tamper match wagon


And so to the exhibition in Hull...


Once again there are lots more pictures elsewhere on the blog if you want to go looking for them.

December

So in the last few weeks of the year I've been working on another carriage, this time the brand new updated design of Super Barn 119 which has recently entered service on the FR.
The word is there will be more of these emerging from the carriage works at Boston Lodge very soon so I've taken the precaution of making masters and casting this one in resin in the expectation it will be easier to make subsequent ones.

If the FR alters the design in the meantime there will be trouble!


The shape and arrangement of the windows are the major change from the original 3 Super Barns so I was able to use my castings for the seats and tables from the earlier carriages with no problems.


And currently Himself has started work on the backlog of incomplete carriages which has built up over the last couple of years while he's been concentrating on locomotives and the layout.


So there are the highlights of our modelling during 2014. Many thanks for visiting the blog and taking a look at what we're up to, we hope you'll stick with us and maybe come along and see us out on the road in 2015.

Happy New Year.

Sunday, 9 November 2014

Train, Set & Match

Those of you who've made it along to see Bron Hebog in Hull this weekend have been treated to the public debut of the KMX Tamper match wagon.

So for the benefit of everyone else who can't be here with us here are a couple of 'works portaits'.


For the moment it's far too clean - the real one has a much more hard-working appearance - and we need to get some tiny, bespoke transfers produced for all the various instructions and notices which are written on it.


Even though it's incomplete I'm nevertheless delighted to finally have got this long term project made and running on the layout.

Tuesday, 28 October 2014

Mix & Match

There's been good progress on the tamper match wagon since I last posted about it.

Underneath I've added the brake gear from the OO9 Society kit although because I have fitted an extra floor section I had to trim the top of the plastic pieces so they sat in the right place.

Fortunately there was plenty of  'meat' on them so there was still a reasonably solid slice of plastic to glue it into position.


You can also see in the shot above how the couplings are mounted on blocks of plasticard to set them at the correct height.

On the real wagon the chopper head is also at this height and the altered couplings have been fitted with a step in the shaft.

I also made up the 3 tool boxes out of styrene.


And here they are glued into place on the wagon.


I have a few rivet head transfers to add and then I think it will be ready to paint, so there's every chance it will make its debut on Bron Hebog at Hull in a just the weekend after next.

Monday, 20 October 2014

Seeing Double

I'll make no excuses for posting some more pictures of my 2nd model of the KMX tamper.

Building the first one was enough of an achievement - and I still think it's the best thing I've done yet - so I'm chuffed that the second has turned out more or less identical to it.


Before handing it over to the client in Hull in a couple of weeks time we took the opportunity to pose it on the layout with our own one.


I think they look rather good together if I say so myself. So, I'm pleased to say does my client who also keeps a blog Penlowry.

Thursday, 16 October 2014

A Lovely Couple

There are some jobs you can't do from 400 miles away and one of them is setting coupling heights.

So the new tamper match wagon I'm making has had to be transported south so it can be stood next to the KMX tamper and have the coupling fitted so it matches precisely.


With that small job done it can be dispatched back to Scotland to be finished off.

With a bit of luck and a following wind it might even be ready for the exhibition in Hull next month.

You may also notice that the rail webs on this section of the layout have now been weathered.

It makes a huge difference and Himself is slowing making his way around board by board.


Sunday, 12 October 2014

Match Point

With the tamper finished for my client I can, at last, get around to working on our own KMX. Or at least the match wagon which goes with it.


Making a match wagon has been a long-term ambition, as I wrote a few weeks ago.

This project is going to be a 'kit bash' and I'm using one of the OO9 Society's latest in-house kits for a generic RNAD wagon which is the basis of the real WHR wagon.

The key bits I need from the kit are the solebars and axles boxes and I'm also making use of the plank effect wagon top.


I got Himself to measure the wagon for me at Boston Lodge Works a few weeks ago so I have some proper data to work from.

Interestingly, if you're building the RNAD wagon kit you need to chop the ends of the solebars because they are over-long (they are also from a mould for another kit) but it just so happens they are the perfect length for the match wagon.

The floor, however, is too short in the kit, which made it harder to use it as intended to set the solebars the correct distance apart.

So what I've done is to cut a piece of styrene to do the job because there is plenty of clearance above the wheels.


The kit does come with two floor pieces (that legacy of its design for another kit, again) so I was able to cut a slice from the second one to make my floor to the correct length.

Now I have started to add the side extensions before setting about making the storage boxes on top.


The floor on this wagon sits much higher than the typical FR / WHR wagon so before going much further I think the next job is to compare it to some of our existing stock to work out how to mount the couplings at the correct height.

Friday, 10 October 2014

Emergency Stop

Finally my 2nd KMX tamper is ready.


This one is for a client who has decided to paint it himself so there are some bits left off for the photographs such as the hydraulic lines on one side and some pipework which disappears into the engine compartment at one end.


The last job I needed to do was to cut and fit all the small emergency stop buttons, which the tamper is festooned with, and that involved cutting many slivers from styrene rod less than 0.5mm thick, for the buttons, picking them up in the jaws of pliers and gluing them into place.


I hope I've made as perfect a copy of the original Bron Hebog tamper as I can. The test will come at our exhibition in Hull next month when I plan to hand it over to the new owner. He's already indicated he'd like to see the two of them side by side.


And, yes, I do realise I've got the roof on the wrong way round in the photos. Doh!

Monday, 6 October 2014

Discs & Pads

Given the job I do I'm very good with deadlines - and on the wireless we measure them in seconds - but the flip side of that is I'm very poor when I'm given an open-ended task and procrastination and diversion are the order of the day.

This goes a long way to explaining why more than two years on I still haven't finished my 2nd model of the WHR KMX tamper which I am scratch building for a customer,

A very patient customer, it must be said.

(The fact he doesn't have a layout to run it on probably goes a long way to explaining why he's not been hassling me to finish it)

However, we have finally decided on a handover date when we exhibit Bron Hebog in Hull next month which gives me a few weeks to complete the final bits which need to be done.

So last week I removed the motor and the trailing bogie - which is a Kato 'shorty' chassis which has been split - and added some of the bogie details such as the outboard disc brakes.


These are made up from some large axle bearings which I have filed down and glued onto the plastic bogie frame before fixing on some styrene to represent the calipers.

Wednesday, 20 August 2014

Matchmaker

Some things have been sitting on my modelling 'To Do' list for years and the WHR KMX Tamper match wagon is one of them.


In the last few months, however, the stars have come into alignment and I think the day is drawing near where I might actually get around the building it.

The problem's always been I didn't have any measurements to work with and I wasn't sure what to use as the chassis. It would have been a case of attempting to adapt an N gauge wagon chassis.

Now, however, the 009 Society has produced an exclusive kit for members of RNAD wagons - exactly the kind used as the basis of the tamper match wagon.

So that's problem one sorted.

Then at last, after years of hiding from Himself on far flung or inaccessible parts of the F&WHR system the tamper and its match wagon broke cover and turned up at Boston Lodge so Himself seized the opportunity to take down its vital statistics for me.

The match wagon, however, is not at the very top of my priority list.  That honour belongs to a carriage and I'll be starting work on that any day now....

Wednesday, 6 August 2014

Tamper At Work

As I mentioned in the previous post, Himself has been finishing off the job of ballasting the remaining sections of newly laid track on the scenic boards built over the last 9 months or so.

As as every permanent way engineer knows, track should be properly tamped before trains are allowed to run over it...


So here, for your enjoyment are a couple of shots of our KMX at work in Cutting Mawr.


Looks quite at home, doesn't it!

Thursday, 16 January 2014

Patience Is A Virtue

Once a year my long-term project to build a second model of the WHR's KMX Tamper takes a big leap forward before gathering dust again for the next 11 months.

This is not entirely my fault. For most of the last year I've been waiting on Himself to bend and solder a few bits of brass together into the shape of a roof.

Finally the nagging has paid off...


As you can see our existing KMX has been used as a template and Himself has managed a very good copy of the original.


When I get the tamper back the remaining jobs will be to add the external details onto the bogies such as the outboard disc brakes.

It is just possible that it might even be finished and delivered to the client this year.

Sunday, 20 January 2013

Suffering For My Art

I am typing this post with mild burns on my finger tips following a session at the workbench fulfilling one of my New Year Resolutions: to get the KMX Tamper I am making for a client finished at some point in 2013.

To this end I have been fabricating the hydraulic pipe runs - which are a very prominent feature on one side of the machine - out of brass wire and strip soldered together, which is where the burning of the fingers occurs.


For the pipes I use picture hanging wire which I untwist into single stands. 

(I got a bit of a strange look from the assistant in the DIY shop in town when I went in to buy it. "How heavy is the picture?" she asked in all innocence, and appeared rather confused when I explained that I didn't actually want to hang any pictures with it.)

The strips of brass, representing the big clips holding the pipes in place on the real KMX, are snipped from leftover frets from my SAR bogie etches. Well, waste not - want not, and all that.


It's quite a fiddly process because you never get the strands of wire perfectly straight after they've been untwisted and so it takes quite a lot of coaxing to get them to lie next to each other and as a consequence I have to hold them qute close to the point where the solder has to be applied to make sure they don't wander off on their own accord during the process - hence the slightly singed digits.


You may wonder why I don't use brand new wire of a suitably small gauge, but I find the picture wire is better for getting the unruly look of the pipe runs on the real thing than starting off with perfectly straight, brand new wire.

Sunday, 5 August 2012

Tube Train

It's mostly wee bits and pieces which are left on the KMX tamper now, except for the big matter of the roof which I'm going to sub-contract out to Himself.

Just because they're smaller doesn't necessarily mean they're quick though.

These air tanks which live under the cab floor took an hour to make and fit.


I make them using a length of styrene tube. It then has a square piece of sheet glued onto either end. Once the bond is solid it is trimmed as much as possible with the scalpel and then finished with a file and emery paper, rounding off the shoulders at each end.

Finally at each end I curled a very thin strip of styrene around it - clamping the ends together with the tip of the tweezers - and running glue all around it. Sometimes the strip will snap when it's being bent around or when the glue hits it, but you always get there in the end with a bit of perseverance.


I did the same with some smaller diameter, single ended ones, beneath the other cab.

(Single ended only because you can't see the other end on the model, that is)


Another job to be ticked off was converting the trailing bogie from the Kato shorty chassis so that it can be secured with a 10BA bolt.


Yes, you've guessed it, another use found for Evergreen tubing. It's handy stuff to have in stock.

Friday, 3 August 2012

The Squeezy Bits

The trickiest bit of making the KMX tamper is the hydraulic gubbins in the middle.


While I am able to cheat by using resin castings for the tamper head, the lifting and lining bits from the Britannia Pacific kits don't look anything like the appendages hanging from the WHR's heavily rebuilt machine. So I have to make them myself.

This is rather complicated - although satisfying - process.

Various different thicknesses of Evergreen styrene rod are employed to make the hydraulic arms and to bodge up something to represent the horizontal guide wheels / grabbing things at the bottom.

This involves slicing such fine discs of plastic tube that would impress a prize winning salami maker!


There's also a frame that they're attached to which has to be fabricated and finally something to represent the shaft beneath. This should run all the way to a point near the bogie beneath the engine compartment, but I can't do that on the model because the Kato chassis has to be inserted / removed from beneath.


I'm starting to feel that I've really broken the back of this project now, but there's still a tremendous amount of fine detailing to be added all around the body, not to mention a lot of cosmetic surgery on the bogies.