Wednesday, 31 December 2014

Review of 2014: Part 2

July

The second half of the year began with Himself starting work on the very final scenic board of the layout which leads into the fiddle yard at the southern (Aberglaslyn) end of the layout.


In a matter of a few days it had progressed from bare Mod Roc to the top coat of plaster and walls and grass being added.


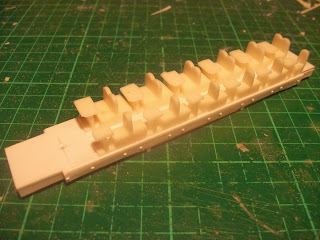
While that was going on I was working on a 5th SAR / WHR wagon kit, this time for the V-16 brake van.

This shot shows one of the masters for the sides made out of styrene with the waterslide rivet transfers being added.


August

Although we had now built all the scenic boards which make up the complete layout the fiddle yards at the back were still outstanding.
With just a few weeks to go until the exhibition in Woking Himself got down to work designing and constructing them.


He was also starting to add some of the finer details on the other parts of the layout like these complex gates around one of the farm crossings.

They were all made up from styrene strips.


I was also making up more of my resin wagon kits for clients who wanted them ready to run.

This is a pair of NGY ballast wagons.


September

For the first time in a while I was able to start work on a model for the layout, having spent a number of months fulfilling an agreement with a client for a rake of wagon kits.

The subject was the WHR's latest carriage produced at Boston Lodge, 2046.

Here are the major component parts fabricated from styrene before it was assembled into a body shell.


On the layout, Himself had painted the two new houses I made earlier in the year and fixed them in position in the estate scene just south of the station.

As you can see there are many more houses still til be designed and made...


And so finally, towards the end of the month, the big reveal!

Bron Hebog made its debut as a complete (but not finished!) layout at the exhibtion in Woking.


Take a look back through the blog to find more pictures from that weekend.
 
October

I didn't get to join the team at the exhibition and would have to wait until Hull in November for my first glimpse of the completed layout.
By this time I'd more or less finished my model of 2046.


My next project was something which had been on the To Do list for many years - the Match Wagon which carries the tools for the KMX Tamper.

The basis for the model was a OO9 Society kit for ex RNAD wagons which had a new superstructure built out of styrene on top of the chassis from the kit.

It took it with me on a visit home to set the height of the coupling against those on the Tamper.


I also carried with me a 2nd model of the KMX which I'd been slowly building over the last couple for years for a client who was involved in re-engineering the machine for the WHR.

I couldn't resit the chance to photograph the two of them together.


November

The main focus on the layout was completing some of the finer scenic details such as the livestock grids which protect the many level crossings around the layout.
Unable to find some styrene sections of the right profile for the job I ended up casting many dozens of lengths of section out of resin.

This is just one half of one crossing - there are many more to go...


By this time I had also completed and painted the Tamper match wagon


And so to the exhibition in Hull...


Once again there are lots more pictures elsewhere on the blog if you want to go looking for them.

December

So in the last few weeks of the year I've been working on another carriage, this time the brand new updated design of Super Barn 119 which has recently entered service on the FR.
The word is there will be more of these emerging from the carriage works at Boston Lodge very soon so I've taken the precaution of making masters and casting this one in resin in the expectation it will be easier to make subsequent ones.

If the FR alters the design in the meantime there will be trouble!


The shape and arrangement of the windows are the major change from the original 3 Super Barns so I was able to use my castings for the seats and tables from the earlier carriages with no problems.


And currently Himself has started work on the backlog of incomplete carriages which has built up over the last couple of years while he's been concentrating on locomotives and the layout.


So there are the highlights of our modelling during 2014. Many thanks for visiting the blog and taking a look at what we're up to, we hope you'll stick with us and maybe come along and see us out on the road in 2015.

Happy New Year.

Monday, 29 December 2014

Review of 2014: Part 1

January

In the final days of the year I like to look back at everything we've achieved in our modelling at opposite ends of the country.
January 2014 began with Himself putting the finishing touches to our model of Welsh Pony which he built - after a long struggle - from a Mercian Models kit.

It looks better than it runs, which is mainly on account of some distinctly un-centred wheels, and nothing more has been done on it in the last twelve months.

We shall wait until the FR has completed the restoration of the real Welsh Pony, but as they're making impressive progress on that we shouldn't have to wait too long.

It's also amusing to look back and see that the year has been book-ended with me casting interiors for Super Barn carriages.

Back in January this was the first one I'd done.


Himself was also starting work on making our third NGG16 from the fabulous Backwoods Miniatures kit.


February

Progress was so swift that by the next month I was reporting the completion of the rear power unit. I could look at that valve gear all day...


I was cracking on with making a trio of Super Barn carriages for a client with the body parts cast in resin and the roofs cut from an empty super-sized beer can.


It's a hard life sometimes!

The Artistic Director also produced some long-awaited plans for the 3rd & 4th houses in the Oberon Wood estate which were a true work of art as always.


March

It didn't take me very long to get the first of the houses knocked up in styrene.


Himself sent us some 'works portaits' of our completed 138 which, unlike Welsh Pony, moves as good as it looks.


And with the deadline for our next exhibition appearance in September a big push began to try and get the layout as complete as possible.


April

Things started getting heavy, quite literally, in April as Himself began work on the rock faces in Cutting Mawr using real Welsh rock.


May

By this time I'd sent down the 3rd house which was in the process of being positioned on the layout and the landscape built up around it.


The 'Head of Steel' advanced rapidly with track being laid on another new board, the gently curving section which makes up the final part of the big S bend behind Beddgelert station.


June

I was being kept busy making another batch of Super Barns for another client, this lot had to be supplied painted but without interiors.


At the same time I was also getting on well with making the 4th house for the estate.

There are common themes to the designs but they are all different so you have to pay close attention to the plans drawn up by the Artistic Director and cross-check with my on research photographs.

This one required some corrections late on in the build process...


At the back of the layout Himself was making the last of the bridges over the Afon Cwm Cloch.

Here is a shot of him checking clearances with a Garratt and the longest carriage, the Pullman observation car 'Glaslyn'.


To be continued....

Saturday, 27 December 2014

Christmas Kit

We've had a bit of a tradition going over the last few years that Himself finds a new locomotive kit beneath the Christmas tree.

First there was Lyd, followed 12 months ago by the NGG16 he has turned into 138 which is being painted currently.

And this year we're going back to where it all stated with another one of these....


(I forgot to take a snap of the Five79 (ex-Chivers Finelines) kit for Conway Castle before I wrapped it up. Oops!)

It was the very first OO9 model he made back in 1989 in its orange, black and grey livery dubbed Liquorice Allsort.

It's still going strong a quarter of a century later, although its Ibertren chassis has had a motor transplant, being exchanged for a Mashima unit.

On Bron Hebog, though, it looks very out of place.

Conway Castle played a big part in the reconstruction of the WHR along with Upnor Castle, but all the while wearing the push-pull green livery its had since the early 1990's.

Making a new one has been on my To Do list for a long time now and at last I've got around to buying one,

I do, however, have a small supply of spare Ibertren chassis so we'll be able to have two 'Conk Out's in operation at the same time should we every have the need....

Thursday, 25 December 2014

Tuesday, 23 December 2014

Swing Time

One of the many reasons that our model of Bowsider 19 has been sitting in the 'Drawer of Doom' for so many years in an unfinished state is a lack of bogies.

All our other vintage FR carriages are running on some decidedly un-heritage American outline Grandt Line bogies, mainly on account of them being the first things we came across when making our model of 17 from a Langley kit 20+ years ago and Himself didn't much like the look of the bogies which came with the kit.

These are starting to show their age, though, and are beginning to fall apart on a couple of the carriages so Himself is looking for suitable replacement.

The problem is there isn't a lot of space under these carriages to allow the bogies to swing, so Himself has be experimenting with some surgery on a pair of Parkside Dundas FR bogies - the correct type for this carriage, in fact - to see if we can get them to fit.

It seems we can, just...


Now the most pressing issue is in what condition will we finish the carriage?

My original intention when we started making it many years ago was to do it as it was running in 1988 - the nominal year we set for Dduallt - when it was the last Bowsider in all-over red livery.

Now that Dduallt is semi-retired and Bron Hebog is out on the exhibition circuit, however, it would make more sense to paint it in its current Victorian plum livery.

What to do?

Sunday, 21 December 2014

Ready To Turn Red

It isn't only carriages we've got going through the paint shop at the moment - there's a certain loco ready for some attention from the airbrush.


First though Himself had one final bit to do to finish off our 138 and that was to fabricate an oil tank and pipe for the lubricator, one mounted on the front of each unit.

It has now been dismantled and washed ready for a coat of primer.

Bron Hebog is going to be looking very colourful in 2015!


Friday, 19 December 2014

Primed For Action

Having chided Himself on the pages of this blog last week for going on strike and not venturing into the workshop when the cold weather hit he's been working hard this week.

Our 2nd model of carriage/van 10 has been treated to a coat of primer now along with another duplicate, a model of carriage 116 in its current condition.


This one has been sitting in the drawer of doom for a few years now.

116 has spend a lot of the last couple of years strengthening the rakes on the WHR trains, if memory serves, so it'll be a very useful addition to the Bron Hebog fleet.

In fact it's the 3rd model we have of this mid-1970's prototype, the other two showing it in its original configuration as a composite with the 1st class compartment at the Porthmadog end, marked by a wider window.

The carriage was rebuilt as a 3rd class saloon a few years ago with the window spaces equalised which is the way its been captured here.

Wednesday, 17 December 2014

10 Plus 10

Over the years we've acquired a number of duplicates in our carriage fleet.

Mostly it's on account of the FR rebuilding the original or changing it in some significant way or my scratch building techniques improving to such a degree that it was vaguely embarrassing to have carriages I built over 20 years ago running around on the layout.

In the case of Number 10 - no, never Van 2 around here! - it's a combination of both of the above plus a third factor: the failure of the original.


In this case it's just one of the plastic bogies from the Parkside Dundas kit which has given up the ghost, and they're easily replaceable, but it provided a very good excuse to do something I've been meaning to do for a number of years now which is built a second kit and finish it in the livery the vehicle is currently running around in, with the red stripe along the bottom of the bodysides and on the ends.

So to this end Himself has been making up another Dundas kit and adding extra details such as the gutter downpipes and the truss rods beneath the frame as well as the vac pipes.

I hope this might spur us on to creating a fuller Col Stephens set to run on Bron Hebog where we're rather short of Heritage train formations - I'm already thinking about new models of carriage 16 and 20 in the green and red livery, making use of the Worsley Works scratch-aid kits.


Monday, 15 December 2014

Tricky Truss Rods

Another one of the big changes on this 4th FR Super Barn, the new 119, is a new design of truss rod - and it's a bit of pain to model.

Most other carriages have two plain support posts which descend from the frame but the ones on 119 have a triangular design.

Not only that, but the truss rods themselves have anchors mounted below the frame - square boxes which the ends disappear into - instead of continuing on up to an end point hidden inside the frame.


So how was I to replicate this?

The proper way, on course, would be to mount some boxes with holes drilled into which I would poke the ends of the truss rods.

However I saw a number of issues with this.

I would have to drill holes at an angle in a small block of styrene. Tricky.

As well as bending the angles in the brass wire - which his always something of a trial and error process - I would also have to cut them to length very accurately. Again, tricky.

And unless all this was positioned perfectly I foresaw a chance that there would be a lot of strain in the structure, either on the boxes representing the anchor points where they are glued to the frame or where the wire is glued to the support posts.

So in the end I decided to cheat!


You can see in this picture that I've mounted the truss rods in the same way I have on every other Super Barn,

There is a more-or-less 90 degree bend just beyond where the anchor point is supposed to be, and some styrene strip is glued in front and along the bottom to appear like a solid box for those who aren't looking too closely.

You can call me a coward if you like.....

Saturday, 13 December 2014

Soft Furnishings

I managed to eek out the last of my resin to cast a set of seats and tables for the new Super Barn 119.

I'm pleased that the seats which I produced for the first trio of Super Barn fit perfectly in this redesigned carriage with the seat backs lining up exactly with the window pillars as they should.


This is more remarkable than it may appear because you have to take into account that I had to draw out my own plans for this model because Boston Lodge does not appear to have anything approaching a drawing of its latest carriage, only a 'back of a fag packet' sketch as I previously posted about.

So clearly I got my calculations and scaling spot on.

While on the subject of furnishings I should perhaps explain and apologise to any reader who has become a little bored that there's only one project on the go to blog about at the moment.

What's Himself been up to you may wonder?

Well, after our return from Hull, Himself has finally had to give into to demands to refurbish the spare room cum office cum modelling room, a task which he has managed to dodge and defer for the best part of two decades.

The problem is now he's finished it the domestic authorities have ruled that he's not allowed to model in there any more lest he should contaminate the new carpet with paint spills or solder splashes!

So he is banished to the garage which has been rather chilly of late, and you know how pensioners feel the cold....


Thursday, 11 December 2014

Re-Moulds

Before I can cast the seats to go in 119 I need to renew the mould.


This is the third mould I've made from the master now.

I usually reckon that each one is good for around 20 casts, but with each Super Barn carriage needing 7 sets of tables and chairs you can see that I have to produce a new mould after every third carriage or so.

Because the seats are quite deep - at least 1cm high - the mould swallows a lot of RTV rubber, about 30g, which is usually enough to make a mould for a typical SAR wagon side.

So I can get many more wagons out of each mould than I can carriage interiors, which I suppose makes these seating sets less efficient to produce.

That said it's still much quicker and easier to cast all the seats than it is to make them from scratch.

Tuesday, 9 December 2014

Loving The Jobs You Hate

There are times when you just have to grit your teeth and get on with the more boring bits of a model build.

For me this is invariably the corridor connections.

In my book they're absolutely essential items to getting the look of modern FR / WHR carriages right.

I have seen quite a few models of FR Barns made from the various brass kits on the markets but hardly any of them have had the hinged extensions added on let alone anything which represents the rubber folded and fixed at the ends where they rub up against the neighbouring carriage.

And no matter how well made, or well painted the carriage it just looks wrong.

(Unless, of course, it's a Barn in its very original, teak-liveried condition)


And that's why I think it's worth going to the effort of making them, but I won't deny it is an effort.

Each piece - and there are 6 of them needed for a carriage - is made up of 4 bits of styrene, so that's 24 pieces in total to be glued together and shaped.

I've written a full step my step guide on the blog before so have a search back through the posts if you're interested in having a go yourself.

Even when you've done the fiddly part of gluing together the U section (rubber bit) and fixed it into the main piece which connects to the carriage end you've got to shave it with the scalpel blade, file and finish it off with emery paper to give it a convincing, rubbery appearance.


Sunday, 7 December 2014

Floor & Ceiling

I've been making steady progress on the new 119 with the floor and the main part of the false ceiling going in this week.


The Super Barns have a very distinctive skirt beneath them. On the real carriage it's the frame, of course, but in model form it makes more sense for it to be attached to the chassis and slip up inside the bodyshell.

The false ceiling is not as vital on a resin carriage as it is on a styrene one, where it is crucial to keeping the sides straight.

As I described last time, the resin carriage sides are much more rigid, but there's no harm in using the same laminated design with the lower half providing a lip which the top of the bodysides can be bonded to when the carriage is complete.

(Our Super Barns have a brass roof skin unlike all our other carriages)


Next I think I shall make the corridor connections - always one of my least favourite jobs....

Friday, 5 December 2014

Super Barn Bodyshell

One of the advantages of casting carriage sides out of resin is how rigid they are.

The picture shows the eight parts which make up the basic bodyshell of 119 glued together.


Now if these were made from styrene rather than cast the sides would be bowing inwards like two bananas placed side by side.

With resin, however, the body sides stay straight and will stand much more robust handling.

The downside of resin is that it is much harder to glue the parts together the styrene - they do not melt into each other the way the soft plastic does - and the bond is very brittle.

Drop the carriage side onto the floor - as I have been known to do, alas - and the shock it will break it clean apart.

Anyhow, it's not looking too bad, is it? Time to make the floor / chassis now.


Wednesday, 3 December 2014

All Cleaned Up

Cleaning the flash from the new Super Barn castings wasn't as tiresome as I had feared - those big windows make a huge difference to how long it takes.


It also helped that they had been cast with very little excess resin so the flash was extremely thin and easily removed with the tip of a blade.

With the open back mould there will always be a film of resin trapped between the mould and the perspex sheet but there can be quite a variation in the thickness.

With a poor cast it can be up to 0.10" thick sometimes but with a good one, as these were, it's so gossamer thin it can be virtually transparent.

I'm looking forward to gluing the bits together later this week if I get a chance.

Monday, 1 December 2014

The Customer's Right To Be Wrong

The new FR Super Barn isn't the only project I've got on the go at the moment.

I'm building a trio of my SAR wagon kits for a client who wants them ready to run.


The build is in abeyance at the moment because I am waiting on some couplings arriving and I cannot go further in case there is any butchery required to fit them.

You see the client has decided he wishes to standardise and have all the rolling stock on his layout fitted with the NEM pocket 009 couplings which PECO have developed for their new RTR range.

Not only is he supplying me with the couplings but also with a wagon so I can ensure that the coupling heights match - which is most important in 009.

Now the old saying goes that the customer is always right, even when he's wrong.

In this case experience with operating my wagon kits on Bron Hebog teaches us that it really is best to have the coupling attached to the bogies - there is an extended shaft on the brass bogie frame for just this purpose - and we solder the excellent Greenwich brass couplings to them.

However we have a few brass Worsley Works B wagons and a V-16 brake van where we fixed the coupling onto the body.

Big mistake!

It makes it so much harder to get the wagon on the rails properly when the bogies are able to spin unrestricted, and even more so if you have one in the middle of a rake which derails while out on the layout.

When there is a coupling on a shaft attached to on end of the bogie you are able to grab hold of it and keep the bogie straight and this makes it much easier to get all the wheels back on the rails.

Unless my client wishes to have a large NEM pocket hanging down from this brass shaft he'll have to have the pocket, and the coupling, attached to the body with the bogie swinging free.

However you pays your money and takes your choice, as they say....