Saturday, 14 July 2012

DZ Assembled

So the first DZ 'kit' is complete - and I have to say I'm quite pleased with the way it has turned out.


For the moment I've got it temporarily mounted on a pair of old Nine Lines bogies I have hanging around.

They are not going to be suitable for the finished wagon, however, because the axleboxes stick out so far they foul on the wee drop down door-stopping thingies and don't allow the bogies to swing very much at all.

Hopefully the other kind which Himself uses on the rest of our rolling stock will be a little slimmer and won't suffer the same problem.


And here it is after adding a few finishing touches, such as the cast brake gear bits which have been strung together with some 0.5mm wire and on each end one of the distinctive SAR handbrake wheels which were etched for me a while back by Worsley Works for my ballast wagon project.


I've already had a number of people asking about these wagons and have decided to make the castings available to other modellers.

I'll be posting more details over on the Boston Largs Works site.

Thursday, 12 July 2012

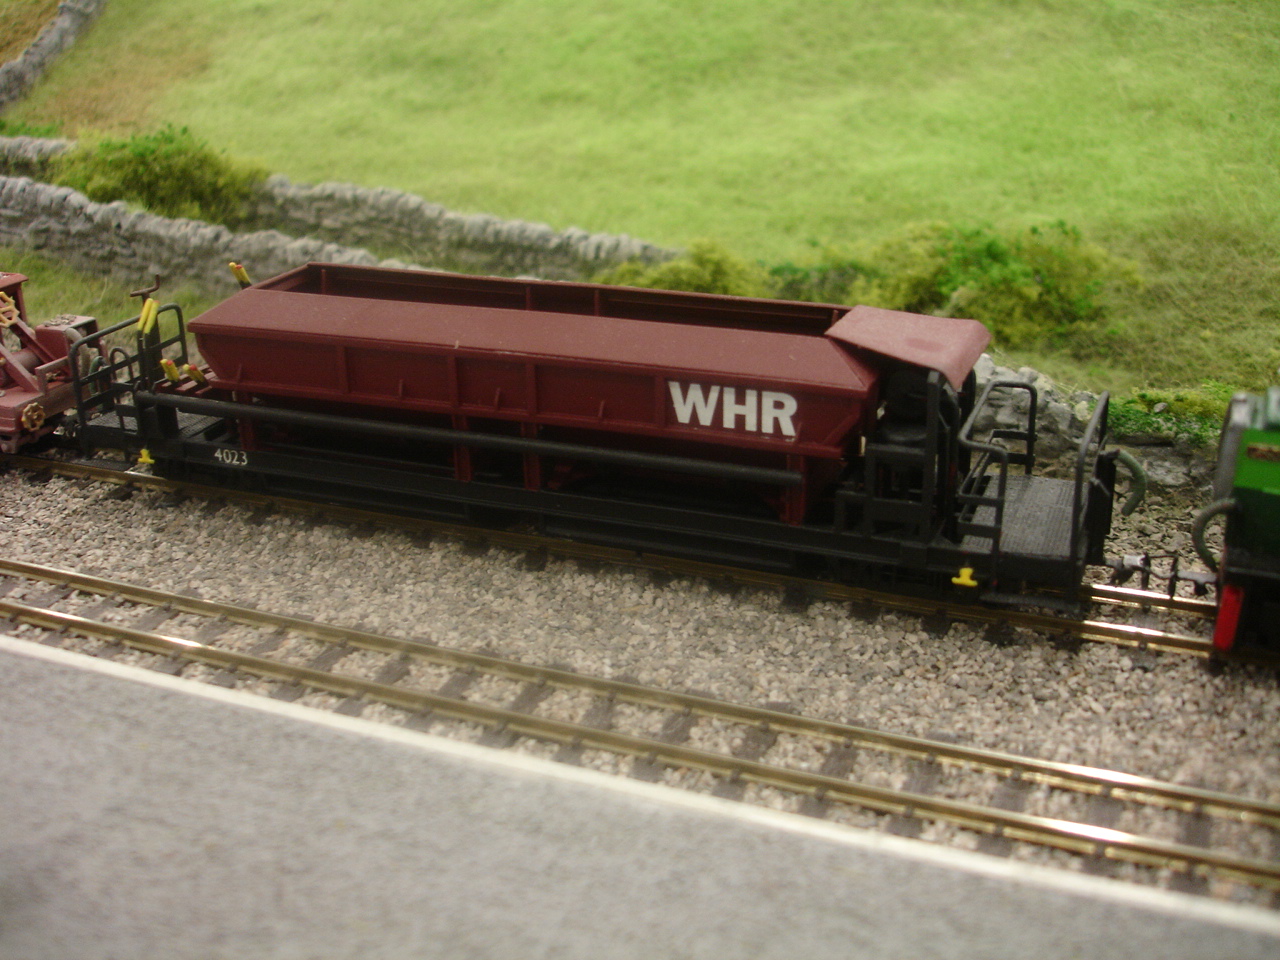
MOTW - Romanian Ballast Wagon

This is another of my most favourite scratch built models.


This wagon was built new for the WHR in Romania in 2006 and was apparently based on a four-wheeled standard gauge design for Austrian Federal Railways.

Whereas the ex-SAR wagons are very simple designs - just a big hopper with sloping ends - this Eastern European monster has one of the most complicated bodyshells I've ever attempted.

And even once you've got all the angles on the hooper (which is divided into two) sorted out you then have the challenge of replicating all the control rods and leves and the ballast chutes beneath the frame.

Unlike the SAR wagons this one discharges ballast along the centre line of the track as well as at the sides.

I was also very pleased with the way the various handrails, which I had to fabricate from brass myself, turned out.

This wagon is so complex that I doubt I would ever have attempted it were it not for a very kind contact on the WHR (who was very proud of their new toy) offering me a large scale General Arrangement drawing which, along with the photographs he supplied of the wagon, was invaluable during the build.

Tuesday, 10 July 2012

Kit Of Parts

I now have all the bits I need to produce my first resin DZ.

The moulds for the floor and ends have cured, the masters extracted and the first copies have been cast.

Laid out before you now is, effectively, a home grown kit for a WHR DZ wagon...


The type of resin I'm using means it's a bit of a race against time to get the stuff poured into the mould before it begins to go off and becomes too stiff to flow into all the places you want it to go.

You have about 90 seconds, according to the instructions. So while you want to work as swiftly as you can you also want to take care to do it as neatly as you can, to ensure it flows into all the right places and is as smooth and even on top as you can get it. (It doesn't necessarily level out perfectly because it sets so fast.)

I think I must be getting the knack a bit, though, because I managed to cast the floor, the ends and these wee brake bits from a single mix of resin.


Now the real test will be to see how well it goes together. Come back here in a day or two and I hope I'll have something to show you.

Sunday, 8 July 2012

Brake Bits

I am a very lazy modeller and I don't mind admitting it.

I don't see the point in making a great effort doing bits that no one's ever going to notice. Or perhaps putting it another way, bits they'll never realise aren't there.

Normally on FR and WHR rolling stock the brake gear comes firmly into this category.

Most of the carriages sit so low that unless you get down on your hands and knees you really don't see a lot of what is underneath them. A few tanks and cylinders, yes, but not a lot of the brake gear is visible.

(It most certainly is audible, though!)

Unfortunately for me the DZ's are the exception to the rule. They are indeed the Katie Price of NG wagons - everything is out on display.


So I really don't have a lot of choice but to bodge up some bits and pieces representing all the thingamajigs and whatitsnames under the floor.

And yes, you've guessed it, I'm going to try and cast these too.


I'm not going to pretend that these bits are going to win any prizes for finescale modelling: if I wanted that then I'd be drawing up designs to be etched in brass.

They will be completely flat, so they won't have the joints and depth that a faithful replica would do, but that's not what I'm wanting to achieve here.

The idea is that it will create an perfectly acceptable silhouette of all the bits that are under the DZ's.

Very little assembly will be required except for drilling through a couple of holes and adding some lengths of brass wire here and there.

Friday, 6 July 2012

The Ends

This resin casting business is in danger of becoming addictive.

I've already made masters for the sides and floor of the DZ and now I've got not just one end panel but two.


Applying my usual searing logic to the matter (who am I trying to kid?) I decided that it would probably be quicker and simpler to be able to cast both ends of the wagon at once.

An additional benefit is it also effectively doubles the working life of the mould. If, as the retailer suggests, the silicone is good for 20 castings, by doing two at a time I am potentially able to cast enough bits for 20 wagons, as opposed to 10, before I have to dig out the master and make a replacement mould.

So I will now be casting virtually a complete wagon - sides, ends and chassis - it's almost like I am producing my own kit.

Hmm, I wonder.....

Wednesday, 4 July 2012

MOTW - Curly Roof Van

It's hard to believe that it's eight years now since this most distinctive of FR vintage vehicles was reborn.

For me this replica of Van 1 is as symbolic as the gravity slate train is in showing how the revived FR has embraced its heritage once more.


The model is made from a Worsley Works 'scratch-aid' kit and runs on the same Parkside Dundas bogies as Van 2. (I still want to call it number 10.)

The unique curly roof was rolled from sheet brass by Himself - and what a cracking job he did on it, too - but the real challenge on this model was the high Victorian gold-lined livery.

After experimenting with bow pens and metalic ball pens we eventually settled on using the thinest waterslide gold lining we could obtain from the Fox range.  Himself did very well getting it into some very small spaces.

The Up end of the van (the blank end) is lined in white.


Somewhat unusualy I have had the priviledge of riding in this luggage van as a paying passenger.

The occasion was a vintage weekend a couple of years ago. It was Merddin Emrys offical relaunch / sponsor charter with a short rake of the FR's Victorian liveried carriages.

When number 15 developed a hot box and had to be detached at Blaenau it caused something of an acute accomodation crisis. It was typical Blaenau weather that October day - the rain was lashing down - so in the end about 20 or so of us decided to make ourselves as comfortable as we could in the central luggage section of the van for the journey back to Porthmadog rather than waiting an hour or so for the next service train.

With all the fussing about with 15 the train - now formed of just a Double Fairle, a bogie van, a 'bowsider' and a few four-wheelers - was running quite late when it eventually departed Blaenau.  I seem to recall it was considerably less late upon arrival back at the bottom of the line......

Monday, 2 July 2012

Floor Plan

So now I've got the sides of the DZ's more or less sorted, and a batch have been cast with reasonable success, it's time to turn attention to the rest of the wagon.

I've decided to try making the floor as a one piece casting. This is not so much because it's tricky or time-consuming, as the dented side doors are, but because I've already had a number of people enquiring about whether I would be willing to make some DZ's for them too.

I figured it would be no trouble for me to make the four floor units I need for my own fleet from scratch, but if I end up mass-producing these wagons (OK, perhaps I'm exaggerating slightly there) it would be so much easier to make a single master and cast others as required.


As you can see above, I've taken this a stage further by attempting to include as much of the underframe detail as I can, which in this case means a vacuum cylinder and a reservoir tank.

The cylinder is one of the unusual fluted types that the ex-SAR wagons on the WHR seem to have, which I have attempted to replicate.

The tank is a little but of a cheat. Because I'm not very experienced in this casting malarkey I'm only using one piece moulds at the moment, which means one face of the master has to be flat and you can't really have undercuts which means a fully cylindrical tank is out.

So instead this one has flat sides at the bottom - in cross-section is it an arch shape - but it's mostly hidden by the frame of the wagon and unless you actually picked up the model and turned it over I don't think anyone would ever notice.

That's the theory anyway. We'll have to see whether I get away with it...