Friday, 31 July 2020

Stacked

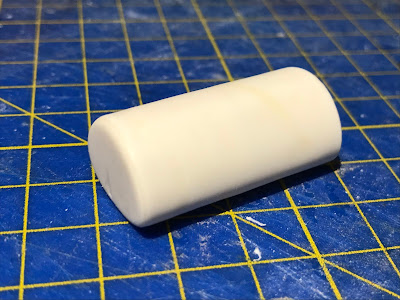
Many years ago when we built up our rake of slate waggons I made loads for them the hard way - what's new?

I cut hundreds of pieces of slate-sized styrene and glued them in rows onto a length of thin strip and repeated the process dozens of times until I had a unit which filled neatly inside one of the Dundas wagons.


Over time - and we're talking decades - the plastic on the wagons has become brittle and Himself is renewing some of the fleet and is looking for more loads.

I was asked whether it might be possible to cast them this time, so I've brought one example home and am about to cover it in RTV and see what happens.

In theory it should be a good way to reproduce them, but my only concern is how well the deep, narrow valleys between each of the slates will be replicated?

Wednesday, 29 July 2020

Ovaltime

I've reached a landmark moment in the Maenofferen Tank Waggon.


There are many details still to be added to it but it's looking the part now.

After adapting the chassis the next key job was to make the four cradles for the tank, for which I chose to make a master in styrene and cast copies in resin.


The next stage will be to add the distinctive metal bands which hold the tank in place.

Monday, 27 July 2020

Green Agreement

It's a rare day when Himself and I are as one on the question of colours - especially greens!

But we had a rare outbreak of unity in choosing the paint shade for our Backwoods Lynton and Barnstable Lyn which is now being finished off.


Himself bought a selection of Southern shades from the Railmatch range and what we decided on was a 50/50 mix of Light Olive and Malachite Green which best seemed to marry up with the photos we took at Dinas a couple of years ago.

Himself held off with painting this loco because he was never quite satisfied with how it performed - it always had a very pronounced waddle.

The solution has been to disable the compensation on the front driving axle, locking it in place with a new bearing. 

Years ago we had to do the same on the Backwoods Ladies which we could never get to run right as the designer intended.

Saturday, 25 July 2020

3 Ton Plus

The plan for the Maenofferen tank waggon was always to try and use a 3 ton slate waggon chassis, the question was always whether the wheelbase would be right or if it would need a lot of hacking about to make it fit.

Himself provided the chassis after purchasing a pack of Dundas waggon kits to renew our fleet and when I compared it with the drawing I was delighted to find the axle boxes in precisely the same place as on the regular waggons.


The tank waggon, is longer, however, but all the extra length is at the ends rather than in the middle, so it wasn't difficult to add some styrene extensions.

The other thing I did was to thin down the main base of the chassis as it was a little too thick, just by rubbing it over fine grade sand paper.

Fortunately the wagon doesn't have anything as sophisticated as brakes, so there's very little that required to be done underneath except extend the frames.


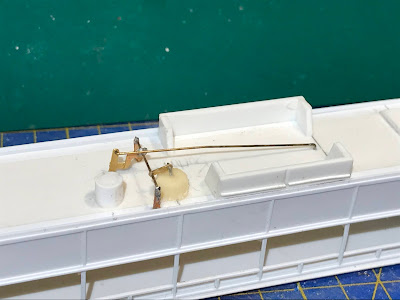
Up top, on the tank, I've made up the tank filler using my ever-handy selection pack of styrene tubes and formed the domed top of the cap with a drop of resin.


Thursday, 23 July 2020

Saloon Primed

Himself has made quick progress on 2048.


It's been given a coat of primer and the holes have been drilled in the top of the seats for the handrail knobs which go on the inside edges.

It's a very minor detail, which is probably a little over the top, but since we've included them on all the carriages so far so I suppose we'll just have to carry on,

The vacuum pipes and holes for the grab rails either side of the doors are also done.

Tuesday, 21 July 2020

Stacking Rings

Having got 2048 off the workbench I've decided to crack on with a 'nice to have' project which I've been itching to try for some time - the Maenofferen tank waggon.

Being me I've elected to go about it in a really labour-intensive way!.

The tank on this wagon has a very unusual squashed profile and replicating that is going to be crucial to getting it looking right.

My first step was a scale a drawing to 4mm and cut out a template which I glued onto 15 thou styrene sheet.

I cut that out with scissors them added a strip of styrene around the perimeter before making a rubber mould and casting a copy which was now 60 thou thick.

Then, I ran off a few more castings and half of them here hollowed out.


Four of these hollow ones were them glued together, with filler used to blend out any obvious ridges where they joined.

Now I had a barrel which was around 1.5cm long.


This was used as a master for yet another mould which was also cast from four times.


These were then bonded together and two of the solid pieces put on each end.

Rather than try to smooth these over I elected to wrap it in very thin (10 thou) styrene sheet before blending the edges at each end.


So now I have the basic tank shape.

The next stage will be to obtain and adapt a Dundas 3 ton slate waggon chassis.

Sunday, 19 July 2020

Ready For Handover

The last of the styrene construction work on 2048 has been completed and it's ready to be passed over to Himself for the final brass parts to be added and then painting.


The roof was skinned using the rolling pin and kettle technique I posted about a couple of days ago, and I do believe it looks a little smoother than when I have previously stretched a flat piece of styrene across.

One of the last jobs was to complete the underframe detail which is quite prominent on these latest WHR carriages which don't hide it all behind a skirt like the first generation did.


For this I make use of some spare parts from my SAR wagon kits for the vacuum cylinder and the brake gear rigging.

There's nothing more satisfying that a spot of recycling, is there?

Friday, 17 July 2020

Grey And Black

Every now and then Himself is tempted to take things to extremes.

Not content with making sure that the cab of our Welsh Pony is finished in grey, as per the real one, he decided to try and replicate the black borders in the corners and around the doorways.


This very neat trick was achieved using black waterslide lining transfers.

He has also managed to paint the end of the saddle tank black, which must have taken a lot of care and skill in such a confined space.


I feel bound to say that I don't think he would have been so keen to attempt this if it wasn't for a friend of ours, who is making a model of the locomotive in 7mm scale, posting on social media that he wasn't going to attempt to pick out the end of the tank and was going to leave it grey.

Given the size differential between the two scales you'd be forgiven for concluding that this is a clear case of one upmanship on Himself's part....

Wednesday, 15 July 2020

Under The Weather


Two of our new tow-around models are finished after a visit from the airbrush to make them look suitably distressed and uncared for.


I found myself in Himself's bad books because on first seeing the picture of Livingston Thompson on my phone I replied with a message querying whether it had been weathered? - and received a withering reply!

That's the trouble with pictures, sometimes.

I popped in a few days later to examine it by eye, and I could see at once that it has been heavily weathered and now has a very dull and dusty look as if it has just been pulled out of the Maenofferen shed after 14 years.

It's pictured here in the station siding on Bron Hebog, but it should only really be appearing on Dduallt.

The other project to acquire some instant ageing was the various components of our dismantled NGG16 which are now looking nice and grubby, as are the DZ flat wagons they are sitting on.


This doesn't have an identity, but I wouldn't be at all surprised if people start calling it 109.

Monday, 13 July 2020

Five Years Later

It's been a very drawn-out affair but the end result of our second Conway Castle was definitely worth waiting for.


Himself has fitted the glazing - which is a very tricky operation - and finished it off with the nameplates which include the badge of Conway on the cabside, supplied by our friends at Narrow Planet.

The one compromise we've had to make is with the headlights.


It seems its no longer possible to get hold of the large clear jewels we've used before, and we've had to settle for amber ones.

But given that Conway became rather neglected in its years as Dinas shunter and helping out with construction trains its headlights let in water and took on a distinct yellow hue.


Saturday, 11 July 2020

Inside Job

I recently completed an order for 9 (!) sets of resin seats and tables for the WHR saloon carriages, which made for an epic week-long casting session, but it was also the perfect opportunity to run off a 10th set to make the interior for 2048, which is my current work bench project.


These didn't go in without a fight.

The joy and curse of scratch building is that each model can turn out fractionally different from the last one.

So it has proved with 2048.

For whatever reason the tables sat ever-so-slightly proud of the waistline on the bodyside.

This could be because the castings were ever so slightly thicker at the base, the body panel of the carriage is ever-so-slightly less tall than on 2047, or that the chassis / floor sits a fraction of a mm higher.

Whatever, the effect was that each seat had to be attacked with a file and sandpaper at its base and also on the top surface of the tables to get them to the correct height.

This modelling lark would be so much easier if I didn't care about such things!


Thursday, 9 July 2020

Steaming

Curved plastic roofs on carriages are a thing many modellers struggle with - especially their tendency to sag in the middle.

We've always got round this by making our carriages roofs as a composite structure with a flat ceiling at the bottom with ribs running along the length to help it keep its shape.

Then I fix a skin of styrene sheet over the top, gluing it along one edge first before rolling it over on it's back, forcing the styrene to bend to shape, and holding it down while the solvent cures on the opposite side.

As you can image, styrene sheet puts up quite a fight and doesn't give in to being forced into a curve like this, and I've recently been experimenting with ways to pre-curve it by heat treating it.

The ingredients for my most recent technique are a wooden rolling pin, lots of elastic bands and wooden stirrers.


The stirrers are the breakthrough here.

Without them the styrene bulges up in between the elastic bands, giving you a very lumpy profile.

The stirrers keeps it flat along both sides.

All you have to do is truss it up like I have in the picture and pass it through the steam from a boiling kettle for a few seconds, before letting it cool and removing the bands and sticks.


Although the styrene still does not match the radius of the carriage roof I'm confident there will be a lot less resistance when I come to fit it onto the ceiling frame.


Tuesday, 7 July 2020

Big Bonnet

We're indulging in another little fantasy - well, in fact, quite a large fantasy - with our latest loco project.

Ever since we ran one of the giant Lyd2 Polish diesels from the WHHR as a guest loco on Bron Hebog  I've fancied having one of our own.


Following an offer to build a bespoke chassis for us I've gone ahead and bought one of the Worsley Works body kits.

I warned Himself that it wouldn't be wise to build it until we receive the chassis but, as usual, he can't resist tinkering so as much of the body as he dares is already made.


There are those that say these machines would be very unkind to the permanent way on the WHR mainline, and others who declare they won't fit.

I couldn't claim to know enough about either, but just as we run Russell on Dduallt even when it would never fit just because it's fun, so we will do so with this beast on Bron Hebog.


Sunday, 5 July 2020

Tree Max

Himself has been planting more trees around Bron Hebog and he swears these are going to be the last!


We're probably still nowhere near the actual amount of vertical foliage to be found around Beddgelert, but we don't want to hide the trains from view too much, and besides which he finds them really tedious to make.


Just like real trees you never actually notice them growing, it just sort of happens over time.


It's only when you look back at the layout as it was first exhibited at its full size that you realise how bare it used to look.


Friday, 3 July 2020

Tentative Tanks

James Spooner is definitely a back burner project just now - there’s no point trying to get ahead of the boys and girls at Blodge - but Himself was keen to see how much adaptation the tanks from the Backwoods kit would require?


His concern was mainly about length but comparisons with the plans for JS which have been published so far suggest all will be well.

Of course, like all our Fairlies, this is going to be a comprised model, trading true scale for something that looks like it has the right proprotions, because the Backwoods kit is based on Livintgston Thompson and the modern machines have rather bulked up. 

(Haven't we all?)

Not being brave enough to scratchbuild entire bodies - or mechanisms - it looks like this is a compromise we're going to have to live with for some time because I suspect the promised RTR Fairlie model from Kato / PECO will end up being Victorian size - and perhaps of no particular prototype like we're told the England will be.


Wednesday, 1 July 2020

Little Blue Guinea Pig

Himself and I are not known for being early adopters of new fangled technology, but we've finally caught up with everyone else in starting to glaze the spectacles in our locomotive cabs with Glue 'n Glaze.


Having never used it before Himself thought it wise to try it out on an old model where it wouldn't matter if he made a Horlicks of it.

Our old Chivers Britomart was the chosen guinea pig for this.

The results were encouraging and he's cracking on with the rest of the main running fleet.

There is a limit to the area the product can be used on and the biggest we've tried is the big plate-sized windows on Lyd.

It does seem to work better on whitemetal kits where the rim is quite deep, and for that reason we probably won't be able to do very delicate etched brass windows like those on the Fairlies or Garratts.

So far, so good, though.